

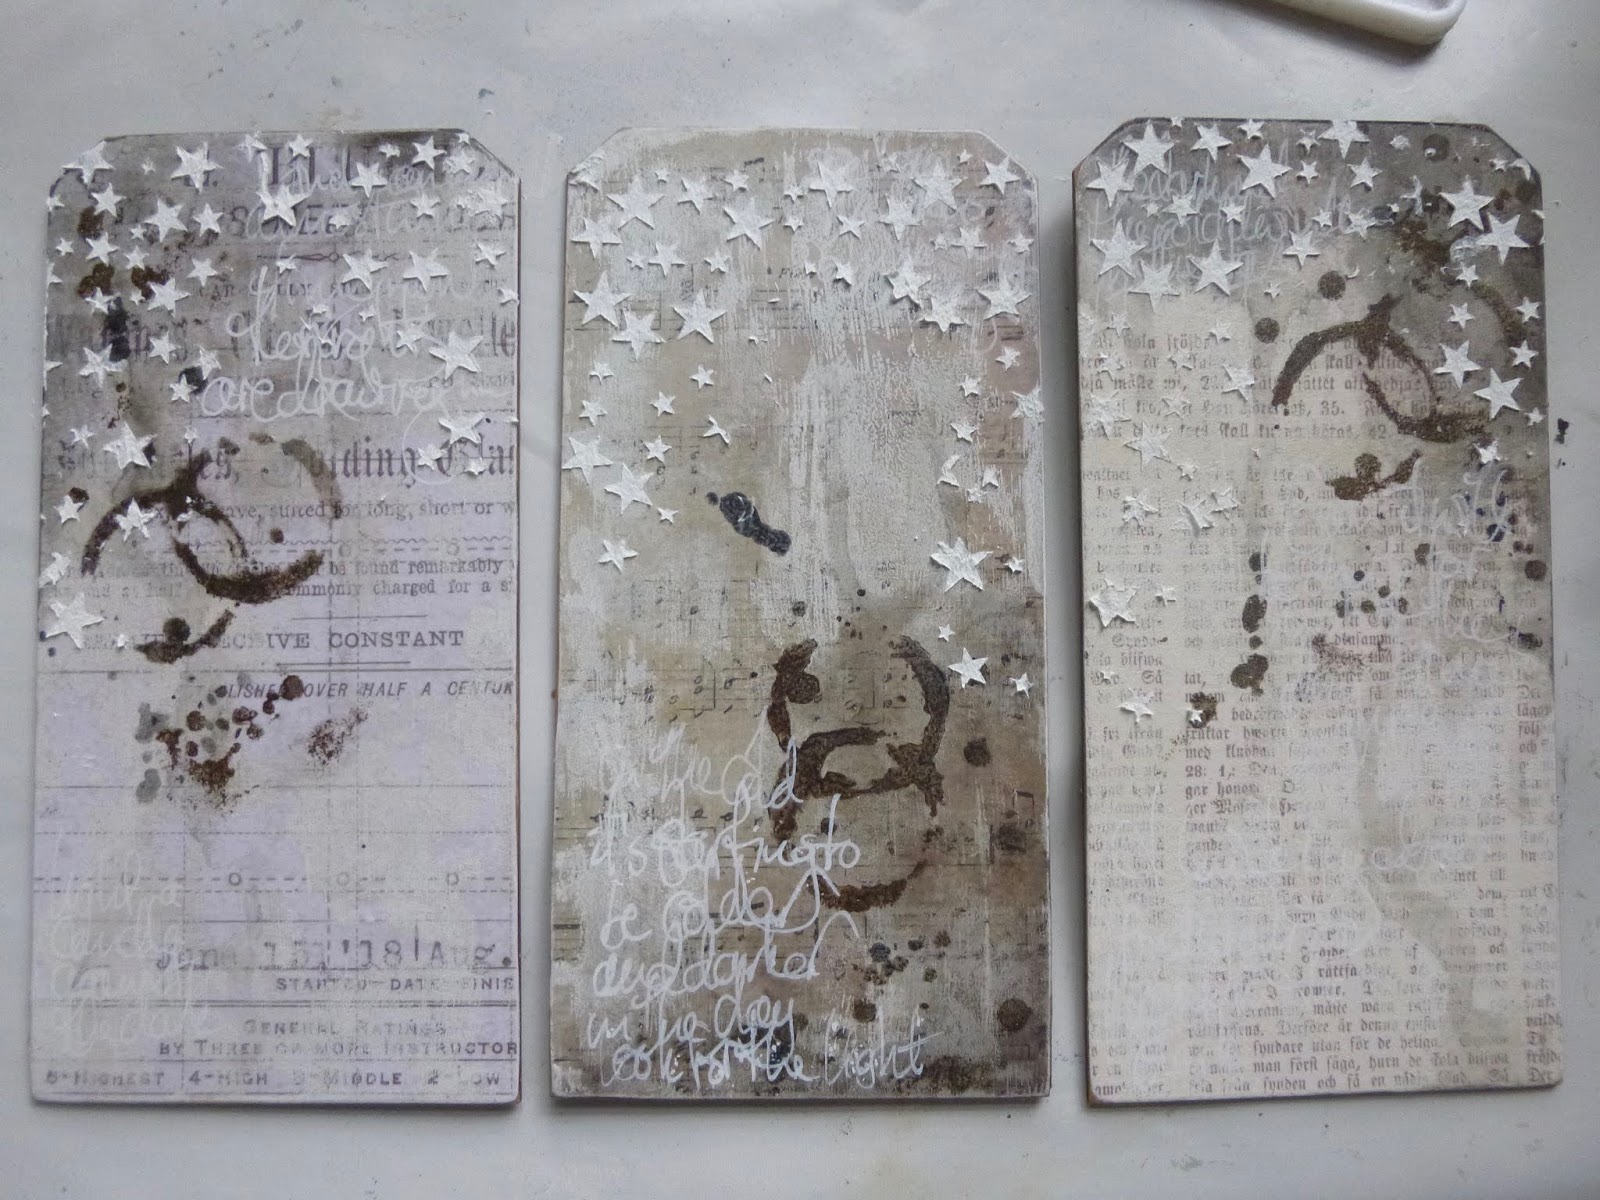
This trio of starry tags came about as a result of another joyful Skype crafting session with Brenda of Bumblebees and Butterflies and Nikki of Addicted to Art. Last time we all worked on a giant tag or MDF surface, but this time we each started with a different substrate. I chose three jumbo MDF tags (though not quite as jumbo as my Curiouser and Curiouser tag from before - these are each 4x8 inches).

Almost by accident, we ended up aiming for something involving stars, so you might recognise some elements when you see their offerings at A Vintage Journey though, again, we each ended up with very different projects.
We took it in turns to deliver instructions, and the first was mine:
Alison (A) - Use paper to start the layers

I have lots of lovely design paper, but I often forget to take advantage of it, so I thought I'd kick off with something off my usual beaten track. I covered each tag with a different paper - one with a glamorous advertisement (TH), one with music (7 Dots Studio), and one with Old German font (Pion).

Brenda was next:
B - Use the monoprint method to add any colour medium of your choice
This is something Seth Apter does a lot. You put the the paint (or other medium) on one piece of card (or other surface) and press it down onto your main surface to get a cool textured look. I stuck in the neutral zone with some Chalk White.

And then Nikki:
N - Add a wash or washes of a colour medium
I worked with watery mixes of DecoArt Media Fluid Acrylic in Payne's Gray and Raw Umber to get a really shadowy aged look that I loved. I applied the washes with a soft brush and then spritzed with water to get even more movement, dripping down from the top of the external two tags and up from the bottom of the middle one.

Shorthand instructions and details from now on... !
A - Use a stencil any way you wish

I used one of Tim Holtz's stencils and sponged some more of the same two paint colours through it.
I was really enjoying the old manuscript look of the tags by this point.

B - Use asemic or dynamic writing to add a layer of visual texture
Essentially this means do some scribbling - so I did, using a white gel pen. It's another effect which I really like - though mine's probably not quite asemic as there are some real words and little bits of meaning hidden in there.
N - Add a bit of physical texture
This is where I grabbed my chance to add my stars.

I applied Watercolour Ground through the new Tim Holtz Falling Stars stencil.
Already in love with this stencil - I love the varied sizes of the stars and the random falling pattern.

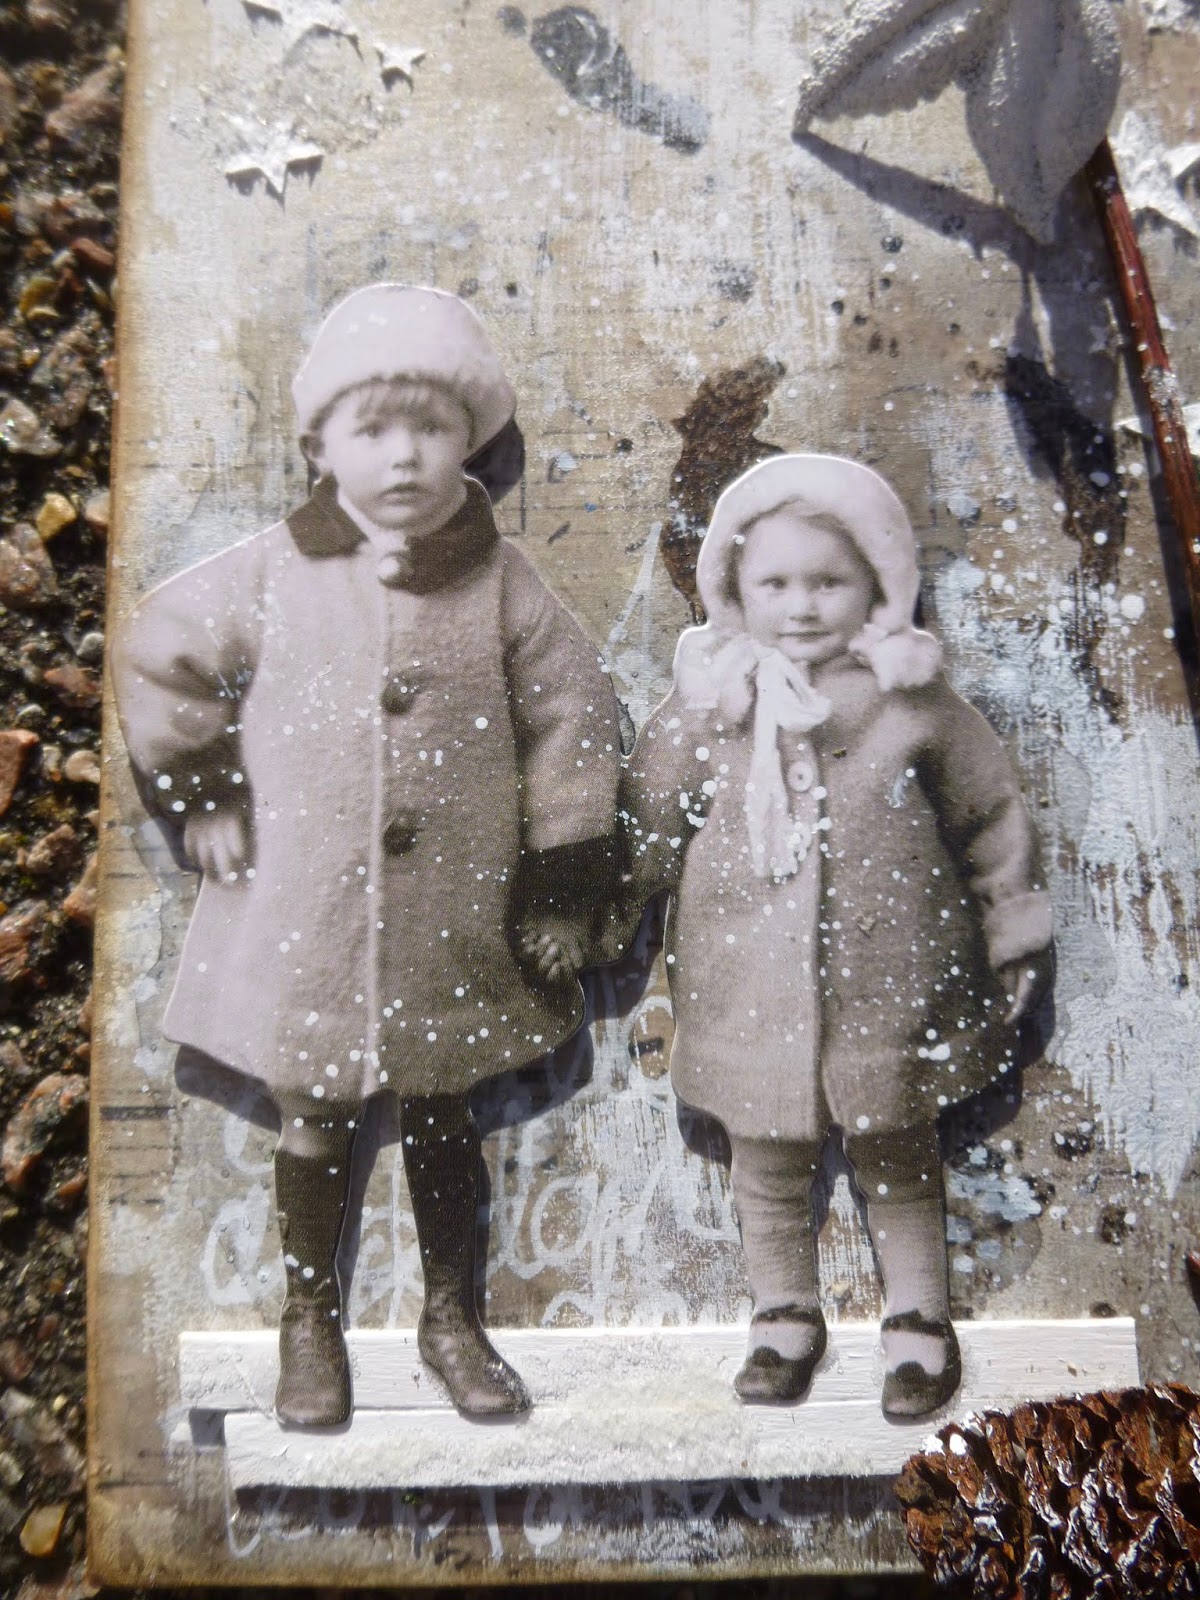
A - Choose and prepare the focal point of the design
I needed some thinking time to work out how to progress. I loved my backgrounds and was actually rather unwilling to cover them up, so it took a few goes to work out where I was going next.

The Paper Dolls were pretty much a given, but the real breakthrough came when I popped outside into the garden to find my bare twiggy tree stems.

B - Find elements to bring the composition together
This was a useful follow on - a chance to gather some more bits and bobs which would serve the stories starting to appear.

I grabbed the pinecones and the little leaves, and found a couple of coffee stirrers to make my "ground" under the dolls' feet.

N - On one or more of the elements use two different mediums of the same colour
Another great next step - a chance to alter and adapt the chosen embellishments. I stayed all white.

I'd already painted my coffee stirrers white with acrylic paint. (Later I added a bit of Rock Candy Dry Glitter to them for a frosted snowy surface.)
I drybrushed some more white paint onto the edges of the pinecones.

And I used Weathered White embossing powder on the Idea-ology metal leaves.

A - Add some words or lettering
Well, obviously... For me it's a given that there have to be words, but I also added "lettering" so that the others could choose something a bit more abstract if they wanted.

My three quotes are drawn from my own PaperArtsy Eclectica quote stamps. One from EAB02 Darkness & Light...
... and the other two adapted from longer quotes on EAB07 Dreaming & Doing...

... chopped about to varying degrees in order to focus on the bits about the stars!

B - Add some sparkle
I sort of knew this was coming... it's a starry theme, it's coming up for Christmas - someone was bound to want to get sparkly!
It's not something I do very often, but the Clear Rock Candy Dry Glitter is usually my saviour when I do need a touch of sparkle.

I applied matte medium with a soft brush over and around the stars, and poured on the Rock Candy glitter. This is when I added it to the coffee stirrers underfoot too.
It's a subtle shimmer, with a chunky icy look, and very lovely when it catches the light - so yes, I'm happy there is some sparkle.

N - Assemble and add whatever you need to finish off your design
A generously flexible final offer from Nikki... allowing each of us to do whatever was necessary.
I needed to re-punch my tag holes through the paper, and then I added some crinkle ribbon, very lightly brushed with Vintage Photo Distress Ink for a slightly more distressed look.

I also did a bit more inking around the edges of the tags, and - as an afterthought - added the little crystal berries to the leaf clusters. (I could have counted that as part of the sparkle-adding instruction, I suppose...)
There was a final shared instruction... Resist. Not to use a resist technique, but to resist adding more or continuing to fiddle! It's always hard knowing when to stop, don't you think?
By sheer chance, when we came to hold up our projects to the cameras so that we could see a bit of what the others had done, we found that Brenda and I had used almost exactly the same Paper Dolls - even though nobody said we had to use Paper Dolls at all! (Click the photos for a larger version.)


I'm very happy with my bare, spare, wintry tag set. You can see how Brenda and Nikki's projects turned out by hopping direct to their blogs from the links at the start of this post, but why not go via A Vintage Journey and catch even more starry inspiration there?


We're looking forward to seeing what you're inspired to create for our Star Light, Star Bright theme this month, and hope to see you somewhere down the snowy December road. Oh, and by all means feel free to borrow our step by step instructions and see what they do for you!
Happy Crafting all!
Look up at the stars and not down at your feet. Try to make sense of what you see, and wonder about what makes the universe exist. Be curious.
Stephen Hawking
I'd like to share these tags at the Simply Neutrals party over at Apple Apricot
And I'm hoping the sparkly frosted look will qualify them for It's Got To Be Christmas over at Stamps and Stencils... it's their final ever challenge and I can't bear not to join in - I'm going to miss their lovely challenge blog a lot
At the Simon Says Stamp Monday Challenge the theme is "B is for..." and my B is for branches, real ones from the garden, and brown berries (not real!)
There's an Anything Goes theme at That's Crafty Challenges for the last month of the year
I've just got time to play along again at Try It On Tuesday where they are walking in a Winter Wonderland
32 comments:
what a fun way to create Alison - with each person choosing techniques or products to use - your tags are beautiful in the snowy off white wintery colors - love the vintage children, your stems and, of course, your lovely starry sky! Julia xx
These tags turned out great. What a way to collaborate. You made three incredible tags that have given me a few ideas, too. I love how you incorporated nature in these, too.
What fun you 3 have with your skype crafting sessions! I love your tags. I will come back and read in more detail when I wake up a bit better!
Oh my Alison, these three tags are pure vintage, monochromatic delight. It was a fabulous day crafting together and now seeing your results in more detail is sheer pleasure. The layers, the compositions and the beautiful elements you added have brought each tag together perfectly. Can’t wait for the next session xxx
WoW , the tags are beautiful , I have visited your blog, a very nice blog and you make beautiful creations. I went to follow you. I want to invite you to take a look at my blog and maybe you want to follow me too
Hugs Corry
Oh my!! These are über fabulous Alison!! Amazing how the twigs add to the composition and design! Totally charming! Nicola x
Your tags are so lovely with the little children and all the stars. Great ideas to use my paperdolls 😀
Your three tags are an absolute delight Alison, I really like how you built up the layers and the twig is such a lovely addition. The paper dolls look beautiful in the setting you created for them and that little touch of sparkle is just perfect! Anne xx
Fabulous!
WOW... what a tag triptych. So subtle and beautiful!!
So inspiring, Alison! I do wish I had the time to follow these prompts and makes something as beautiful...
It must have been a wonderful session creating with friends via the internet.
All your tags are gorgeous and together they make a a beautiful trio .
Yvonne xx
The neutral tones , the detail , the touches of nature and the 'darling ' paper dolls all come together to make three absolutely beautiful tags that hold such a wonderful wintry charm, Alison .
Adore them
have a lovely weekend
hugs x
A lovely wintry trio Alison!
Happy weekend to you!
Alison xxx
These tags are really gorgeous dear Alison, really great christmas tags, I love al the details on them!! Have fun greetings .Maria!!
Gorgeous, Alison - love the monochromatic look and the addition of the elements. Sounds like a fantastic DT session to me... bits and bobs added as instructed certainly produced something fab. I'll have to check out the others' work.
Thanks for sharing with TIOT this week.
Cath x
These are simply FANTASTIC Alison! So very beautiful!Love the addition of the natural twigs! Brilliant!
Great to see those fantastic tagsat Try It On Tuesday! Much appreciated!
Big hugs,
Susi
Love these tags don't know how I missed them Friday, so better late than never
Love
Amanda X
These are fabulous Alison and I've loved seeing how they've come together element by element, so clever yet you've made it look so simple xx
Outstanding Alison!! What a delight to see your gorgeous tags!
I really enjoyed reading about the processes and steps that you each laid out for the group! Soo cool~
Wonderful textures and layers of dif. mediums; Very beautiful!!
I can understand your reluctance to 'cover-up' your great backgrounds! but what awesome results : ) I like the addition of the twigs and pine cones too~ Thank you for sharing! Hugs to you, karen o
Your trio of tags are such a delight Alison x Great background details and wonderful sentiments x Love those paper dolls
TFS and hugs
Annie xx
LOVE the quotes and the neutrals! You've been busy! Gorgeous trio here!
So beautiful, they are-and the embossed metallic leaves looks stunning Alison. Maybe simple, but so much for the eye to love !!! Hugs, Dorthe xo
Your tags are so gorgeous, Alison, they're magical! And what a fun way to create together! I love the sweet little snow flowers you added to them. Thank you for sharing at Simply Neutrals :) Big hugs xx
From humble beginnings we have the most beautiful tags I have seen in a long time. They truly are beautiful Alison. How I missed these I don't know - must have been my three days away - hopefully caught up with the loveliness of your blog now.
Hugs, Neet xx
A fabulous Trio Alison, each so different but complimentary to the other. A super way to craft, I love following prompts for tags especially a winning formula can be invaluable.
Hugs Tracey xx
Stunning tags!! And oh how exciting and fun to create with others like you did! Good for you, Brenda and Nikki!! I love the idea and would love to give it a go sometime!
Your steps are put out brilliantly and each one looks perfectly at home on your tags! Well done!
Jackie xx
Wow, I’m a big tag fan and these are fabulous. Just love the monochrome and vintage look. Brilliant
Wendy x
My goodness, Alison, these tags are just lovely! I was on the edge of my seat every step of the way to see how the three of you played by way of Skype. Beautiful neutrals and just a breathtaking scene on each of these! Wishing you a very Merry Christmas!
Gorgeous! I love these sweet neutral vintage vignettes! Merry Christmas Allison!
Alison, These tags are stunning, and I appreciate your tutorial style post so others can learn how to do it too. Wow! So inspiring to see it step by step! Thank you. I wish you a Happy New Year with much creating and playing.
Love,
Jesse XXX
Beautifully assembled and my fave neutral palette....sublime. I love the results of these joint sessions, really stimulates your creativity! Fantastic results Alison. THanks so much for joining us at Stamps and Stencils for our last challenge and for supporting us over the last few years...I think I spy a few for entries for Dec :). Hugs Ruth xx
Post a Comment