I'm travelling into a new way of working, a new country, a new language, and a new hobby which I'm passionate about. Come with me for some of the journey...

Friday 31 March 2017

Wallflowers


Hello all!

It's a Tag Friday at A Vintage Journey today - that extra Friday in the month when the Creative Guides get to just play with a tag, and here's mine.

I actually made it more than a month ago, when spring was still just a dream... and I think that's what I was dreaming of.

In fact, the making-of went back even further than that.

I stamped the flower heads in a watercolour journal some time last year, so that I could practise some watercolouring with them during my travels.


In the end, I didn't get around to colouring them in until January when I used them to explore some of my new watercolour paints bought in the sales.


And then I didn't think of putting them on a tag until February... so it seems right after all that time that they had to wait that little bit longer before appearing on the blog!


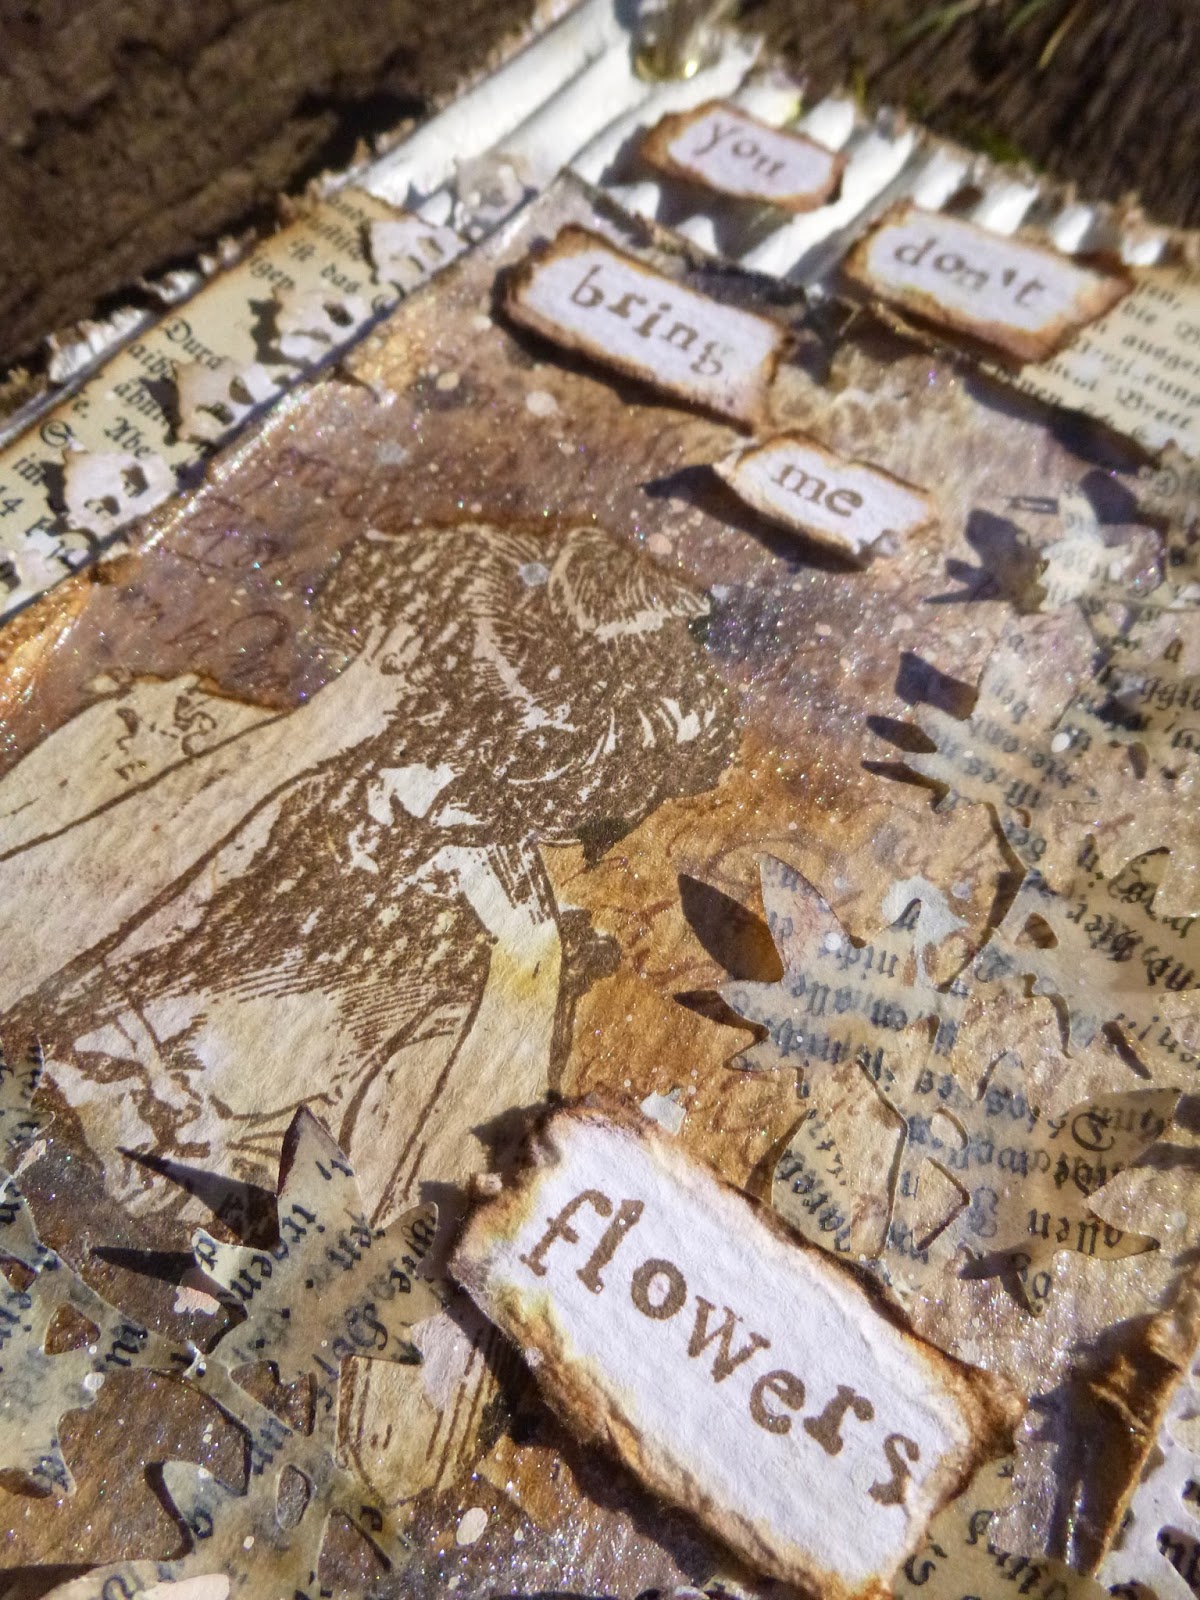
The background is one of my brick walls... getting in training for some more dollshouse work, I suppose, though really I'm supposed to be trying to tackle dollshouse dolls for the Tudor Tavern this time around.


Personally, I'd rather be making brick walls and wooden beams and floors than dolls, I think... we'll see.  I'll be sure to update you with any progress I make.


This wall is made with texture paste through a stencil, with some weathered areas of book page text.


I gesso'd over the whole thing and then set to with some paint layers to build up depth and texture.


I wanted to keep to a pale stone look so that my reddish-tinted flowers would stand out nicely against it.


Yup, not quite sure where the urge for the warm peachy reds came from - it's a rare colour around here at Words and Pictures.


I was just experimenting with some of my new colours - taking them out for a spin.


They were just flower heads on a notebook page, so no harm in a bit of red, eh?


Who knew they'd end up taking pride of place on a tag?!


Thank goodness for the Thinlits dies... you'd never catch me doing all this fussy-cutting I'm afraid.


I do find it pretty amazing that you can even cut the stems.  Technology is a wonder!


I love the poppy, but the coneflower remains my favourite of these flowers, I think.


It's certainly the one I've played with most often.


And there's another trio of them here...


I kept the rest of the tag pretty simple.  An Idea-ology QuoteBand provides the words...


... attached with twine, both regular and fine.

And of course there are some more words hovering in those book pages in the weathered wall.


There's some more twine at the top to complement it.


But really, it's those watercolour blooms taking centre stage, all layered up with foam tape for plenty of dimension...


... though I will admit to being rather fond of my wall too.  And you'll have spotted that I was unable to resist adding some of my favourite dried flowers to the bouquet.


I hope you like my wallflowers, and I hope you'll find time to hop over to A Vintage Journey and see the fabulous time my team-mates have been having with their Tag Friday creations too.

You've just got a few more days to join in with our anything goes 3rd birthday challenge, so "All Aboard" everybody.  Hope to see you somewhere en route.


Romance and poetry, ivy, lichens and wallflowers need ruin to make them grow.
Nathaniel Hawthorne

It's ages since I've played along with the Stampotique Designers Challenge.  They're looking for a Text Background this week, so with my subtle book text wall, I'd like to share this there
Another place where I've missed being able to play is Try It On Tuesday.  The current theme is Botanical - how perfect
And they're looking for Foliage and Flowers at That's Crafty Challenges - well timed!
And with my well-splattered wall, I'd like to play along one last time with Splatter Some Fun at Emerald Creek
As usual, Anything Creative/Mixed Media Goes over at the Love2Create challenge blog

Tuesday 28 March 2017

Encore - Steam Pipe Trunk Distribution Venue

Encore Posts
Projects which made their first appearances elsewhere for Design Team duties or Guest Designer opportunities, but which only had a sneak peek here, are being gathered together in the pages of my virtual scrapbook.  I'm calling them "Encore" posts and they're formatted differently (all the way down the centre), so you can spot them easily.
Please don't feel that you have to comment all over again!

This is a Calico Craft Parts DT piece from the end of August 2015 and you'll see that I was ahead of the (Tim Holtz) loop with my suggestion to Calico Craft Parts that it would be nice to have some pipes and connectors to play with.  Oh, and what's more - this plaque is almost exactly the size of the medium-sized new Etcetera tags.  Just goes to show there is "no new thing under the sun"!  This is what I wrote back in 2015...
_______________________________

Steampunk fans will be excited to hear that the latest additions to the Calico Craft Parts range offer a wealth of Steampunk inspiration.  There are fantastical cogs and flourishes, quirky characters and vehicles, as well as the pieces I've been playing with... a set of pipes and connectors (I'm proud to say they were my suggestion, though the actual design details were all in CCP's hands).  They're so much fun to play with, and here's what I've cooked up on my first go.


It's not where I meant to go, but I rather like where it ended up.


(The post title is there for any West Wing fans - you'll know what I'm talking about with the Steam Pipe Trunk Distribution Venue!  It just seemed the right title for this piece.)


The whole thing is on a large plaque, so there's plenty of room for one of my favourite steampunk-style stamp images as well as lots of the pipes and taps and screws from the Pipework Maze set.


The base is one of the Birch Plywood Plaques - the large Rectangle, 30x15cm (12x6 inches for those in old money!).  I had a little play with the pipes and the image to get a rough idea of where I might be headed.


Next step was to cut and emboss some card to fill the plaque around the area for the image, and then I covered that with black gesso from the edges and white gesso from the centre, so that we'd have a nice glowing light at the centre of things.


Then I started adding colour - some ink and mica sprays and some DecoArt Traditions Prussian Blue Hue - before dry-brushing with white gesso to highlight the texture.  (It's all a sort of combination of things learned from Andy Skinner and Finnabair.)


I spent a while playing with the pipes, trying out various finishes.  Thankfully, the Calico Craft Parts are more than sturdy enough to take several changes of mind.  Here's one that didn't make it - too dark against the background, but a look I'll be playing with again soon!


In the end, I've got DecoArt Dazzling Metallics Silver paint with some mica sprays over the top, and a shading wash of the DecoArt Prussian Blue applied with the fingertips down the "dark sides" of the pipes and washer heads and taps.


In places, there's also some Pewter Treasure Gold providing highlights along the inner sides of the pipes, shining in the light cast by our beautiful Steampunk woman (a La Blanche stamp).  I love all the stopcocks and pumps and taps (I'm sure there are proper names for them all... I just don't know them!).


And I love that you can pretty much create any map or maze of pipes that you like.


I altered some of the Mini Cogs, Styles 3 and 4, in the same way, and added them to the steam pipe maze...


... along with some metal cogs of various sizes.


I was lucky enough to be given some tiny lightbulbs by a friend of Cestina's.  I've been hoarding them, but finally some of them have a home of their own.


So the glow of the woman at the centre is not the only source of light in the piece!  She's stamped on tissue paper and glued into place.


You'll probably have noticed that the Pewter Treasure Gold made its way onto the background cog texture too.  It adds a great metallic lustre.


The sentiment is stamped on watercolour paper, tinted around the edges with the same ink and paint colours to tie it in with the rest of the piece.


I can see so many possibilities for these steam pipes.  They'll work on layouts (they make a great framing feature for an image or photo), or on masculine cards or tags.


You could go all out grungy and rusty, but for this particular creation I'm going to claim the Glampunk label again.  I'd intended to go for rust and verdigris, but that just wasn't where it took me this time around.  There's always another day!


I hope you like my Glampunk plaque, and do check out the new Steampunk offerings over at Calico Craft Parts.  You might just find yourself setting out on a Steampunk adventure of your very own. 
__________________________________

So there you go - if you don't fancy cutting your own pipes with Tim's new die, then Calico have got it all sorted for you!  Thanks so much for stopping by today, and I'll see you again soon, once I've got the current bit of dashing about done.

I never drink water.  That is the stuff that rusts pipes.
W.C. Fields

Saturday 25 March 2017

Encore - You don't bring me flowers...

Encore Posts
Projects which made their first appearances elsewhere for Design Team duties or Guest Designer opportunities, but which only had a sneak peek here, are being gathered together in the pages of my virtual scrapbook.  I'm calling them "Encore" posts and they're formatted differently (all the way down the centre), so you can spot them easily.
Please don't feel that you have to comment all over again!

Hello all!  I'm back with one of my Encore posts.  They'll be bobbing up now and then when life is too busy or too complicated for regular projects and posting.  I've still got watercolour experiments to share, but just haven't got time to write the posts at the moment, so an Encore it is.

This one was for the Artistic Stamper and it's from almost exactly three years ago... 23rd March, 2014.  Funnily enough, I've just recently been playing with some moulds again, so it seems like the right time to post this particular project.  Here's what I wrote back then...
_____________________________

Hello all, Alison (butterfly) here again, with a musically-inspired hanging for you today.  (Click on the photos for close-ups if you'd like to see more.)


This happens to me a lot... a phrase or song lyric will go round and round in my head until I'm pretty much forced to allow it to play along.  If you want to listen while you look, You Don't Bring Me Flowers is the song that invaded this creation!


I know this song was triggered by the new toy I was playing with to create the stone urn on this piece... there's something very melancholy about old stone planters in my head, and that dictated how this piece took shape.


Jennie has just added these fabulous Katy Sue Designs silicone moulds to The Artistic Stamper shelves.  There are some really lovely and intricate moulds - and I thought this little trio might have dollshouse potential as well as crafty applications.

UPDATE I'm afraid The Artistic Stamper doesn't stock these any longer, but they do have other moulds to play with here.


I had meant to use some air-drying clay, but when push came to shove I wasn't patient enough to wait for it to dry, so instead I melted some beeswax in a tart tin, using my heat tool, and poured that into the moulds.


I sealed it with multi-medium, and then painted it with various colours, including the marvellous Stone Fresco.  The little mulberry paper flowers are from my stash.


Regulars will know that when I need melancholy, I usually reach for the Gibson Girls, and this woman was perfect for my purposes.


I stamped her in Potting Soil Archival onto some Distress Watercolour Cardstock, and then used a mask to allow me to ink and stamp around her.


I stencilled around her using the new Tim Holtz Doily mask, and stamped with my favourite Calligraphy Mat, but lots of the layers have almost disappeared under the final spritzing of Perfect Pearls Mist in Pearl.


Worth it for the shimmer - though it's hard to capture in a photo.


The book page ivy strands had been sitting around on my desk for ages (created for this art journal page at the beginning of February, but then that needed something darker).


Despite the layer of beeswax covering them, they're pretty fragile, so it's a miracle they've survived this long!


The watercolour panel is layered up over some distressed book pages...


... with some die-cut paper lace tucked under the edges.


Another crack at that shimmer here... with lace and book page and corrugated card and all!


The words are stamped on another piece of watercolour cardstock...


... torn...


... and inked around the edges.


And I used gesso and some Picket Fence Crackle Paint on the corrugated background to create a shabby chic look.


I rather like all the layers of distressed elements, and the masking of the main image which I think really makes her pop.


A couple of eyelets and some pale twine, and it's ready for hanging.


__________________________

So another blast from the past for you - delivered as close to its third birthday as possible!  I hope I'll be sharing some of my more-recent mould-making with you soon, but first I'm supposed to try to make some dollshouse dolls for the Tudor Tavern... it's been empty long enough.  I haven't decided exactly how to go about it yet, so that will be taking up most of my time and creative energy over the next few weeks.  I'll keep you posted if I have any success, but in the meantime, happy crafting all!

You don't say you need me
And you don't sing me love songs
You don't bring me flowers anymore
From You Don't Bring Me Flowers by Alan Bergman, Marilyn Bergman & Neil Diamond