I'm travelling into a new way of working, a new country, a new language, and a new hobby which I'm passionate about. Come with me for some of the journey...

Saturday 29 August 2020

Encore - Calico Flourishing Butterflies

Here's a blast from the past - a project for Calico Craft Parts from all the way back in June 2015.  There's a wealth of different crackle products in the background, and I had a lovely time adding colour with sprays - something I don't do very often.  It's a slightly different vibe from some of my creations, but you'll recognise the colours and of course my passion for crackle!  Here's what I wrote back then...  (Oh, and if you're not sure what an Encore post is about, you'll find the explanation at the end of the post.)
_____________________________

Hello everyone, Alison here from Words and Pictures, and I've brought along some Flourishing Butterflies to share with you today.


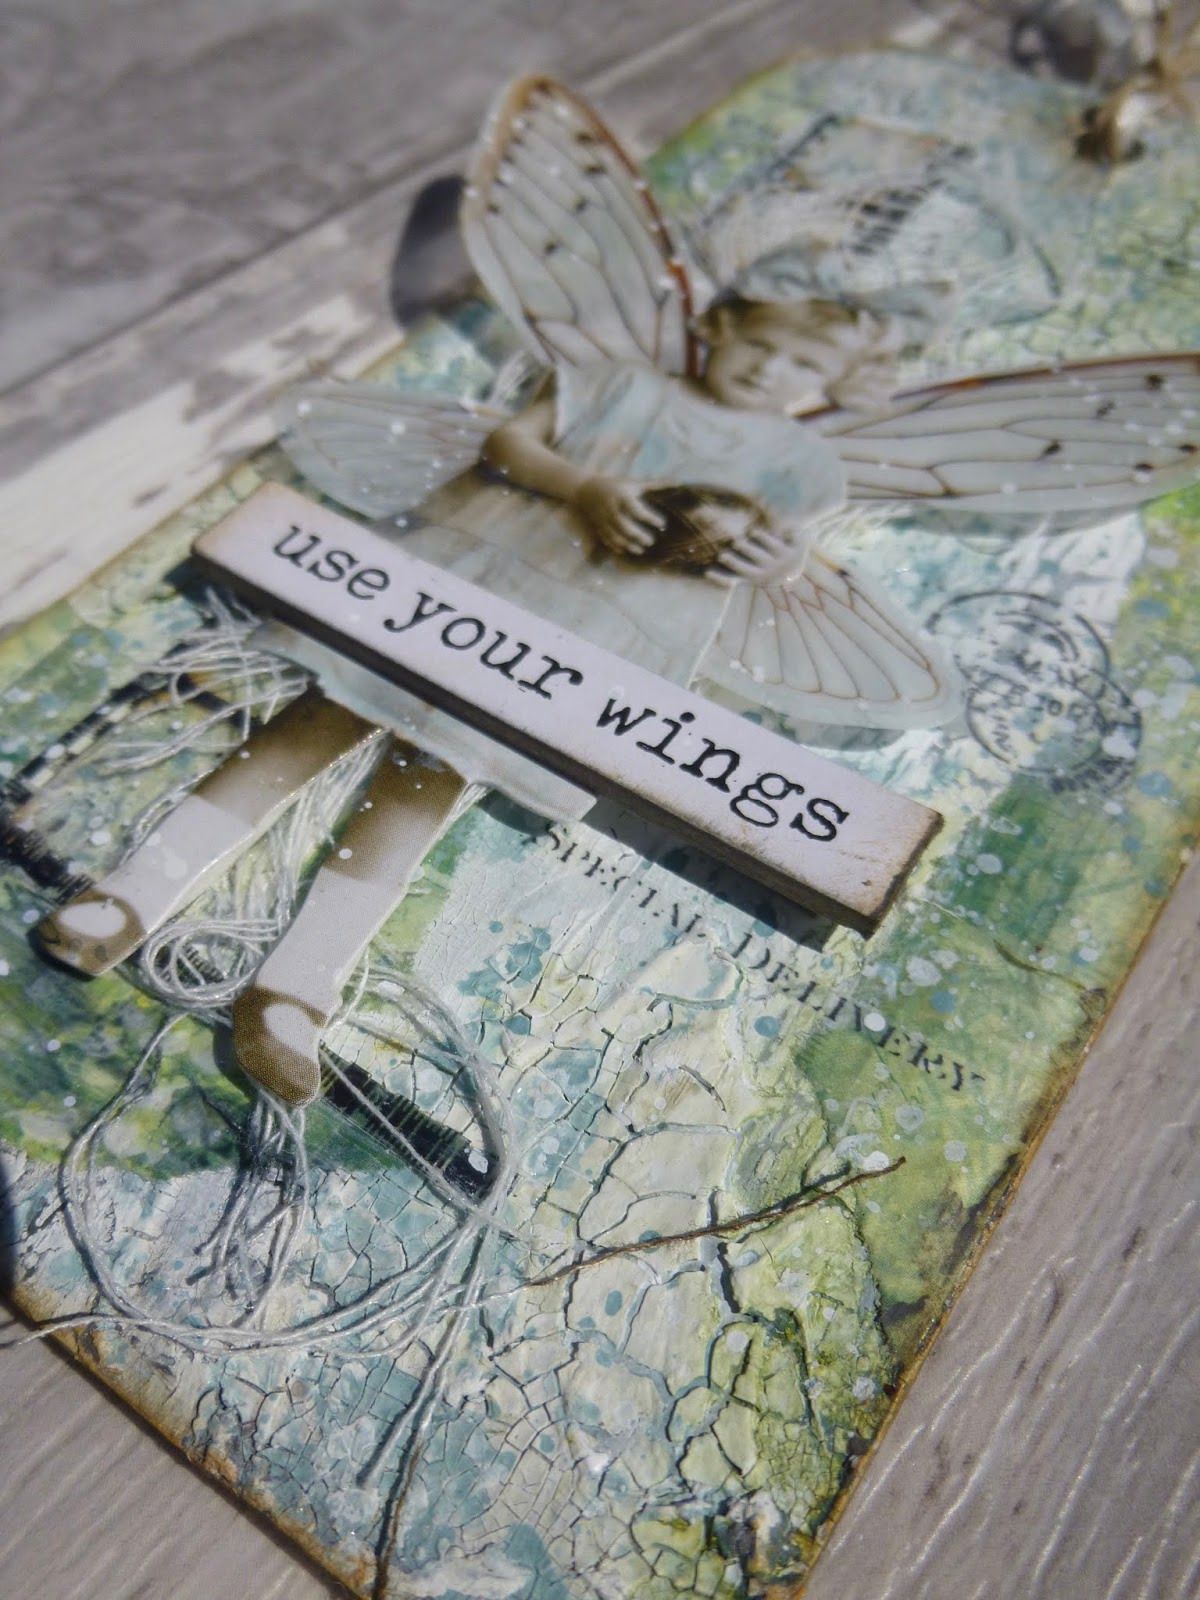
What I mean by that is that I've been playing with the fabulous Mini Butterflies again, as well as some of the scrumptious Mini Cogs, and they're all nestled around one of the glorious ornate Flourishes now available to create an altered notebook cover which, I will confess, I'm rather in love with!


I played with the layout first of all - you'll notice I ended up with fewer butterflies in the end.


I had a lovely time creating the background - book pages, masking tape and various layers of gesso and crackle mediums are at the heart of it.


I also applied texture paste and gesso to the large flourish before gluing it in place.  I added the metal flowers and filigree pieces, and gesso'd all of it.


I decided I needed a bit of extra crackle texture, so I applied that and let it dry before going on to the next stage.


Ah yes, the next stage - lots of spritzing inky colour over and around it all - such fun.


As well as spraying on inky colour, I also used a paintbrush to apply paint (shockingly conventional, I know) to intensify the colour in places.


That also gave me a bit more control in deciding where and how much colour I was applying to the flourish, the flowers and the crackled "sky".


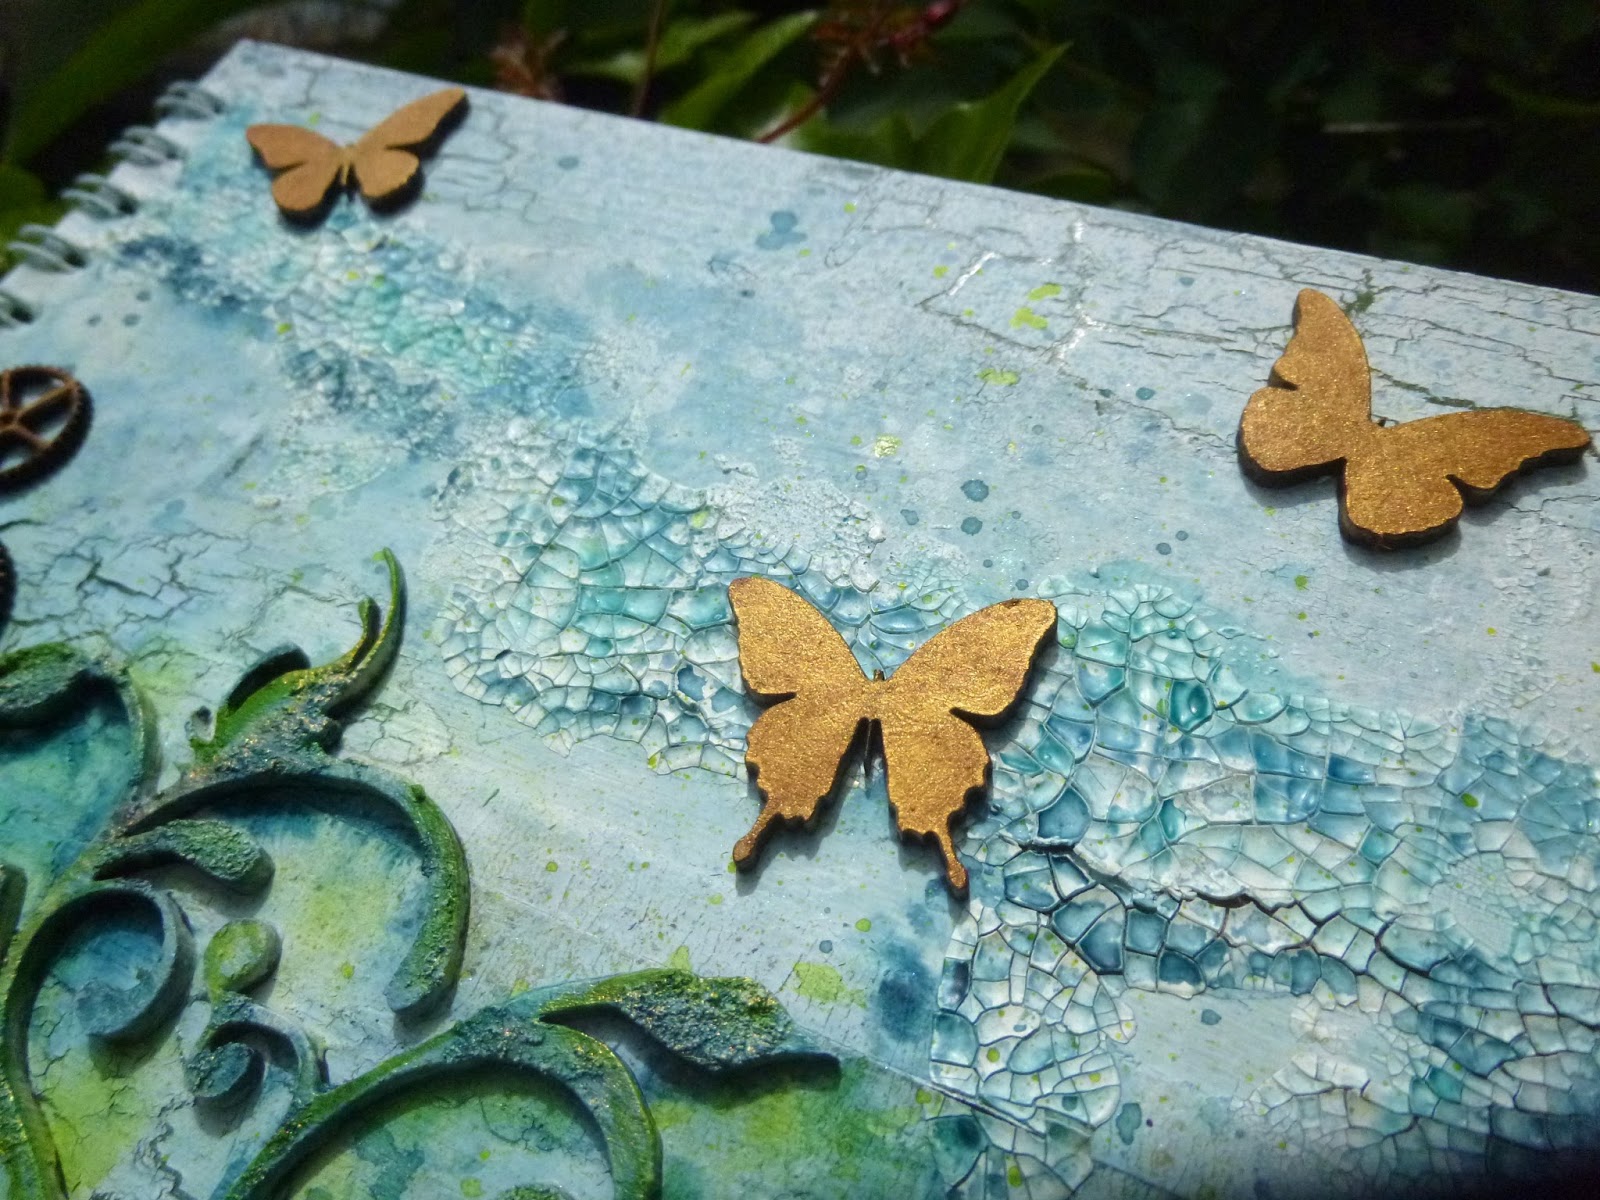
Both the butterflies and the cogs have been given a touch of golden shimmer using some iridescent gold paint - Interference Gold, which changes as it catches the light.


I've used some of the same stuff to add highlights and gilding on the flourish texture and the metal elements too.


The butterflies gleam as they catch the light...


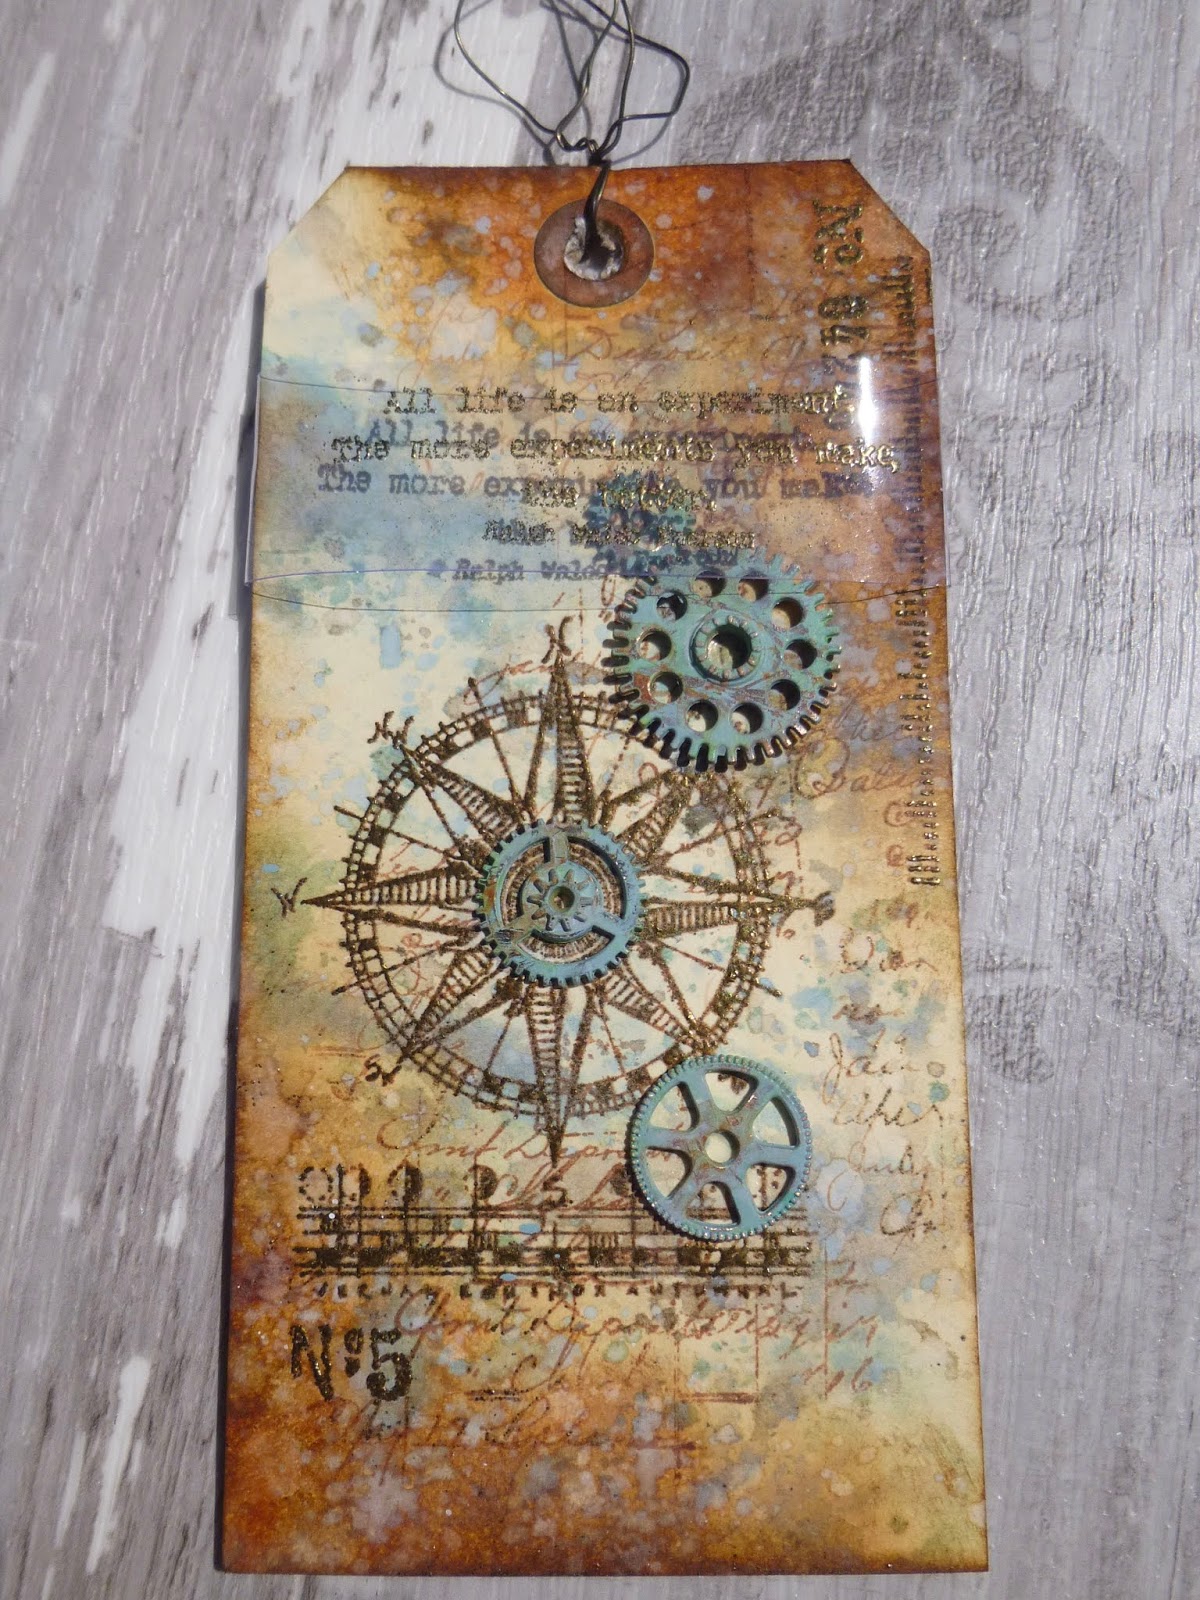
... and the cogs add a little hint of Steampunk glamour...


(... or should that be Glampunk? - something I explored with one of my first ever posts for Calico way back when - my Glampunk Birdhouse!!)


I love how they glow amongst the other elements.


There are spots and splatters of ink to add extra detail, all in colours to complement the main colours on the flourish.


I quite often leave my Calico Craft Parts "naked" as I find them so beautiful, but as you've seen in my last couple of projects, they're also fabulous when altered, and so much fun to play with!


So there's my notebook cover for you - I hope you like it.  See you again soon.

________________________________

There you have it.  I hope you've enjoyed this little wander down memory lane.  I still have lots of these fabulous flourishes in my stash.  I must dig them out when I get home (or make sure they're near the top of my packing when I pack up to move house!).  I hope you all have a wonderful weekend, and I'll see you again soon.  Stay safe, stay well and happy crafting all.

Nothing is ever really lost to us as long as we remember it.
L. M. Montgomery

Encore Posts
Projects which made their first appearances elsewhere for Design Team duties or Guest Designer opportunities, but which only had a sneak peek here, are being gathered together in the pages of my virtual scrapbook while I'm busy.
As always, the Encore Posts are formatted differently from the regular ones, so that you can easily spot them.  For some of you they will be new, but if you've seen them before, please don't feel that you have to comment all over again!

Wednesday 26 August 2020

Washi Wings


Hello all!  There's been a shift in perspectives here at Words and Pictures. I've been spending less time at the computer and more time actually at the craft table... all of which means there's a backlog of tags to share with you here on the blog. 

Since I'm working with a travelling stash at the moment (albeit a largeish one), there are certain limitations on what I can do, but I've found those limitations liberating.

The other thing which has given a much-needed kick to my mojo is the arrival of Speckled Egg as the new Distress Colour (well, it was new - the next new one is being announced later today!).

This particular tag was also inspired by the arrival of some glorious new washi tapes from Paper Garden, a Finnish shop I discovered via Instagram... well worth checking out.


This all happened on an MDF tag because I knew I wanted lots of crackle going on.  In fact, there are two different kinds of crackle here - a two-step weathered paint crackle glaze and some crackle paste simply spread on and left to do its stuff.


Next step, the addition of the washi tape.  This one is a very broad tape, so even torn in two it provides a lovely edging to the tag.  I added some Speckled Egg Distress Paint and spritzed with water to let it trickle into all the cracks and crevices.


That's enough to make me happy!  In fact, at the moment I am having a ball with backgrounds and then struggling a little to work out what goes on top.


Not having any die-cuts available is often frustrating (I'm particularly missing my Wildflower Stems!), and often I'll know exactly what I'd like to put on the tag... only it's not with me here, it's at home in the full stash!


The Paper Dolls have been putting in plenty of appearances as a result - even more than usual.


This little girl got some magical wings to go with her magical garden background.


And an Idea-ology Quote Chip provides the advice.


I've become fairly obsessed with the acetate Film Strip too - it provides good structure or architectural bones for a collage (something I exploited on my Winter Journalling last December, if you remember).


And some Remnant Rubs made their way onto this one, encouraged by that black edging to the film strip.

I'm generally pretty wary of black on projects.  It always feels very full-on to me.  I almost never stamp in black, which I realise is pretty unusual!


But in a balancing act with all those deep cracks, the film strip, and the words on the Quote Chip, I was willing to allow a little more black into the mix with the rub-ons too.


However, I will confess I brushed over them with a wash of gesso to knock them back a bit!

I particularly like the "Special Delivery" one, tucked just below the Quote Chip.


There's some fine twine at the top along with a ribbon which was cut out of the shoulder seam of a top (one of those loops that's meant to help the clothes stop falling off the hanger, but I never use them).


I hope you like the magical garden on this crackled tag and the little girl getting ready to use her Washi Wings.


Thanks so much for stopping by.

I'm aiming to fit in some blog-visiting, but I'm so enjoying having some creative mojo again that I may continue to prioritise the craft table while it's here!!

Stay safe, stay well and happy crafting all.

If you were born without wings, do nothing to prevent them from growing.
Coco Chanel

Tuesday 18 August 2020

Speckled Egg Combinations

Hello all!  Thank you so much for your lovely comments about my Speckled Egg speckled eggs tag.  I've been continuing to have a wonderful time playing with my Speckled Egg Distress Ink and Oxide, combining it with various other favourite colours to see what I get... and here's what happened, pretty much entirely unexpectedly!


Even though the colour palettes are quite different, I found myself creating something of a trio, particularly in the fact that each of them has one of my hovering quotes, stamped and embossed on acetate.


It may mean you can't quite make out all the words from a distance or on a photo, but up close as you hold them and move them around, it's perfectly easy to read them clearly.


What you gain is that you can still see the whole of the background and/or stamping underneath the acetate.


And in the sunlight, you also get the magical bonus of the shadow words being cast on the tag below.


So obviously all the smooshed backgrounds have Speckled Egg involved - these are Speckled Egg Combinations, after all - both Ink and Oxide formulations.  This one also has Mowed Lawn, Peeled Paint and Stormy Sky in the mix.


Then there are some of my favourite Rubber Dance tendrils from the Weed Love stamp plate...


... and a cobweb, clear-embossed to glimmer with dew.


And I'm really pleased with my Queen Anne's Lace stem.  It's one of Tim Holtz's stamps, stamped in Olive Archival, but then I scattered some Vanilla White Wow embossing powder on the flower head.


It took some careful brushing with a very fine brush, but I managed to clear most of the stems in between the heads to get the lovely detailed finish.


And I have to say I'm rather in love with this method of adding a quote!  The quotes on all the tags are from my latest PaperArtsy collections - this one is from EAB18 Gardens & Growth.


The quote is by Frances Hodgson Burnett who wrote A Secret Garden.  There's something rather wild and secret about the garden in this tag, so that seems highly appropriate!


Next up a combination with Speckled Egg, Vintage Photo, Rusty Hinge and a touch of Pumice Stone.  I love the vibrancy of this, with the chalky Speckled Egg Oxide adding that lovely weathered patina effect.  


I don't seem to have any pictures of this one in its unfinished state, but it's pretty straightforward.


The TH compass is stamped and embossed in Emerald Creek's Turkish Bronze powder.


The metal cogs are altered with Distress Paint - Speckled Egg, with touches of Weathered Wood and Frayed Burlap - and then sanded back.  (I've only got a few DPs in my travelling stash, but I seem to have picked good ones... obviously Speckled Egg had to come!)


There's a bit more background detail stamping, also embossed with the Turkish Bronze.  The golden glow against the rusty browns makes me happy.


And the quote, hovering on the acetate here is from EAB19 Life & Living, and again embossed in the Turkish Bronze.  I concede that with all that gilding catching the light I haven't got a photo where you can read the entire quote in one go...


... but I hope that you can see from the various photos from different angles that all the words are there, so when you hold the tag and rotate you get to see the whole of Ralph Waldo Emerson's idea: All life is an experiment.  The more experiments you make, the better.


And finally the one which, as I was making it I was least certain about, and by the end is maybe my favourite.

With Ground Espresso, Pumice Stone and Stormy Sky mixed in with the Speckled Egg, the drama of light and dark is quite spectacular.  (The lights are just where the manila tag is bare or almost bare of ink.)


The stars are done with crackle paste through one of the Tim Holtz stencils.


They've had a little bit of watery ink dribbled over them to highlight the cracks, so they so have a touch of Speckled Egg blue about them.


Down in the bottom corner I stamped one part of the giant Glorious Garden stamp.  I love the weeds and stalks in this section, giving it a very wild look.  I used a wash of white paint to add some highlights to the petals of the larger flowers.


It's embossed with Wow Primary Bark to give it a bit more presence against the dark Ground Espresso background, so you also get that light-catching glimmer that I love.


And the quote is embossed in Bright White - Vincent van Gogh dreaming amongst the stars.


What with the quote (and its magical shadow) and the stars and the wild flowers and branches, it's all a bit Midsummer Night's Dream for me, this one.


So there you have it... three tags I never meant to make!

I'm so thankful for the arrival of Speckled Egg - it really seems to have reignited my mojo.  I'm having such fun playing with it and trying it with different colour combinations.


And then once you've got these lovely backgrounds, it seems wasteful not to take them on the journey towards completion.

My limited travelling stash is also forcing me back towards more stamping than I've been using lately, which is another boost to the mojo.


I hope you enjoyed these because there are quite a few more tags on their way to you in the next days and weeks (as and when I get time to blog them!)... they are piling up on my craft table!


I hope you're all well.  I've been spending more time at the craft table and less time online - which has to be a good thing - but I'll be round for another catching up session soon.  Stay safe and well - best to stay at the craft table if you can as infection rates rise again... what a good excuse!  Happy crafting all!

The soul becomes dyed with the colour of its thoughts.
Marcus Aurelius

Colour is a power which directly influences the soul.
Wassily Kandinsky