

I've had such fun with the challenge themes throughout August, and while last week's rusty lavender ATC may be my absolute favourite of the projects, this one runs it pretty close!


From the moment I heard that S is for... was our theme, I thought I would probably be getting my spook on, and lo and behold the stargazing skeleton emerged from the shadows of my fevered imagination. This is going to be a long post, so buckle up!

It's a bit early for me to be going the full Halloween hog, so I've got an eerie midnight graveyard to share with you, but it's one that could be visited at any time of year.
It was one of those makes which started from a relatively simple idea and then snowballed (ooh, couple more Ss there), taking on a life of its own as I was playing.
And as things progressed, it wasn't long before the candle demanded to be included. It all definitely gets spookier when those skulls are viewed by candlelight. But more of that later...

Speaking of skulls, there are almost too many things beginning with S involved in this creation. Let's start counting, shall we...

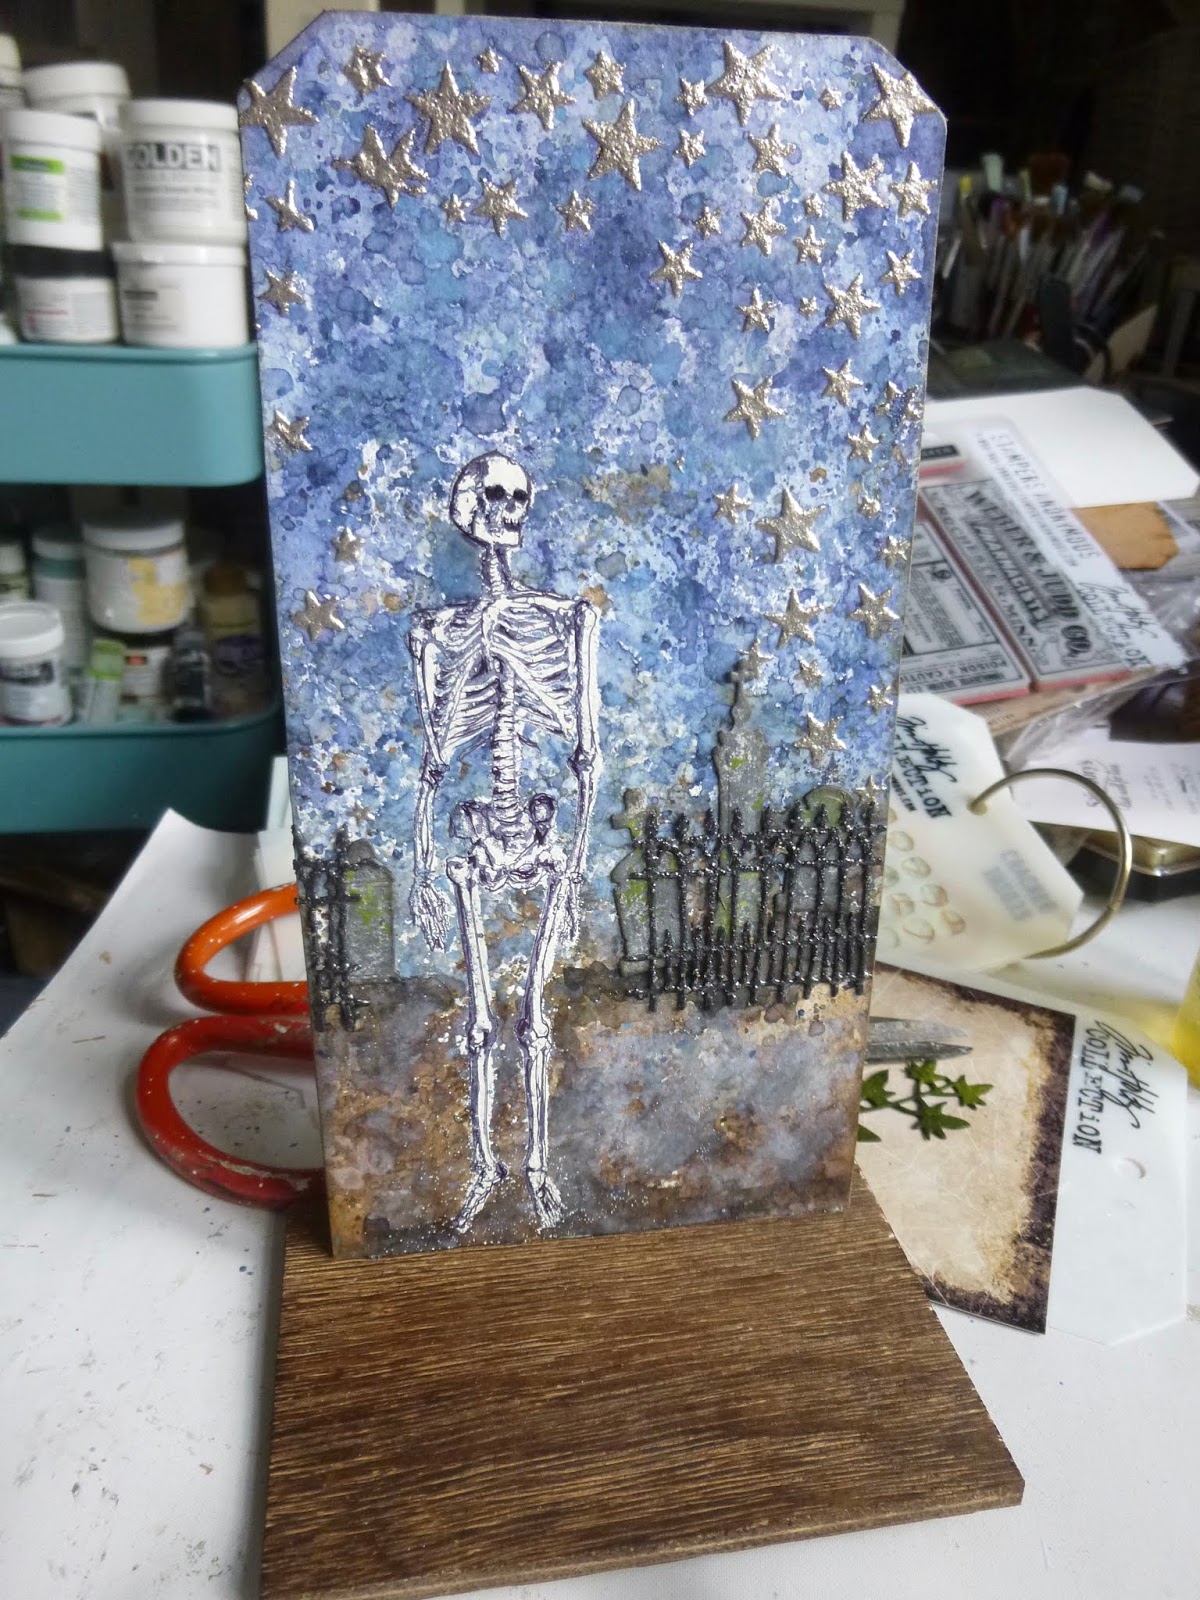
Why don't we start with the stargazing skeleton himself? He's from Tim Holtz's Poisonous stamp set, and my starting thought was to emboss the image in white.
But then I realised that the lines of the stamp needed to be dark, they're the shadows... it's the gaps in between which needed to be bone white. Hmmm... out with the Stamp Platform.

First off, I stamped the skeleton fairly lightly, and then used an embossing pen to draw over the whole of the image, so that my Wow Vanilla White powder would fill up all the gaps. (Otherwise, you'd have the night sky in the middle of his bones instead of bony whiteness.)

Once heated, the vanilla white gives that perfect ivory for bones. (Pretty tricky to tip the powder off the platform without dislodging anything, but it can be done.)

Then I re-inked the stamp with Jet Black Archival and stamped over the white bones for the finished look.
(The background, I should say, is also full of Ss. There are smooshed Distress Inks and Oxides in Stormy Sky, Chipped Sapphire, Pumice Stone and - not starting with S but with plenty of them to go around - Ground Espresso. Plus I used the Distress Sprays to add a lot of the extra spatters!)

The alignment isn't completely perfect, but I'm really happy that you can still see some of the night sky between his ribs!
Because the ink was on the shiny embossed surface, it did start to fade a little (even being Archival) so in the long run I had to use a very fine Sharpie to retrieve some of that intricate detail. I think having those darker lines gives an illusion of even more depth to the ribcage.

The idea of a skeleton led on rapidly to the idea of including some of the amazing Idea-ology resin skulls. So by this point, I'd made a rough plan for how things might proceed, using a Vignette Panel as a base for my MDF tag.
The tag is 8.5 x 4 inches, so it's the 4.75 x 3.5 inch panel creating my "ground".

The lid of a perfectly-sized tiny cardboard box provides the necessary stability to the structure. Sometimes it's a good thing that I never throw anything away!

The tree stumps are from my stash. I'm pretty sure that they are silver birch twigs, and I enjoyed gathering moss and fibres and pebbles to adorn the woodgrain surface.

But I thought it would be nice to add in some extra background detail to the tag too, to give the skeleton a proper setting... time for some gravestones.

These stones are cut using Tim's Graveyard Thinlits. I used a natural sea sponge...

... to add Stone and Slate Fresco Finish Chalk Acrylic paints (and some Hey Pesto for the mossy look - sorry, it doesn't start with S).

Really happy with my gravestones. Now for the railings...

For these, I used Seth Apter's Rocky Road Baked Texture powder. It has fantastic silvery particles amongst the black so you get a wonderful metallic sheen - just right for cast iron by starlight.
And speaking of starlight...
The tall tag means there's plenty of room above my skeleton's head for the silvery stars he's gazing at.

These are created using the Falling Stars layering stencil, some texture paste and my favourite Liquid Platinum embossing powder.
I simply love how they catch the light, as well as adding texture and dimension.

Okay, time to start assembling things properly and gluing them down.
Along with the skulls, perched on their stumps and logs, there are some bones from the Idea-ology Boneyard.

The larger skull in the foreground is from the new edition Skull Fragments...
(This is one of my favourite photos - worth clicking for a larger view.)

He's guarding some silverware, a Halloween Token with the lettering highlighted with some Snowflake Fresco paint, and it's pretty clear what his opinion of the rest of us is!

Also nestled in amongst the logs and moss and cobwebby fibres are some little white stones. Well, some of them are little - the regular Prima Art Stones - and some of them are slightly larger - the Mega Art Stones.

The smaller skull resting on high is from one of the older sets where the skulls were all pretty much the same as each other.
He's in charge of some more silverware, an ominous invitation.

This Quote Token is one of a seasonal set which I don't think is available any longer. But you can still get a couple of spooky phrases on these fabulous discs in this Halloween Word Adornments set.
Again, the Snowflake Fresco paint spruces up the lettering in ghostly white.

Growing up out of the real moss, I've added some ivy die-cuts from the Garden Greens Thinlits set.

It's probably one of my most-used dies (I love ivy in real life as well as in crafting), and I particularly like it here, growing off the edges of the tag...

... and providing a dark contrast to allow the dried flower stems to pop.
It was a little tricky gluing everything in place without crushing the flowers, but I got there.

The candle, an ordinary tealight, has been dressed up with some spider's webs, courtesy of an old roll of Tim's cobwebby tissue tape. (You can get something similar these days in one of the Halloween Design Tape sets.)

And seeing the cobwebs me realise the necessary finishing touch would be, but of course, an actual spider.
I'm pretty certain that I have some of the Idea-ology Wicked spiders hibernating somewhere in my stash, but after some heaving and hoving of boxes and peeking in many, many baskets and drawers, I decided to save my time if not my money and order some generic spider charms double-quick from Ebay.

He's dangling on his wiry cobweb from a Halloween Story Stick (the perfect adornment for this S challenge!), and if his legs look a little blurry in the pictures it's because he quivers quite delightfully on the end of his strand of spun silk.

I think I got the perspective about right to add depth to the scene with the distant gravestones.

And I do like the glint of iron railings amongst the greenery. I inked in plenty of shadows around the skeleton's feet too.
Surely that pretty much covers all our Ss, doesn't it? Nope, hang on...

The spidery sprigs spreading out across the night sky are some pre-cut chipboard branches which have been painted with more Stone Fresco paint, and to which I've added some speckles of Pumice Stone ink so as to give a silver birch look to them.

Right at the very top, there's a Hinge Clip which has been distressed with Mushroom Alcohol ink, some white paint and some crackle glaze, and now I do think we're there.
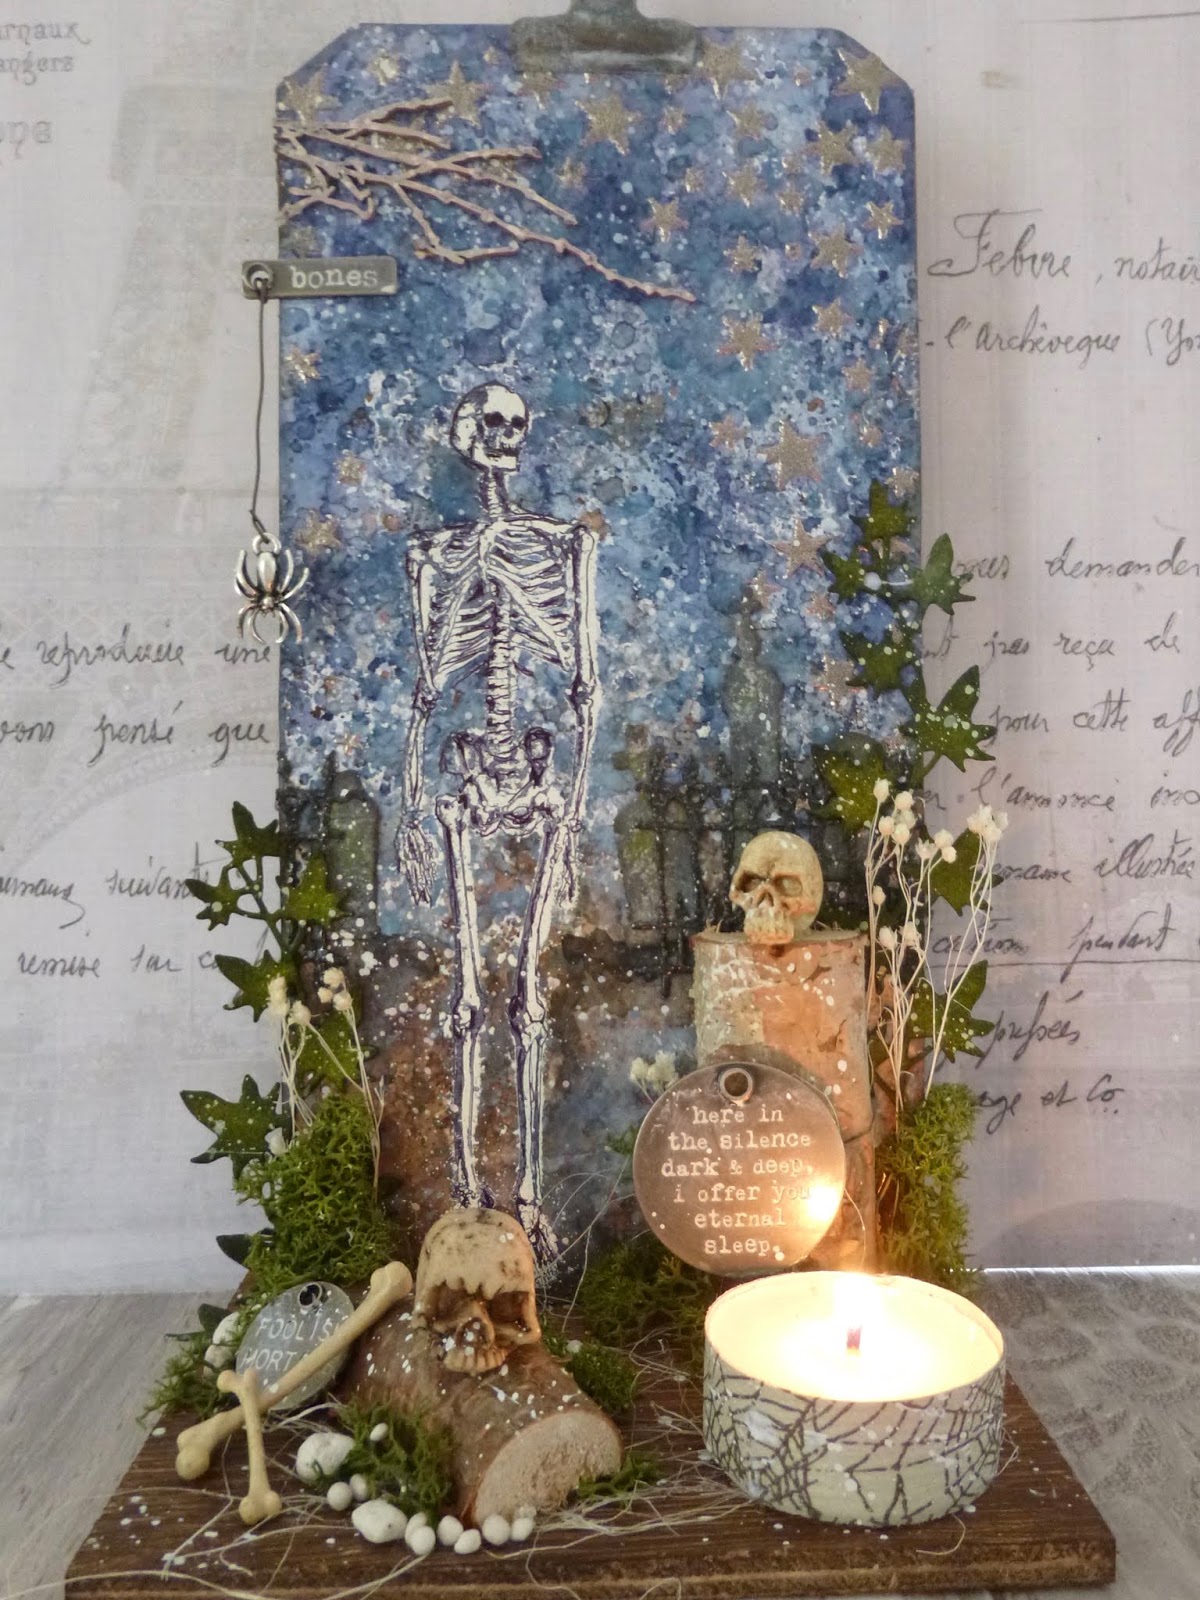
So there's nothing left to do except to light the candle...

... and enjoy the gathering darkness.

Don't be scared! Time for silence and sleep...
UPDATE: And of course Erika is right in her comment - there's one more S underlying all this: William Shakespeare and the gravediggers scene from Hamlet, all those bones flying about including Yorick's skull. Shakespeare's so embedded in my imagination, I don't even notice when he's hovering there!
If you're inspired to create something beginning with S, it would be great to see you over at the Simon Says Stamp Monday Challenge, and do let us know what S is for... in your project.
And if you're not inspired enough yet, then do check out the amazing creations by the full-time Design Team there. As always, there's a $50 shopping spree at Simon Says Stamp (plenty of Ss there too) on offer to one lucky winner, and you could end up as one of the team's Spotlight selections.


It is not my intention to be fulsome, but I confess that I covet your skull.
From The Hound of the Baskervilles by Sir Arthur Conan Doyle
I sometimes think about old tombs and weeds
That interwreathe among the bones of kings
With cold and poisonous berry and black flower:
Or ruminate upon the skulls of steeds
Frailer than shells...
From A Reverie of Bone by Mervyn Peake
I'd love to join in at Try It On Tuesday where they have the lovely theme of In my garden there is... spooky trouble... not so much a skeleton in the closet, nor fairies at the bottom of the garden, but a skeleton at the bottom of the garden!
I should be just in time to play along again at Tag Tuesday where it's Anything Goes (as long as it's a tag) - I know this is a pretty elaborate tag, but it's definitely a tag!
And there's also time to squeeze in another entry for the wonderful Textures theme at Country View Challenges
29 comments:
This is absolutely fabulous Alison, I love it! And Halloween is always my fave season, so this is definitely my cup of tea or should it be 'cauldron of potion'? And thanks for linking again to Tag Tuesday, much appreciated indeed. Hugs, Valerie
Stunning creation, Alison!!
Oh my goodness!! a Spookylicious masterpiece!! Amazing details and the skeleton looks particularly awesome!! I love the whole design of this Alison!!! Absolutely brilliant!! :-)
Thank you so much for being in the spotlight, again ;-) It is always such a great treat to have you along with us and I hope we get to do this again soon!!
Hope you have a great week!
luv
Lols XXX
If this wasn't so beautiful I would say it's way too early for Halloween (never my favourite celebration) but you have created such a brilliant spooky scene (and even spookier lit up!!!) that I would say it couldn't be a better time!! I love this take on your garden - just don't venture out at night!! Thank you so much for joining us at Try It On Tuesday! Chrisx
Freaking awesome, Alison!!! WOW! I think you may have hit just about every letter S with this, LOL! Wonderful detail and imagination, I love it when you light it up, so cool!! Super project for Halloween! It's been such a delight having you with us this month! hugs, Maura
Ooooh, it is a big wow from me too, you have definitely got me in the mood for Halloween now! You did a brilliant job with the stargazing skeleton, especially as you can see sky through his body. I can see this in your window on Halloween night, all lit up and spooky. A fabulous make! Anne xx
Maybe not Halloween but this could be a cool Shakespearean scene. Hamlet perhaps, with poor Euric. (Is that the right name?) I do like this. It is really cool. Happy new week. Hugs-Erika
There are so many wonderful things to rave about here, Alison. I am in awe. I love how you found a way to make the bones stand out by first coloring everything white, then stamping black ink over the embossed image.
The tombstones were the perfect size and shapes and using Seth's baked texture on the gate was genius. It worked SO well.
I love the vignette you created, too. Everything was perfect from the "stumps" to the skulls, to the spider on a silk string. Your attention to detail is unsurpassed. Even the candle is decorated. Nothing is left to chance. I am SUPER impressed with this incredible tag and wonderful decoration that should sit proudly through Halloween.
So many details. Fabulous!
Oh my goodness Alison! You’ve done it again. A Spectacularly Spooky ‘Sumptious vignette! 💖
Perfect vignette! I love everything about it...the stars, the color of the sky, and all of the spookiness.
Oh my goodness, what a wonderful project Alison..I love every detail..the brights stars, the frowning skull, all the moss and ivy..fantastic.
Luv CHRISSYxx
Much to be admired here... starting with the texture of the gravestones and railings which are so perfect! I love the vegetation too and how it looks by candlelight. Another beauty...
One of my favorite posts of all time, Alison! Not only is your scene absolutely fabulous (that background - swoon!!) but your writing - spidery sprigs and speckles, oh my! Your fence and gravestones, and skulls.... stupendous, smashing, superb, splendid, sumptuous, scrumptious, smacking!! Your sense of theater and setting always delights, but none more so than here! xxx Lynn
I am not really a fan of Halloween, skeletons and the like, but having said that, this is a very clever project! Specially like the photo with the lit night light.
Just when I think you cannot improve on your last piece of work you come up with another wonderful piece. Oh Alison, I LOVE this. How on earth did you come up with that way to do the skeleton? He is tremendous!
The cast iron is just perfect, Seth's RR Baked Texture powder just works so well on here.
Background, stars, and everything else you have added - mega! I certainly would not go in there to try to help myself to any treasure, a real warning to Keep Out! The perfect scene!
Hugs, Neet xx
A fantastic scene. I love the look of the skeleton, he really looks mysterious. Great details!
You’ve created a Halloween spectacular with this one. Fabulous spooky scene with all your details.
Love
Amanda x
Oh Wow! I am loving this what a great piece. Have a lovely creative week, Angela xXx
Hi Alison, sorry to catch-up only now with all your lasts posts, but I enjoyed my holidays with my family without any Internet for once! Yippeee... And next some big and hard works in the house with no rest and time for anything...
OMG I LOVE this so much!!!!
Great use of your stamping platform, your skeleton looks fabulous!
But I also adore the decor you created, stunning and wonderful, and your use of all "S" elements!! ;-)
Hugs, Corinne xxx
This is such a fantastic Halloween creation! Alison. Love all the awesome and spooky elements you created. Thank you so much for sharing your beautiful projects and great inspiration with us at Simon Says Stamp Monday Challenge this month. Love and hugs. :)
Your very creative project sure did take on a life of it's own and what a magical piece of art. Your attention to detail, as always is staggering and what an amazing and unique spooky project with tons of 'S'SSSS' x
For me, your skeletal stargazer would be classified as spectacular, and significantly spooky! I think that skeleton turned out amazing! I love the details and always an admirer of your style, the entire scene just radiates that spellbound feel! I am in love with this! Congratulations on your designer spotlight, what a wonderful month full of inspiring projects thank you!
This is fantastic. Halloween is always a fun theme. I love this.
Wow what an amazing project Alison, this must have taken you days to create, but it's so worth it. The double stamped skeletons are fabulous, and the mossy gravestones are just perfect. Brilliant! xx
Its a fantastic project Alison, it will soon be Halloween. It looks like you really enjoyed creating this piece. Thank you for linking this with us at TioT's, I hope I don't find a skeleton in my garden this coming October.
Yvonne xx
Oh my goodness!! This is absolutely stunning Alison! What a fabulous Halloween project. I love the skeletons (particularly, the stargazer) and the whole little graceyard scene is awesome!! Looove this!! hugs xx
WOWZA!!! Get you for going out with a bang! This is SERIOUSLY SUPERB Alison and you definitely nailed "S is for!. The skeleton is very clever indeed and each and every little element looks spookily brilliant. Well done on yet another tour de force. Nicola x
Oh my Alison , this is a superb example of how to do 'haunted and eerie' without having to go go all out black , spooky and gorey. Every step you took along the creative road has resulted in a fantastic finished piece . Your attention to detail is spot on . LOVE it x
You have created some fabulous gd spotlight creations . Tfs and inspiring x
Post a Comment