I'm travelling into a new way of working, a new country, a new language, and a new hobby which I'm passionate about. Come with me for some of the journey...

Friday 31 August 2018

Thy sweet love remembered...


Hello all!  It's that lovely time of month - a Tag Friday over at A Vintage Journey... a chance for the Creative Guides to come out and play with a tag, but with no other rules or constrictions.

I made use of a jumbo tag background made months ago - some Tim Holtz paper stuck onto a piece of recycled cardboard.

I probably had some plan in mind when I started it, but work got in the way, and it has sat there awaiting inspiration ever since.

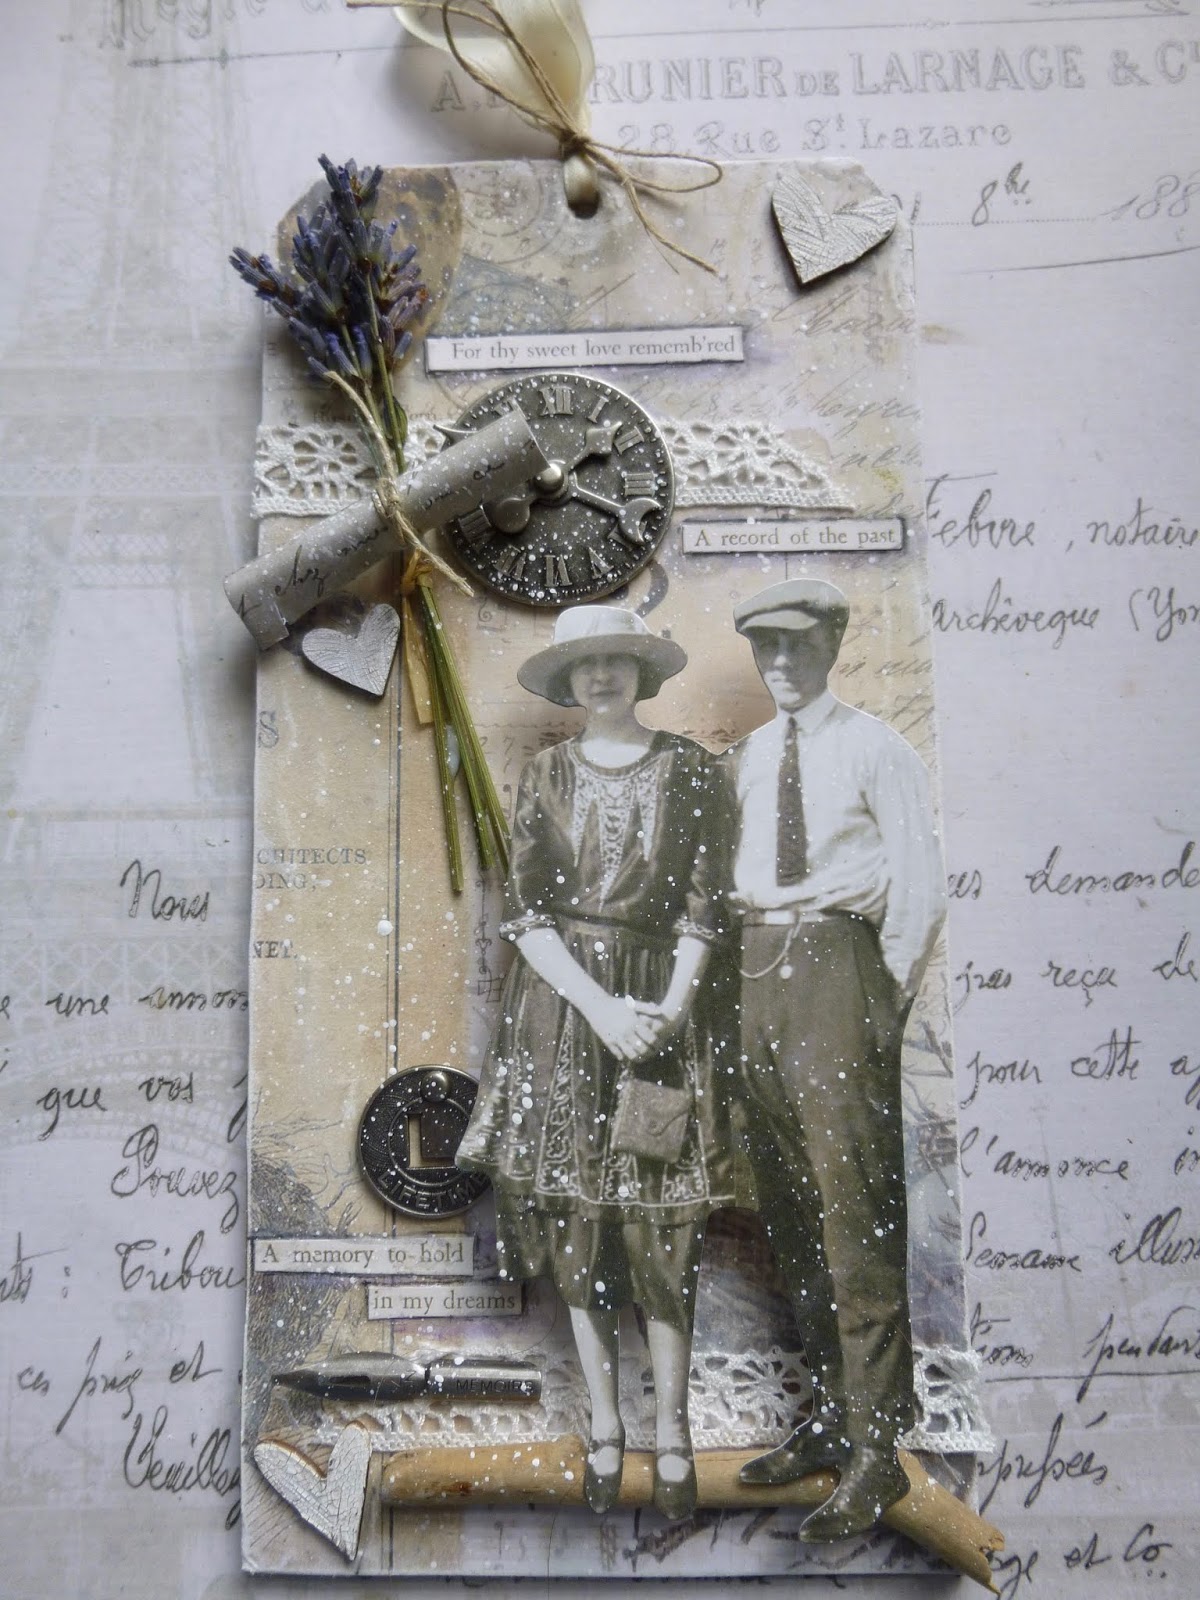
As it's such a large tag (4 x 8.5inches), I was able to use one of the larger size Paper Dolls couples, and once they were in position everything else sort of gathered around them without too much conscious decision-making.

There was plenty of internal story-telling going on though... I'll leave you to make up your own romantic versions of it.


Here's the background before anything started happening.  I've a feeling it may have been way back in spring that I first stuck the paper onto the cardboard...


.... sanded around the edges, and gave it a few swipes of leftover gesso.


The couple themselves are mounted on a few little wooden alphabet dice, from a pound-store set, which gives them a lovely dimensionality.

(I used the Zs and Xs - I'm unlikely to want them for actual words on future projects.)


I needed the dice because I really wanted the pair of them to perch on this lovely bit of driftwood - always a touch of romance about driftwood, I find.  They're about 3/8 of an inch proud of the tag surface.


There's a scroll tied with twine - a love letter, I'm sure...


... and the little bunch of lavender came from the birthday cake of our 101-year-old neighbour, Rose, at the beginning of August.  I remembered that it was still sitting in the kitchen and thought it would make the perfect romantic keepsake to add to the tag.

(See the 101st birthday present made for Rose by Cestina over at Cestina's Dollshouses - a miniature replica of her living room.)


Lavender is wonderful stuff to put away with your love letters to keep them fragrant, and to keep those carefully preserved fragments of lace safe from the moths.  (Hmm... a slightly less romantic thought there.)


Since I'm just back from working in Stratford upon Avon (more details of that in the next post), what could be more appropriate than a little touch of Shakespeare for the first words?

You can find the sonnet in full at the foot of the post.


The other nostalgic yearnings are also from the wonderful Idea-ology Clippings stickers.  It seems you can always find just the right little broken thought for your artwork.


They've had a little shadowing with pencil and ink - Dusty Concord Distress Ink and Shaded Lilac Oxide to echo the lavender sprigs.


A couple of other Idea-ology pieces - the clock, ticking away the time the lovers have to spend apart...


... the Muse Token which tells you all you need to know about their devotion...


... and the pen nib with which to record every precious moment spent together.


There are some tiny wooden hearts, crackled with DecoArt Media Crackle Paint, with some Pumice Stone Distress Crayon to highlight the cracks.


No need to tell you what they symbolise...


A touch of ribbon, tied with twine at the top, and we're pretty much done.


Thank you for your company today, and do hop over to A Vintage Journey to see what my fellow Creative Guides have created for Tag Friday.  I can hardly believe August is drawing to an end.  The year is flying, and I'll be back before you know it.  Until then, happy crafting all.


When in disgrace with fortune and men's eyes
I all alone beweep my outcast state,
And trouble deaf heaven with my bootless cries,
And look upon myself, and curse my fate,
Wishing me like to one more rich in hope,
Featured like him, like him with friends possessed,
Desiring this man's art, and that man's scope,
With what I most enjoy contented least;
Yet in these thoughts my self almost despising,
Haply I think on thee, and then my state,
Like to the lark at break of day arising
From sullen earth, sings hymns at heaven's gate;
   For thy sweet love remembered such wealth brings
   That then I scorn to change my state with kings.
Sonnet 29 by William Shakespeare


With its nostalgic romance of times past, I'd like to share this over at Tag Tuesday, where the theme is Time/Clocks

Monday 27 August 2018

Get Wrapped Bloghop

Hello all!  I'm thrilled to welcome you to a very special bloghop extravaganza today.  I'm delighted to be part of the Get Wrapped Bloghop, featuring products by Seth Apter, PaperArtsyEileen Hull and Emerald Creek.  It's all in the name of fun and cross brand creativity, but there will also be a prize pack valued over $150 USD from PaperArtsy, Seth Apter, Eileen Hull & Emerald Creek. To be entered you must pop by and comment on each of the blog posts before midnight, August 29th.


If you're already hopping, you should have arrived here from the wonderful Karen Bearse, and I'll point you in the right direction for your next hop at the end of the post. If you've landed mid-hop, as it were, you can find the full hopping itinerary at the foot of th
e post too.

It's a real honour to have been invited by Seth to be a part of today's inspiration bloghop, alongside so many amazing artists and crafters... and a joy to play with the products too.  Here's what I came up with using Eileen's Wrapped Journal, Seth's fabulous PaperArtsy Fresco Finish Paints, and some amazing embossing powders from Emerald Creek, including Seth's own Baked Textures.


I'm going to show you a couple of different angles to start off with.  The Wrapped Journal is deliciously chunky, so you get lots of surfaces to play with... front, back and sides...


Some of you will spot that I've used some of my "Engraved Enamel" plaques on my journal.  I shared the full details of how to make these recently over at PaperArtsy, so I won't go through it all in detail again now.


These plaques do make me happy.  I knew from watching Seth in action at Creativation (via youtube, not in person, sadly!) that you could get great results from stamping into his Baked Textures powders...


... but I wasn't sure that I would be able to get a clear enough impression with my intricate quote stamps until I tried... and lo and behold - magic!


Let's go through a few making-of stages for those who'd like them - otherwise just scroll down for some more close-ups!

I started with a matboard die-cut of the Wrapped Journal, and gave it a rough coat of Seth's Midnight - a rich dark blue.


No need to be a perfectionist at this stage - it's all going to get covered up, first of all with a coat of PaperArtsy Crackle Glaze.  These are most of the Seth paint colours I used as I went along...


... with the addition of the white Snowflake - always necessary.  They're from his special edition collections with PaperArtsy - sets 3 and 4.


Once the Crackle Glaze was dry, I applied Snowflake Fresco paint over it, and then sponged on some of the lovely grassy Magic Moss colour.


Coming down from the top, I sponged some Glacier Ice - the palest of icy blues - layering some touches of Double Denim over that for a deeper blue, as well as adding some at the bottom edge too, to tie things together.


I decided I wanted a touch more definition along the bottom edge, so I swiped on some embossing ink and sprinkled on some of the Deep Sea Baked Texture powder.  


Time for some stamping.  Since it was clear by this stage that I was once again heading out into the meadows, I reached for my much-loved PaperArtsy grasses by Lin Brown.


They're stamped in Olive Archival ink, another favourite.  I haven't had much crafting time lately, so when I do find myself at the craft table, I tend to indulge myself with my favourite things!


Next I cut some of the lovely Tim Holtz Wildflower Thinlits out of plain card, and started adding layers of Baked Textures powders to them.  Just look at the glorious sheen when the sunlight catches them.


They're done either with the Vintage Beeswax or the Deep Sea powders.  One of the things I love about these two translucent powders is that, the more layers you add, the deeper the colour tone of the finished result.


So the palest of these stems has only one layer of Vintage Beeswax...


... but the glorious golden one down in the middle on the front has had three layers.

They've all had some white spatter by the end too, which adds to the depth, I think.


For my signatures, I've used some mixed media paper from a Canson 7 x 10 inch pad.  Torn in half and then folded once, the pages are the perfect size for this small Wrapped Journal.


I used fine twine to fasten them into the journal with a simple knot - and I haven't stitched my signatures, so that I can pull the pages out to work on, if I want to, and then re-insert them later.


I love the look of the fine twine on the outer spine...


... nice and natural against the meadow background.


The interior of the journal cover is done very simply with Seth's paints.  Again, it's a coat of the Midnight to start, then some Glacier Ice brayered over the top, and some Magic Moss applied with an old credit card.


It creates an artsy look without being too in your face, so you're free to concentrate on what you're putting on the pages of the journal.


Finally, the actual wrapping of my Wrapped Journal...  It's some more of the same fine twine, a triple string, which I've glued between the front enamelled plaque and the journal cover.


To keep the twine more fully in place, as well as to strengthen the plaque itself, I glued another piece of card to the rear side of the plaque where it extends out from the cover.


Then you simply wind it all around the journal a couple of times and tuck the knotted end into the wound twine to keep it in place.


I really love the structure of this Wrapped Journal... the chunky look when it's all wrapped up...


... the excitement as you start to unfurl it to see what's inside...


... plenty of journalling space, with four whole signatures...


... and the lovely extended decorating space over the whole cover when it's "unwrapped"...


And I can't get enough of the gleam of the "enamel" in the sunlight on those word plaques...


Thanks so much for stopping by today - or should I say for hopping by?!  Your next stop on the Get Wrapped Bloghop is the lovely Nora Paolini.  Remember you need to comment on each post before midnight, 29th August, to be in with a chance at the fabulous prize package.


Before you go, I'd just like to say thank you again to Seth, to Eileen and to Kim and Katelyn at Emerald Creek.  It's been just lovely to be a part of the hop today, and I hope you're finding oodles of inspiration along the way.

Plant your own gardens and decorate your own soul, rather than waiting for someone to bring you flowers.
Jorge Luis Borges


Full Get Wrapped Bloghop line-up
Eileen Hull
Kim Evans
Debi Adams
Josefine Fourage
Susie Bentz
Linda Cain
Karla Yungwirth
Jenny Marples
Amanda Pink
Livia Yellowbird
Karen Bearse
Alison Bomber - you're already here!
Nora Paolini
Tonya Trantham
Emma Williams
Peg Robinson
Maggi Harding
Stephanie Eaton