I'm travelling into a new way of working, a new country, a new language, and a new hobby which I'm passionate about. Come with me for some of the journey...

Monday 30 July 2012

A Proper Gent

Hello all... I've been drooling over the Vintage Gentleman Kit available at Vintage Page Designs for nearly a whole month now.  I'd finally decided to give in and go shopping, only to find that they were on holiday - thwarted again!

But I still wanted to enter the challenge over at their blog this month which is entitled simply 'Gentlemen'.  I've created a number of shabby chic albums (some of which you've seen, and some of which are still to be revealed), but mostly in gentle blues, greens and the occasional mauve/pink.  So what a good opportunity to go for something more manly.  I had done a toilet roll mini-album in browns and blues using the BoBunny Weekend Market collection of papers, but I wanted something on a slightly larger scale (it's a 6x6) - so here it is:

I'm imagining a smoking jacket, pipe, library kind of gentleman here... and definitely of a certain vintage!

For the cover I used a paper from the Papermania Persimmon collection, and distressed it to get a very old wallpaper look - the sort he might have in his study or library.

I sanded it with an emery board (nail files are very useful craft tools), and blended on some Vintage Photo Distress Ink.

The corners are adorned with the corner flourish from the Tim Holtz Journey collection, double stamped in Vintage Photo for extra dimension.
The tiny tabs, cut using the TH die Tiny Tabs and Tags, have Weekend Market papers front and back, sandwiched onto card for some dimension and UTEE'd (Ultra Thick Embossing Enamel) for strength.
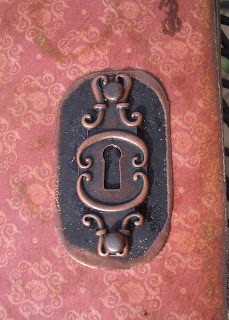
The lock and key are from the BoBunny trinket set which is part of the WM array, and it's all strung on to the book ring using one of TH's ball chains.


I made a black backboard for the lock, and edged it with Copper embossing powder.  I used the same embossing powder to transform my silver book rings into copper ones, so that they'd suit the look of the album.

Throughout the album, I've used the Weekend Market papers combined with the Persimmon set, as well as adding music manuscript and plainer handmade papers of my own.  I'm always worried that I wouldn't want to cover the amazing designer papers with journalling or photographs, but I realise that's pretty much the whole point of an album... so I try to create other spaces for journalling or as photo mats which will allow the papers to still shine through.

Let's take a quick flick through the album...

I like to create each double page spread as a single 'whole' area, so that each time you turn a page you find a new environment.

The flourishes most of the way through the album are from Whimsy Stamps, a set called Lavish Flourishes.


Quite often, I've embossed them with copper embossing powder, to get a lovely burnished sheen.  Love the wooden rulers from the BoBunny papers, so I've created my own version on the reverse of the tags using TH's stamp from the Seamless Experience set.


I can certainly imagine that Sir Jasper (oh, look at that, he has a name...) has one of those glorious globes in his study, and probably an astronomical one too.  This next spread pays homage to that, with a photo pad or journalling space created within the gentle curves of lines of latitude and longitude.


The next spread has a large pull-out tab, one side of Weekend Market, and one of actual sheet music, stamped with flourishes and edged with Vintage Photo.  There are die-cut hearts to match, glazed with Rock Candy Distress Crackle Paint.


I'm sure that, if not a musician himself, Sir Jasper is a keen connoisseur of fine music - chamber music I think, or possibly opera... he might, in this pocket, keep mementos of performances he has attended... a ticket, a programme, the lace handkerchief of the young soprano from the chorus...?


The next one is a little ornate for a man you may think, but a gentleman of Sir Jasper's standing and character will always appreciate beauty in his surroundings.  A fine architectural flourish such as this one, provided by the TH Scrollwork On the Edge die would perhaps be reminiscent of the ironwork of his wrought iron gates.  And rather than lace, let us consider it the mouldings upon the very fine ceiling of his Great Hall.


This page
opens as well, to reveal a pocket in which Sir Jasper might keep records of his latest shooting party.


An elegant gold and brown affair here, a dark rich brown like the leather of Sir Jasper's favourite ottoman, or his favourite wingback chair, with the gold stud work.  (Additional flourishes provided by the Whimsy stamps and some gold acrylic paint.)


The stripes on this spread are a little rakish, like Sir Jasper's younger brother (hmm, let's see... Bertram?) who is, as the phrase has it, 'half flash, half foolish', but very fond of a dashing waistcoat.


There are copper-embossed flourishes, and tags with one of my favourite TH stamps, the pen nibs from the Curious Possibility set.


I shouldn't think Sir Jasper gets many letters written while Bertie is staying - unless they are bills of payment for the debts his brother has incurred.


A retreat to the music room, then, so tastefully wallpapered (BoBunny), there to listen dutifully to the daughters of his near neighbours, the Cottingtons, as they demonstrate their musical prowess... or lack of it.

Still a gentleman will always be attentive and complimentary to the gentler sex.


And then this last one, with much more delicate wallpaper that I love (Papermania), makes a return to the rulers and measures - some of my favourite vintage objects.


I work, in a very old-fashioned way, with a wooden ruler myself - not only that, it has a list of the Kings and Queens of England all the way down the back.


I feel sure that Sir Jasper would approve of my learning the history of the nation as I'm crafting!


Thank you for joining me for this little tour of Sir Jasper's domain - apologies, I think it's the Whimsy stamps that must have induced the whimsical approach... I've been infected by the Lavish Flourishes in my writing too.  Normal service will be resumed as soon as possible.  I hope you'll drop by again soon, just to check my pulse, perhaps?!

I'm entering this (though Sir Jasper would probably disapprove of vulgar competition - oh, hush now) in Vintage Page Designs' July challenge Gentlemen, played, of course, by Marquis of Queensberry Rules... okay, that's enough now - I'm going to bed!

He was the product of an English public school and university.  He was, moreover, a modern product of those seats of athletic exercise.  He had little education and highly developed muscles - that is to say, he was no scholar, but essentially a gentleman.
H. Seton Merriman

A gentleman is one who never hurts anyone's feelings unintentionally.
Oscar Wilde
Saturday 28 July 2012

La Scapigliata (or Bad Hair Day)

What a sensational challenge set by Anita Houston over at Frilly and Funkie - to pay homage to any one of four great "Renaissance Men" - Leonardo, Michelangelo, Donatello or Raphael (not the mutant turtles, as she points out).  Talk about setting a benchmark!  Well, I can't allow my week to be dominated by one gender only... so I decided to see if I could even out the balance by combining the Renaissance Men with the challenge over at Simon Says Stamp and Show, which this week is "Hey, Girl!" (Or, to redress the balance more fully, you could make that 'woman', of course.)

I did a Google image search for some inspiration, starting with Leonardo da Vinci.  I've always loved the bare bones of his notebooks and preparatory sketches, preferring them to the full oil paintings (hmm, just realising that this is probably connected to the fact that I love the projects I see in monochromatic browns), so that's what I looked for.  Almost immediately I found this beauty, and fell in love...

Nobody is quite sure whether this was ever developed into a painting, or who the model might have been.  She's known as La Scapigliata, which translates as 'the dishevelled hair girl'.  When I discovered that, it was a foregone conclusion - we were made for each other!

One of things I find so extraordinary and so beautiful about the sketches is the amazing three dimensionality achieved with just some white highlighting over the area, so that tonality was part of what I wanted to play with.


All I had to do now was create something based on this drawing that wouldn't let her down.  And here is where I ended up...

With this project I really tried to listen and let the work develop (as I've done several times recently, with results which give me pleasure).  I tried to allow La Scapigliata to dictate what grew up around her.

I often allowed the piece to just sit on my craft table, and would stop by to gaze every now and then, to see what wanted to happen next.  So, for instance, when there seemed to be a need for some more dimension, I'd look for a charm or accent that would fill the space; when I started to get an itch to work up the background, I would set to work on that.

This is a real change in process, even from just a month ago, when I would pretty much have things planned out in my head before starting.  I'm astonished by the changes in what I make and how I make it, even in these few short weeks.  What a journey this stuff takes you on...

Really, I would have loved to work on a canvas - what more appropriate tribute to the Renaissance masters could there be?! - but I didn't have one, so I decided to pretend... making a 12x12 piece of Kraft cardstock into my "canvas".


From very early on, I had the three separate colour-fading twinchies (not quite 2 inches square, but very close) as well as the large version.  I was only messing around with the colour on the computer, and suddenly there were these three, gradually fading, versions.  I felt quite strongly that they should all be part of the work.

And the mesh also put in an early appearance, and established its position overlaying the three smaller pictures.  Somehow, it just felt right and interesting visually.


I think that that's related to a political layer of meaning for me.  I feel there's something quite provocative and interesting in having them 'caged' in a society which still tries to define and constrict women's roles and behaviours.

I sometimes worry about my beloved niece, Anya, growing up surrounded by the pink, fluffy 'girliness' relentlessly marketed to her, and on the other hand by the reworking of the 'raunch' culture, where oversexualised images, especially of women, pervade our society.

How and where do you look for the female role models which compare to the great Renaissance men that the other challenge asks us to celebrate?

Of course, the women are out there too - but you often have to work a little harder to find them and their stories.  That's why I loved hopping round the SSSaS Design Team projects with the strength and life and power of the female being celebrated both in general terms and in very specific personal projects.

So the quote and the words are just as vital a part of the project for me...  (and I guess that's a key part of what I'm really about - combining the verbal and the visual - it wasn't just a random blog title!)... the whole piece holds a message for Anya, and for all girls/women to be as magnificent and extraordinary as you are.  Dream, fly!


The quote had been buzzing around my head for a while.  I read the Diary of Anne Frank when I was her age (at writing), and a more remarkable and yet, at the same time, ordinary girl is hard to imagine.


I caught a radio programme about her a few weeks ago, and went online to remind myself of some of her writing - and this quote was one of the things I found.  It bobbed back to the surface when the 'Hey Girl' challenge came up, and seemed also to complement La Scapigliata perfectly - when you look at her face, I think you see an immensity of soul shining out of her.

It's stamped on to a piece of the Tim Holtz Crowded Attic paper with the architectural drawings, in a nod to the Leonardo notebooks with all their engineering and architectural plans and sketches.

Then for some rugged texture, it's backed on to a piece of rough brown textured card, ripped out of one of the seedling pots I've found so useful in crafting!


The engineering also makes an appearance in the gears - a girl can choose any path in life - and the pen nib is an obvious nod to poetry and words as part of the teeming soul.  The music darting around is another part of what's going on inside...


I gave the music a coating of the wonderful Rock Candy Crackle Glaze. Another great product from Tim Holtz and Ranger - I love it!  One drawback though: I did at one point try crackle glazing La Scapigliata, thinking it might look like an old painting that way.  Unfortunately, the printer ink is not 'fast' and started seeping yellows and purples.  I suppose really the drawback is with the printer ink not the crackle glaze - I take it all back, Tim!


I liked the metal accents of the jump rings - circles of life if you like, or just some pretty dimensionality! 

The mesh ribbon started to play a larger part in the piece, providing accents as an element in itself, but also as a stencil to add texture to the background and papers.

As the piece progressed, it became clear to me that it was crying out for a frame... but I was using the whole 12x12 sheet, so it would have to be large and square - not that easy to get hold of.  So I made it myself! 


I'm very pleased with how it came out, especially that lustrous gold gleam. You can find out more about what it's really made of in the "Making Of" section below!


And even though I wanted a 'proper' frame, I also wanted the elements to be breaking out of it, since there is 'so much' going on in the young girl's soul; so the mesh, the music, and the woven ropes (my disintegrating doormat again - how's that for a metaphor for breaking out of domesticity?!) flood over the sides of the frame.

I played with these positions for ages before I found out where they should be... in this splayed relationship with one another, echoing the angle of the torn backing paper.

So that's my Leonardo tribute, with a strong focus on the female.  If the technical stuff doesn't interest you, you're welcome to scroll straight to the quotes now... the next bit is mainly for the craft obsessives!

I'd like - just quickly - to show the background to you in a bit more detail, as so much of it is now - hah! - background, and therefore barely visible in the finished piece.  I layered lots of techniques, essentially just playing, and allowing it to build up.


There's some stamping with Distress Inks: you can see Kaisercraft Script and Music but mainly flourishes, brick and woodwork from the Tattered Angels Architectural set.  


I was using mainly Walnut Stain and Archival Sepia blended onto the stamp.  (I know, I know, shouldn't really mix probably - but so far I haven't vanished in a puff of smoke...)


There's also some stamping using thick acrylics, white and a very dark brown, dabbed onto the stamp with paper towel, to give a really dimensional effect.  


On some you can still see the bricks quite clearly; others are more impressionistic - and yes, I know that's the wrong artistic era for the great masters.  What can I say? -  I'm a 21st century gal - I like to mix and match!


I stamped the flourishes in Versamark Watermark and clear embossed them to give me a home-made Kraft resist effect.


There's some stencilling (using the mesh ribbon which had migrated onto the project from the windowsill, and was being pretty insistent about being included).

And the TH flicking technique, splashing water onto the Distress Inks which are reactive with water, and so give you great effects when the drops hit - you can let them run, or dab them up with kitchen roll.


For some of the solid colour, and to work around the resist areas, I used Distress Inks in Walnut Stain and Vintage Photo with a blending tool, and in other places I brushed on (and wiped off!) some gesso, to get those white highlights I mentioned right at the start.


So you end up with what Douglas Adams would call a WSOGMM (Whole Sort of General MishMash), to provide, I hope, layers of texture and depth to the overall project.


The need for a frame provided a whole fresh challenge.

At first, I thought I'd just stick it on a larger piece of card and paint/tissue tape/cover the edges.  Fortunately, I had ordered some 12x12 paper by post whilst staying here, so there was some packaging large enough to do the job.

But then I decided I really didn't want the 'canvas' standing proud of the frame... I wanted the frame to enclose the canvas, and therefore it needed to have some depth and substance.


Hurrah for Grungeboard, say I!  Who makes it?  Need you ask...?  The genius Tim Holtz has come up with the crafting material from heaven.  It's easy to cut; it's flexible; it can withstand any amount of painting, inking, distressing, embossing without losing its cool; it's made from recycled materials; it even smells delicious!  I'm not kidding - it's kind of marzipanny...


In any case, I had a packet of the Striped sheets, to which I gave a coat of my very dark brown acrylic.  Paint goes on to Grungeboard like a dream... great coverage.


Left like that, it was a bit too slick and dark, though, so I took an emery board to it once the paint was dry, and distressed the strips I'd cut it into, getting plenty of rough, light patches on the raised sections. I then used a blending tool to apply Tea Dye Distress Ink to those places, so that it got a lighter, rusty tone into the mix.  Final step was some very light spritzes of the Heirloom Gold Perfect Pearls Mist... gives it a great vintage lustre, just lifting the colour again, but with a lovely aged look, I think.

Here it is still at the background stage... I was pretty reluctant to start covering it up I must say!  But once my (Leonardo's) lovely La Scapigliata took her place, I was happy to go right ahead!


A long post today... but probably my last bit of crafting here in the Czech Republic for now, so I had to make the most of it!  I now have to brave the journey across Europe (taking several days, stopping with friends on the way) and, following advice from other addicts - sorry, I mean crafters - I think I will pack a small bag of emergency stash supplies in case the itch strikes en route!

I can't believe quite how the last few weeks have changed me and the work I'm creating.  I'm entering this not only in the Renaissance Men at Frilly and Funkie, and in Hey, Girl! at Simon Says Stamp and Show, The Fashionable Stamping Challenge who want us to 'Get Messy and Inky', but also as a second entry over at La-De-Dah, for Sarah Engels-Greer's My Mojo Monthly.  The July task/inspiration/prompt there was to try to show 'My Style', and I launched straight in at the beginning of the month (even though I'd only been going a couple of weeks with the blog by then) with a card which, at the time, I loved.

I still like it as a piece - and at the time it was a big step forward -  but while shabby chic still attracts me, it's certainly not where I want to live full-time.  And I seem to have taken so many more big steps since then.  I suppose the truth is that I'm still right at the beginning of my crafting explorations, and it's probably still too soon to be trying to claim that I know what 'My Style' is - but I think this project comes a good deal closer to somewhere I'd like to explore in more depth at this stage of the journey!  And, most importantly, I absolutely loved creating it.

I do hope you've enjoyed your visit today.  Thank you so much for your support; your lovely comments are so wonderful to receive, and to have such loyal and lovely followers is an honour and a joy.  It really makes the journey special...

It is good to have an end to journey toward, but it is the journey which matters in the end.
Ursula K. Le Guin

One's destination is never a place, but a new way of seeing things.
Henry Miller


Thursday 26 July 2012

Bottle of Butterflies

Hello and welcome (back) to Words and Pictures.  Thanks for taking the time to stop by.

I'm sharing an Altered Bottle today - and altered from clear glass to green too -  so without further ado... here it is on the right, my Bottle of Butterflies!

This project was kick-started by the photo prompt over at the Shabby Tea Room challenge this week:

I loved the delicate pinks and strong greens, and also I started to crave pink lemonade really badly!!

The colours reminded me straight away of the Pink Paislee London Market collection.  I've got it with me as I've been planning to alter one of the Ikea Moppe chests of drawers with it to go in the spare room here, which is all pink and rosy.  Haven't got round to it yet... three days to go - what odds would you like to give me?!

The B of B didn't really get started though until I was washing out one of the glass bottles from the light evaporated milk we like to put in coffee.  It doesn't come in bottles in the UK, so none of this would have worked out there!

The bottle is quite small (holds less than a pint, I'd say), and has lovely fluted ridges towards the top.  Unfortunately it's clear glass, so my first desire was to see if I could transform it to green.

I haven't any alcohol inks yet (well... that's to say, I do own some, having just completed an ebay purchase, but they're on the way to my UK address, and will almost certainly be there before I am... no good to me here, though), so I had to figure out a way of getting the colour to stay on the glass surface.

I have some Peeled Paint in a Re-Inker, so the very concentrated form of Distress Ink, and I tried dabbing it onto the bottle with some paper towel.  It looked sensational... but it wouldn't stay there.  Every touch wiped some away, and left me very green-fingered (and I don't mean in a good gardener type way).

Having seen how it looked, I wasn't prepared to give up though... so I resorted to my old favourite when I can't get colour to stay where I want it - emboss it on!!

I got plenty of Peeled Paint back on to the glass (no problem with it staying wet to hold the powder), and then tipped clear embossing powder over it - making sure I had the paper there to catch it underneath (been there, done that, spent hours trying to sweep it carefully off the craft mat!).

I then started to heat it, VERY carefully, as I wasn't at all sure that I wouldn't end up shattering the glass (though it's pretty thick).

I started with one hand held in front of my eyes, just in case... and in the end resorted to putting on my sunglasses, as the closest thing to protective goggles that I had (note to self: maybe buy some protective goggles?).  In any case, disaster didn't strike, and I was thrilled to end up with a glossy green glass bottle, in the bright tones of Peeled Paint.


Once I'd decided which papers from the collection I wanted to use, they pretty much worked themselves out in terms of which order the stripes wanted to go in.  The paper's nice and sturdy, which means it was quite easy to get it to encircle the bottle.  

I knew I wanted the word BUTTERFLY, obviously, and followed the nice arching of the word from underneath as I cut that strip.  That's over to the left here.


 I also wanted the butterfly itself from that same sheet, and his stripe needed to go at the top, as I wanted his top wings to float free of the strip of paper.


The gorgeous pink music manuscript, with composers' names and lovely swirly music cover embellishments, wasn't quite pink enough once it was set against the other stripes, so I put some ink from my Spun Sugar Distress Marker with some from the Tattered Rose ink pad onto my acrylic block and blended them together onto the paper to give it an extra embarrassed blush.

The two pink butterflies are cut from that same music sheet, and - in a reluctant concession to 'girlydom' I added some Rock Candy Distress Stickles, and some sequins to tone in with the overall colour scheme.

The little silver charms which make up the bodies of the butterflies were one of my best, best bargain buys: they came from The Works, who were selling packs of 6 craft embellishments at 59p a pack, but then at BOGOF (I'm not being rude... that's Buy One Get One Free), and then came an extra reduction to four packs for £1 - that's 24 silver charms for £1.  

Sadly, this was at the beginning of the year, and I idly picked up a few packs thinking they might come in useful for something dollshouse-y for my mother.  If I had only known what obsession was about to hit me for six, I'd have bought up the entire stock!!

The flower is made with a couple of the cardstock tattered florals I bought ready-cut from ebay.  I gave them a coat of pale pink acrylic, and then stamped them with my much-loved Prima 'wallpaper' stamp, the Alla Prima background - little flowers and leaves.  

It's stamped in Ranger Archival Sap Green (appropriate given the plant stems in the photo prompt!), but it's very delicate, and hard to see in the bright sunlight which has suddenly flooded the Czech Republic again today.  The whole thing's also got a generous spritz of Perfect Pearls Mist in Pearl.


The bow is made from the white gauze ribbon which I get for free every time I buy a box of the plain cream cards and envelopes I like, again from The Works.  They're a great base for cardmaking, and they come tied up all prettily in yards of this white ribbon.

I did my trick of pulling it through, pressing it under my thumb, against the Tattered Rose ink pad, to get that nice blush onto it (and onto my thumb).  

I've also used some of the Tim Holtz tissue tape - the butterflies from the Sketchbook set - right at the top of the bottle, pressing them into the ridges of the screwtop, and then giving them a swipe or two with the blending tool pad I use for green - which by now has a combination of Forest Moss, Bundled Sage, Sap Green and a bit of Peeled Paint all embedded into it.  I didn't even add any extra, just used up some of the spare ink soaked into the sponge!


You can get a better idea of the colour here.  I also wanted a sort of double bow affair... so, having placed a button (pink acrylic to the rescue again) as the centre of the flower, I added a couple of extra lengths of the ribbon, so that there'd be an additional 'layer' to the bow.

I'm so glad the sun came out for the photos of this one... it really allows that green glass to glow.


Thank you for spending some time here at Words and Pictures today - especially if you've given up some sunshine to be here!  I didn't realise that once the sun came out there'd be such a conflict between my desire to soak some of it up, and my desire to continue crafting.  Anyone who knows me, and my sun-worshipper tendencies, will understand what a statement that makes about the power of this addiction I've developed!


I'm entering this in the following:
The Shabby Tea Room challenge: Oh - So Pretty In Pink
Simon Says Anything Goes at the Simon Says Stamp challenge blog
Buttons and Bows over at The Craftroom Challenge
At the Anything Goes challenge there's a suggestion - Let's Not Be Square

A Muse Studio who are inviting us to have Triple the Fun, with at least one flower, one ribbon and one button on the project.

I'm making another entry to Top Tip Tuesday (for whom I'll be making a Guest Designer appearance shortly, thanks to my Big Top... watch this space) and their Circles challenge.  They also invite you to add a tip.  My first thought was: When using sequins... don't!  But I suspect that's not quite what they're after.  


So I think I'm going to go with my glass altering technique, with a strong Health and Safety caution: Make sure you have heat-happy glass - eg. would it withstand boiling water being poured into it?.  Apply Distress Re-Inker (for the concentrated colour) to the glass.  Add clear embossing powder and heat VERY CAREFULLY - protective clothing may be advisable.  No joke. 

Butterflies are self-propelled flowers.
R.H. Heinlein

The butterfly counts not months but moments, and has time enough.
Rabindranath Tagore

And to all my followers, old and new, an Irish blessing:
May the wings of the butterfly kiss the sun
And find your shoulder to light on,
To bring you luck, happiness and riches,
Today, tomorrow and beyond.