I'm travelling into a new way of working, a new country, a new language, and a new hobby which I'm passionate about. Come with me for some of the journey...

Showing posts with label 7 Gypsies. Show all posts

Tuesday, 29 March 2016

Encore - Nautical Salvage Plaque

Encore Posts
While I'm away, there are some scheduled posts with new creations coming your way, but I'm also taking the chance to do some catching up here at Words and Pictures.   Projects which made their first appearances elsewhere for Design Team duties or Guest Designer opportunities, but which only had a sneak peek here, are being gathered together in the pages of my virtual scrapbook.  I'm calling them "Encore" posts and they're formatted differently (all the way down the centre), so you can spot them easily.
Please don't feel that you have to comment all over again!

I hope you caught my new White Fire journalling pages in between all these Encore posts... If you missed them, you might want to visit the Golden Stained Glass over at Country View Craft Projects.

In case you're confused (and I wouldn't blame you), I'm now on the next leg of my travels - New York, New York, so good they named it twice... and I feel so grateful to get to go and work there twice!  I should have a bit more time to spare than the last time around, so I'm looking forward to that and to some sightseeing in Craftyblogland too.  

But we don't Press for another few days yet so, while I'm still busy with the shows, I'll just share this layered Nautical Plaque, which was created with the Calico Craft Parts.  Here's what I wrote back in June of 2015.
_____________________________

I used some of the Birchwood Plaques to create this - an Oval and a Rectangle.  There are various sizes and you can specify whether you would like holes pre-drilled or not.


My oval has holes so it's ready for hanging, but my rectangle is hole-less, making it a great substrate for layering.


Let's start with that rectangle... I gave it a coat of DecoArt crackle paint and then stamped and painted it.  I didn't plan it that way, but I noticed it was starting to look like an antiquarian map - something I love to pore over - so I decided to let it happen, and added more ocean tinting around the "land".


So then I changed direction with the rest of my plans.  I had thought I would go for quite an industrial grey-blue look with all the Mini Cogs and Gears, but with the old map looking so splendidly weathered I decided to go for a rusty look instead.


I applied texture sand paste roughly to the cogs, leaving some blank areas, and then layered paints and sprays until I liked the look of them.
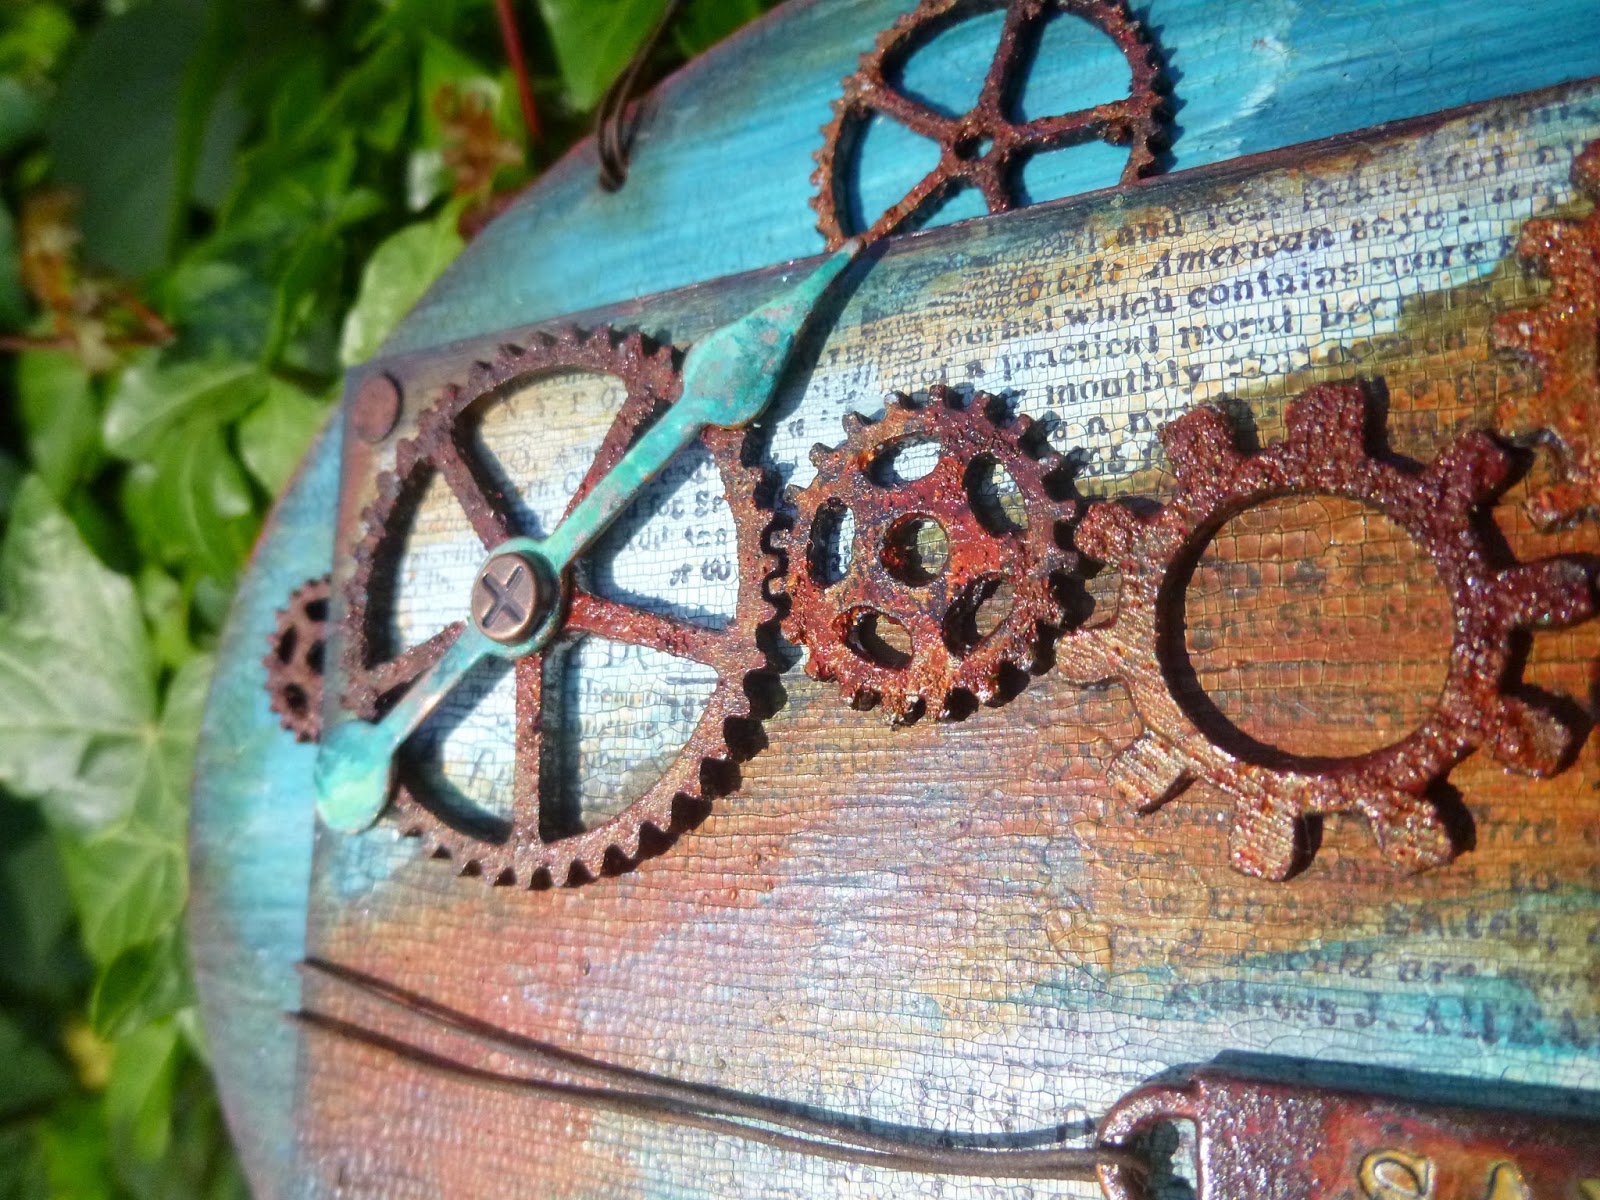

I added some metal pointers to some of them, as well as a couple of extra altered metal pieces.


As I tried to position the cogs on the plaque, I found they were covering too much of the map for my liking, so I decided to expand the whole project by a layer.


That's when I took the oval plaque and applied layers of paint and crackle to get a look of ocean waves and weathering around the edges.


Now I had some extra space to arrange my cogs, and it also created a great dimensional look.


I attached an altered WordBand with some of my trusty rusty wire, and there's also some rusty wire to hang it up by.


____________________________________

So there you have it.  Once the press performances are out of the way, I'm hoping to be able to meet up with Marjie Kemper as well as some of my other friends in New York, but there'll be time to catch up with all of you too, all being well.  Thanks so much for dropping in today, and I hope to see you soon.

The fishermen know that the sea is dangerous and the storm terrible, but they have never found these dangers sufficient reason for remaining ashore.
Vincent Van Gogh

Monday, 1 September 2014

A Nautical Box

Hello all!  It's the first of the month, so there's plenty going on today... I'll be back in almost no time with the new Our Creative Corner challenge (Update: now ready to be seen here), but first here's some inspiration for the new theme at Country View Challenges.


Our host is the wonderful Jennie, and she'd like to see your Nautical creations this month.

There's lots of inspiration from my fantastic team-mates over at Country View Challenges today, and as always we'll be offering up more ideas and projects over the course of the month.

Here's my first piece for you, a little nautical ATB.


I don't have very much in the way of nautical craft stash, but I remembered this lovely Legend stamp set by 7 Gypsies, full of markings from old nautical maps.

The background of the ATB was created just to use up the paint left over when I was making my dimensional dragonfly hanging.  I sponged it onto the surface with a natural sponge.


I stamped the nautical map markings in black archival.


There are measurements, and compasses, and labels for various seas and oceans.


I daubed on some Versamark ink and added a few grains of clear embossing powder in various places.

I like the effect you get of droplets of water.


The final touch was to line the edges with some thick white twine from my stash - the idea was to get the look of ships' ropes.


And that's your lot for now, but do hop over to Country View Challenges to see what my team-mates have been up to.

I'll be back later in the month with another Nautical offering, and later this morning with my Our Creative Corner offering, so I'll hope to see you again very soon!


Man cannot discover new oceans unless he has the courage to lose sight of the shore.
André Gide 

Wednesday, 26 March 2014

Birds in the Wood


Hi everybody!  

No Artistic Outpost bloghop this month, but we're all still creating away, so you'll find delights at all the DT blogs should you feel inclined to visit (links are all available on my Design Teams page just under the Words and Pictures heading).

I'm here with this week's AO creation, and I've been having lots of fun with a chunk of wood.


I've long been an admirer of the chunky ATC (the lovely Redanne, for instance, is always coming up with brilliant ones), but have never got around to getting any cut.  

This is not strictly a chunky ATC, as it's just an off-cut and not the right size (at around 5.5 x 2.75 x 1inch it's taller and less deep, I think), but having had such a lovely time playing with it, I'm definitely going to stock up soon!


All the stamping is done with the fabulous Birds of a Feather plate - it's become a springtime staple round here.

The base colour is a mixture of Sage and Honeydew Fresco Paints, and then the first step was to get the stamping in place.


I really enjoy getting things to go round corners and edges, and there's plenty of potential for that with a chunk of wood.


I did some inking through a stencil and clear embossed it for a touch of dewy shimmer.


Next, time for some texture paste. I mixed it with Peeled Paint Distress Stain on my craft mat, and then applied it through the leaf mask.


The two bird stamps are so deliciously detailed, and I love the texture you get from stamping directly onto the wood.


In many ways, the rougher the better, I'd say!


I also stamped the Gothic text from the same set anywhere I could find any spare space...


Final touches - some Idea-ology flowers and Finnabair brads altered with various paints...


... and a few tiny wooden butterflies, also painted and with a touch of iridescent shimmer added (not enough sunlight to really capture it, sadly).


There had to be some cogs and gears too, otherwise the flowers just looked too flowery, if you get me?  


Some twine wrapped around for that earthy, natural feel...


And finally, the sentiment, small in size but so important: Spring is here, attached as a tiny banner over the 7 Gypsies hardware.


Der spring is sprung 
Der grass is riz
I wonder where dem boidies is?

Der little boids is on der wing,
Ain't that absoid?
Der little wings is on der boid.

Known as Spring in Brooklyn - sadly, despite speculation, the author is unknown!


Thanks so much for stopping by.  It seems to be another busy week here at Words and Pictures... lots to get done before March goes out like a lamb (we hope!).  Plenty more to come before April Fool's Day!

Wednesday, 21 August 2013

The Ghosts in the Machine

Hello and welcome, everyone - and an especially big welcome to the newest followers... it's lovely to have you with us.

You've arrived just in time for the monthly Artistic Outpost bloghop, and our theme this month - to get you in the mood a little early - is Halloween.

Do hop around to see what my amazing fellow designers have been up to.  Here's the full itinerary:


Artistic Outpost has some delicious Halloween sets, but it so happens that I don't own any of them (yet!), so I got creative with some of my other AO stamps to create my ghostly tag.


To be honest, I've always found the little girl from the Kudzu Kafe set more than slightly unnerving, so she was my first choice.  


And I figured, well, if one of her is unnerving, how spooky would several of her all at once be?!


I started by sticking a book page to a tag, and then used Linda's technique of stripping away some of the text using masking tape, so that it would be even more distressed and shabby.

Then I gave the whole thing a rough coat of gesso so that the stamping would show up better.


I stamped the little girl in black Archival, and then stamped her again on another piece of paper so that I could cut a mask to use.

I layered up several versions of her, using second and third generation stampings to get varying ghostly transparencies.


I played with Distress Stains and a water brush to tint the main figure.  

Those in the background got a touch of colour too, but again, in paler and paler variations.


The little phrase was hovering in my mind - I've Googled it, and it doesn't seem to exist as a quote, so I suppose I must have cooked it up myself... 

There's something in it about those internal voices, or the other versions of ourselves that hover in and out of view at various points in our lives, haunting us with the possibility of other life choices we might have made, or might still make.  


The larger tag behind has actually been sitting around since April - it was one of my experiments with the Metallic Distress Paint background for Tim's tag that month.  It wasn't quite right for my tag at the time, but I still quite liked it, with all those swirls of Pewter shimmer.


Since I was working with spooky blues, it suddenly became clear that maybe its time had come.  I added some text stamping using the book text from the Bluebird set, so that it would match up with the book page background of the smaller tag.


And having added text to make the large tag more like the small one, I then added some blue inking and some Aged Silver Frantage to the small tag to make it more like the big one... 

The Frantage is sort of like internal ectoplasm, maybe?!


The cogs and gears arrived because the other words running around my head were "the ghost in the machine".


It's a phrase used in philosophy to question the notion that in some way our mind and body operate separately - as though the mind were somehow a separate entity trying to tell the body (machine) what to do, and not perhaps always with the body's best interests at heart.

With all my internal ghosts, it seemed right to add some machinery for them to operate.


A little topper of broad white paper ribbon and satiny grey ribbon tied together with some of the Idea-ology paper string is the finishing touch.


So there's my slightly off-beat, philosophical Halloween tag... Do go and have a look what my team-mates have been up to - I promise you won't regret it.  If you get lost along the way, you'll find all the details here.

For now, thank you so much for taking the time to stop by, and I'll see you soon somewhere out there in Craftyblogland.

The past is a ghost, the future a dream and all we ever have is now.
Bill Cosby

She walked with a ghost of herself, one full of potential and possibility. One who was fearless. Where had that girl gone?
From Vision in White, by Nora Roberts


Saturday, 11 May 2013

Inspired by... Part II


Hello and welcome all.  And now, for something completely different.  Cups of coffee at the ready, please - or perhaps take it in stages... it's a biggy - well, it's nine weeks' work!

And Simon Says Stamp and Show have really timed this one well.  Their Inspired By challenge has already helped me in the midst of a little wobble (more about that in Inspired by... Part I, in case you missed it), as have all your warm and supportive messages - thank you so much.

But it also coincides perfectly with me fulfilling my promise to fill you in on some of what I've been doing here in the Czech Republic for the last nine weeks.  I said I'd try to do it before I leave CZ... well we're off this afternoon, so I've just made it!

I've been deploying my crafting skills, not to mention inks, stamps and paints - and even some craft design papers - in a slightly different direction... and it's all been inspired by one person: my mother.

There, I've said it - if the ick factor's too high, then move on now!!  Some of you may know her as Cestina, and I know some have visited her blog, and you're following her side of the story and you've seen the projects she's been busy with ... but now I'd like to share some of what I've been doing.


Dollshouses are really her hobby, but I have always joined in - for instance making most of the meat and much of the fish for Peacocke's... a rather upmarket butcher's and fishmonger's shop - all done years ago.


Slices of bacon... not the easiest thing to make out of Fimo.  Making the kidneys made me feel slightly ill.  And because I don't like fatty meat, I made all the joints ridiculously lean, and had to correct afterwards with paint.

I like to think I'd do it better these days.


The ice on the fish slab is broken car windscreen glass - because it's safety glass, it smashes into little cubes, perfect ice cubes.  We scrabbled on the car park floor at Cockfosters Underground station at nearly midnight (having just got off the tube) for these, to the consternation of several passersby...

Spot the mussels and prawns!


Now, all this may not precisely count as papercrafting (it may not even qualify for the SSSaS challenge, but that's not important - it's just a chance to share the fun), but it's certainly closely related - particularly the way I do it now, with my new found skills and crafty products!


We've been preparing Cestina's dollshouse - or dollhouse, as I know the Americans amongst you prefer - collection (the sum of more than 40 years collecting - hoarding, some might say) to open as a small museum here in the Czech town where she lives for half of each year (not far from where her mother was born and brought up, but had to leave in 1941, emigrating to England).


Many of the houses had been in storage in our slightly tumble-down garage for more than a decade, so there was some serious cleaning and restoring to be done.

In addition, many of them had never really had the intended care and attention lavished on them.


Now, at last, they have a home worthy of them; we have space to work; and plans and ideas which have been on the shelf for decades can finally be put into practice.

I'm going to fill you in on how just a few of those plans have turned out.

Details of stuff I'm not talking about can probably be found over at Cestina's Dollshouses.  If it's not there yet, it soon will be!


I've got lots of before-and-after pictures... it's probably the element of transformation which is most exciting to me in the work.  Bear in mind that this is a working collection, rather than a finished, polished museum... there will always be more to be done, and things to be added.  Almost everything I'm sharing today is work in progress.

In fact, I'm not sure a dollshouse is ever "finished"... there's always more to do; some little extra texture to add, just as in a real house.  But some of these are more "finished" than others!!


So, for instance, in the last nine weeks, I've turned this... a homemade house, made out of a tea chest, decorated in the most extraordinary 1970s wallpaper scraps, and given to my mother by a kindergarten group who didn't have the space for it...


...into this... a nineteenth century Colonial bungalow.  We're still arguing about whether it's in Africa or India, but that's okay: all the final detailing - maps, photographs, papers etc is still to be done.

The gentleman's residence is essentially very simply furnished but, like our German friends in the diplomatic service, he does travel to his postings with some home comforts, as you'll see.


Obviously paint played a big part in the transformation, and some straw matting with a coat or two of woodstain makes a wonderful roof.  The straw was rescued and hoarded from a puppet theatre my mother made for me when I was about 5 - so nearly forty years ago. 

But I'm also very proud of my first attempt at a handmade floor (wait till you see what I did once I'd had some practice!).

The verandah floor is made from cardboard, stamped with the Kaisercraft woodgrain stamp, and doused in some wood dye.

I cut the card into strips and mosaic'd them together.  The same "planks" are in the hallway, while cork tiles do service as "exotic flooring" in the main rooms.


This is what will become the bedroom.  Mmm... lovely wallpaper - and imagine how large those flowers would be full size!


I'm also very happy with my mosquito net - fashioned from some old net curtain, and the wire from the top of a champagne bottle (okay, it was Bohemia Sekt - the Czech equivalent of Cava or Prosecco), painted with enamel paint.

From the decanter and two goblets, it seems that our man - a bachelor, who left England having suffered a broken engagement - is not above entertaining company in the bedroom.


This is one of the most inspiring things about my mother's approach to the hobby...

She's never had lots of money to spend on it (many houses were picked up for peanuts at auctions, or more recently ebay, or - as with this one - handed over for free), so she has become adept at taking ordinary household objects or leftover bits and pieces and turning them into part of her miniature world.

It does mean that there are now two of us hoarding the most unlikely odds and sods, ready to use them in our respective hobbies!


So the cork tiles are odd ones that have been lying around for ages.  The tiles around the fireplace are cut from some bookmarks and leaflets from an exhibition.

The tiny cushions are made from material samples and swatches (made by my aunt, Mette Breminer - as was the bedding in the bedroom, out of an old linen tablecloth and some hankies).

"One must, of course, always travel with the family silver."


In the kitchen (note the mottled walls - tried not to breathe while I wiped away whatever it was! - and the dessicated spider hanging over the door)...


... we now have a table mat as the straw floor, a balsa wood counter, but no cooking range yet, I'm afraid.  Until I'm back again - I hope early next year - they'll have to make do with the little burner.

"One simply can't get the staff these days."

A sneaky little view of the hallway here too...


And the study is where the business of the day takes place.... a desk for meetings, one for private correspondence, and one for the new-fangled typing machine.  I whittled the pencils from some straw matting strands.


"I'm awaiting delivery of the trunk containing my school photographs - Harrow, don't you know - and my other paraphernalia.  Until then, I'm afraid the place looks rather sparse."


I also had a great time completely making over our Cape Cod house.  From the outside this weatherboarded beauty looked the part, though I have repainted the roof, shutters and front door.


Goodbye green... hello Weathered Wood Distress Paint (the shutters - not the whole roof!).  I've still got work to do on repairing the weatherboarding itself.  And you'll notice there are no actual windows yet in the new version.

The old ones were made by sticking wood to acetate, but the acetate has now gone completely yellow.  Making new ones is going to have to wait for another time... my focus was on the interior.


It's not always easy to get at the insides though!


This house was certainly bearing the scars of having stood in a garage for more than ten years.  I gave it a complete re-papering and re-flooring makeover.

And pre-garaging, the inside had been filled with various bits and pieces of furniture which really didn't fit the bill to my mind.

I'll admit to being heavily influenced by Hollywood versions of Cape Cod houses (for instance, the glorious one in Something's Gotta Give - oh, dream house!).

I've still got lots of work to do on gathering the tiny things that add real life and texture to a house, but I'm pleased with where I've got to so far.


The floor downstairs is the pine base on which the house is built, whitewashed with white woodstain, and then the boards were painstakingly drawn on by hand.

The pale grey wallpaper in the living room - which seemed somehow very USA to me - is wrapping paper from the cheapy shop!  The beautiful irises in the bedroom are printed off the internet.  Most of the rest come from the hoard.


I also ripped out one whole wall and created a new one with an arch through instead - open-plan living, American style - using, yup, plain old recycled cardboard off the back of a sketchbook!


Now, to the furniture.  I've been putting all that distressing training to excellent use.  I took the mass-produced plastic furniture (how come they always make the "wood" so orange?) and applied my painty techniques, including crackle and dry brushing and so on, to create a houseful of shabby chic wood furniture... light and bright and airy.  Lots of little pictures: do click for a closer view - if you're still awake, that is...


The dining room furniture had the full crackle treatment.

First a coat of dark brown acrylic... then crackle glaze, some white acrylic, and watch the magic!


Or just a coat of paint and some dry-brushing for the highlights.


And even the pieces that are made of actual wood can just be a bit much... time to get painty.


I've always wanted a desk like this (in real life, I mean) - but the shabby chic version please, for me.


Basically, this dollshouse lark is about creating houses I will never get to live in in real life, isn't it?!

And, um, yes... that would be me in the tiny photograph, aged about three, I think!


More beautiful bed linen sewn by my aunt, Mette, with the tiniest stitches you've ever seen - and made of a handkerchief... very fine material, you see, so it works brilliantly in this scale.

Vintage Photo distress ink - of course - to shabby up the lacy rug in the bedroom...


Vintage Photo and Walnut Stain also worked brilliantly to create a bit more life in the brick paper used in the external transformation of this rather lurid house...


... into this highly typical piece of North London architecture.

It's going to be a pair of bedsits inside, and fairly rundown, so I didn't want it looking too pristine.  

The inking brings a touch of weathering to the bricks that is really helpful in starting to paint the picture of a property where the landlord doesn't exactly get right on the job when you call him.  A long way to go on this one, but I'm pleased with the outside.


Time for my pièce de résistance... the handmade floors in our large Edwardian house.  It's actually an American kit house, made by the Walmer company, later taken over by Greenleaf.  (Regulars will spot my Tick Tock altered clock now happily on the wall.)

First of all, let me show you the floors in all their completed glory!!


I love this house and all the things in it... we put it together, decorated it and added all the wonderful little touches throughout my teens.  

Even though it didn't ever end up in the garage, twenty years had taken their toll, and a full scale redecoration was needed.


If you're a WOYWWer, you already know that I used some 7 Gypsies paper in this house for the living room wallpaper.

And the fireplace was plain wood, so I got out the paints to "convert" it into marble!


And I also created the wood panelling you see in the music/school room out of - yes, it's here again - plain old cardboard!


I'm not going to show you inside the whole house, it's too huge... you'll just have to wait for Cestina to get round to this one!   It's the floors I'm really proud of.


Many of the papers we already had in the hoarded stash, some are craft papers, or downloaded from the Internet and printed out. 

But when it came to floors, I was very dissatisfied with most of what we had available.


I wanted something worthy of this house I love, but short of spending a great deal of money on the beautiful floors which do exist, but cost a fortune, there was only one option... handmaking the floors myself.


So it was kraft card to the rescue - some sheets of the PaperMania 12x12 Basics Kraft Card which, in a stroke of genius, has grids and lines on one side of some sheets.  

This was the breakthrough which would enable me to cut thousands of individual parquet tiles with some precision.


First though, it was back into action with the Kaisercraft woodgrain stamp and the Coffee Archival ink.  Then cutting into strips, and finally into the tiny tiles (about 1.5 x 0.5cm each).

Once they were all stuck down (oh, how quick to type; oh, how slow to do!), I used Vintage Photo Distress Ink to bring them to life, and then a coat of matte varnish both to seal and to finish the look.  Safe to say, I'm thrilled with the results.


And I'm possibly even happier with the boards upstairs in the main bedroom and nursery.


Simpler and quicker to lay than the tiles, obviously; and this time inked with Walnut Stain before the varnishing for a deeper, darker look.

Worth the effort, I think!


It's already a marathon post, and I haven't even touched on the makeover of the tiny 1/24th scale house (interesting trying to wallpaper when you can barely get your hands inside)... 

...or the paper-embossing I've been doing ready to do some pargeting on our Essex pub-to-be... 

...or the bay window I built out of balsa wood for the Georgian house Cestina was working on, and where a troupe of performing mice have just moved in... 


...or how I used texture paste to plaster a new chimney for our medieval thatched cottage (yup, genuine straw, and it's just been rethatched by our Dutch friends who came for a week to help out)... 

...or the stamps I used to create the signage for our French patisserie Chez l'Artiste (upstairs is an artist's gallery with a rather scantily clad model sitting for her portrait).

I'm leaving all those delights to Cestina over at Cestina's Dollshouses... 

And I'm sure she'll also let you know how it goes when we open to the public for the first time on Saturday morning (before I head back across Europe to the UK).


I just wanted to try to give you a taster of some of what I've been up to, and share some of the challenges and the fun inspired by this amazing project of my mother's... an extraordinary woman who is an inspiration to me in this work, in her adventures into a new (even though familial) language and culture, as well as in more ways than I can possibly say.

I'd like to enter this into Simon Says Stamp and Show's challenge Inspired by...  yes, my mother (though a rather more conventional option will be along tomorrow if I get finished).

Two Tim Holtz stamp sentiments to end with:

It's the little things that make life big.

And one which is unbelievably appropriate for Cestina.  You wouldn't believe how often I heard the phrase, "I've never seen that before in my life", as we were unpacking and sorting 40 years' worth of collected miniatures, so this is perfect:

One of the advantages of being disorderly is that one is always making exciting new discoveries.

Any hint from those quotes as to who might be in the frame for Inspired by... Part III?  See you soon!