I'm travelling into a new way of working, a new country, a new language, and a new hobby which I'm passionate about. Come with me for some of the journey...

Friday, 7 September 2012

The Fabric of our Lives

Hello and welcome!  I'm finally allowed to share some very exciting news with you... a week ago, after my Guest Design slot, the Fussy and Fancy team got in touch and invited me to join their Design Team full time - I was completely over the moon!  Oh, and I said, "yes, please"...

So here, just a week later, I'm offering up my first Design Team piece as part of their new challenge for this fortnight, The Fabric of our Lives.  The challenge is to use fabric as part of your project, but with a title like that, I'm afraid my brain goes into word-world and comes up with all sorts of extra layers of meaning.  So, as well as actual fabric of our lives, I've got some metaphorical 'fabric of our lives' in the mix.  All will become clearer - but first, the card:


So what goes to make up this card?  And the larger question: what does make up the fabric of our lives?  The quote that popped into my head was: A house is made of bricks and beams; a home is made of hopes and dreams.

So there are the concrete materials which make up the places where we live, and the abstract things which make up our internal lives.  And that's how the little houses became part of the game.


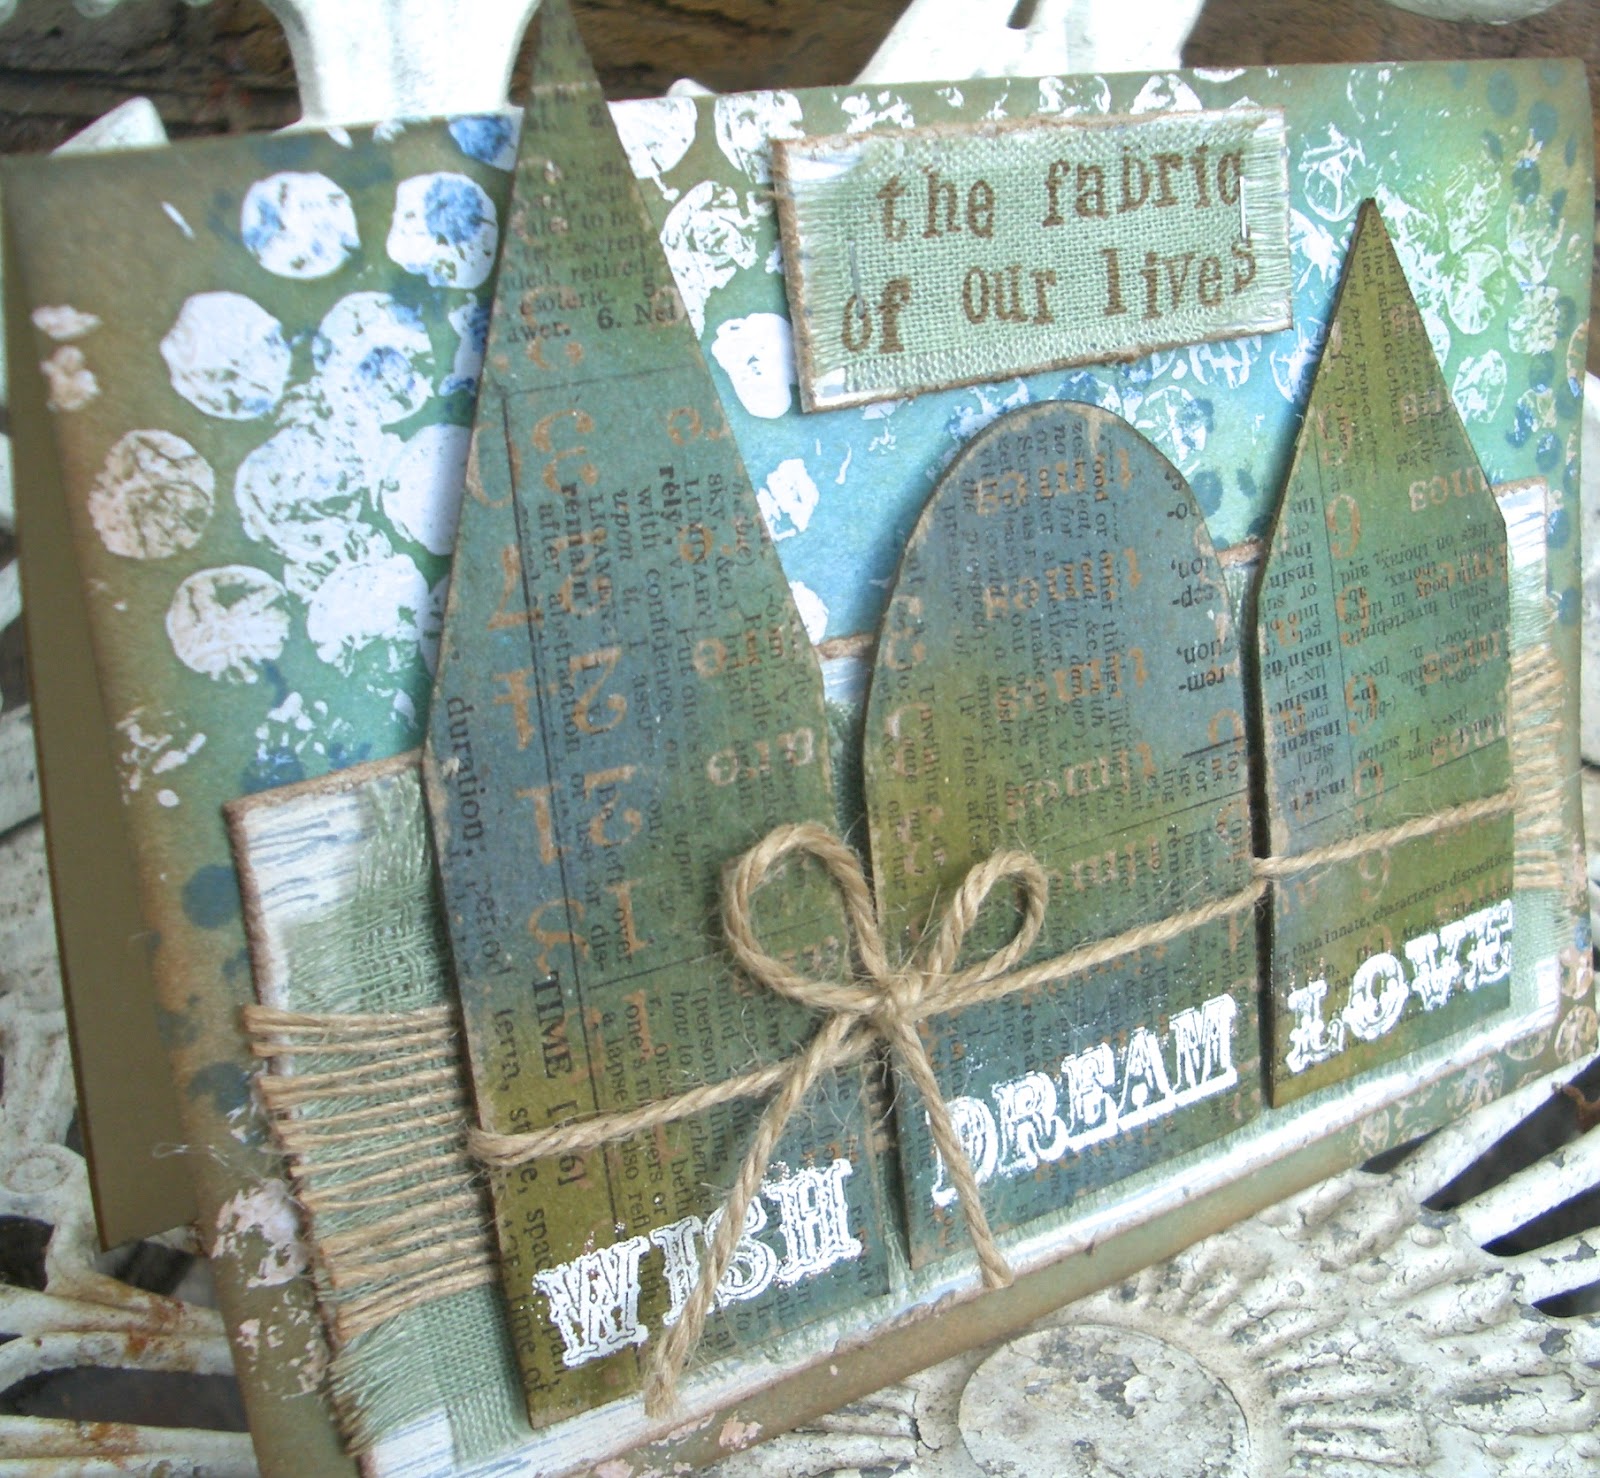
First things first, the background: this I used the Multi Medium resist technique on, painting some of the medium onto actual bubble wrap and 'stamping' it onto the white cardstock.  Once dry, I stamped some Tim Holtz Ultimate Grunge dots in Cobalt Archival, and then inked it up with Broken China, Peeled Paint, Faded Jeans and some Vintage Photo round the edges.

A spritz of water on some kitchen roll, a quick wipe, and your bubbles shine through again, having resisted the ink.


The fabric I used really has been part of the fabric of our lives. Sharp-eyed followers may recognise it as having formed both the table runners and sashes for the chair decorations at my brother's recent (handmade) wedding.

We've got a lot of this stuff still hanging around at the moment, more than I could ever use however long I carry on crafting!  But it seemed highly appropriate to use some for this card - so that partly dictated the colour scheme.


It's backed onto some thick chipboard, painted with white acrylic, attacked with the TH Paper Distresser, edged with Vintage Photo, and then stamped with the Kaisercraft woodgrain stamp in Weathered Wood DI, so that there's another 'building' material in there (my favourite one - if I could have a wooden house, I'd be very happy!).

And the top layer of this element is some lovely, wide burlap ribbon from the Funkie Junkie Boutique.  I hope it doesn't say something about the fabric of my life that I found it necessary to distress and fray the edges of all my material(s)... hope I'm not unravelling!

If I am, I've now got the perfect thing to hold everything in place - I spent my recent winnings from a challenge on a Tim Holtz Tiny Attacher ... look, baby staples!  And so easy to use.


The little houses are cut using the TH Artful Dwelling die, and show another version of resist... This one uses the TH Kraft Resist paper, inked with similar colours as the background (but you get different shades since it's on Kraft), and then stamped with some of the abstract things which make up the fabric of our lives - Dreams, Wishes and Love.


The words all come on one TH stamp, but I used masking tape to separate them so that I could have one word at a time.  They're stamped using clear embossing ink, and then a bright white embossing powder.

The Kraft Resist paper has a resist 'built in', so that again you can wipe away the ink to reveal the shiny kraft colour beneath.  I think it's a great effect - I've used it a couple of times recently...


Once it was all stuck and dried, I used some sandpaper to roughen it up a bit.  I'm a big fan of the 'lived-in' look, and I love the texture and weathering you get with something as simple as an emery board.


The houses are stuck down with padded tape to lift them away from the surface of the card even more.  Something else that helps with that is the rustic burlap twine I've 'woven' around them, and tied in a simple bow.

I know it's not usually done to use the title of the challenge as your sentiment, but it just seemed utterly appropriate, given how the piece had grown out of it so directly.  


I stamped directly onto a piece of the fabric using Coffee Archival and my little £1 alphabet set (best buy ever?), and then backed it onto another bit of chipboard, treated the same way as the main backing piece.

And it's held in place by some more tiny staples.  (Sewing machines and I aren't on speaking terms, so sadly I can't manage the stitching I so admire in many of the projects I've visited, but I'm good with the staples.)


So there you have it... If you'd like to join in the challenge, hop over to Fussy and Fancy, and you'll find lots of amazing inspiration provided by my fellow team members (big proud smile!).  For now, thank you so much for visiting Words and Pictures today.  It's so great to hear your comments, and I will always try to return the visit if I know you've been.  Hope to see you again soon, here or elsewhere in Craftyblogland.

I've always loved a challenge.
Lana Turner

Life is challenging, but I'm always up for a challenge.
Venus Williams

I'm also entering this for the following:
Simon Says Stamp's challenge this week is Put A Stamp On It
Tuesday Alchemy are having an Anything Goes challenge
Anything But Square over at Allsorts... I've got a rectangle with lots of other shapes as the focus on it
ABC Challenges have reached W for Wishes - mine are the wishes and dreams that guide your life
Since I don't really expect my Friendship tag to qualify properly for the draw, I'm popping this into the Sunday Share over at Frilly and Funkie, having bought the burlap ribbon from the Funkie Junkie Boutique

Wednesday, 5 September 2012

Friendship Tag


Hello all, a very warm welcome to you all, and an especially big welcome to the new followers - it's an absolute pleasure to have your company for the journey.

I've got a little something today using a Stampsmith stamp which delights me... she's called Serena, and the piece is inspired by this month's Stampsmith challenge Bags and Tags.  It's a tag in a bag!

I used a tissue bag which actually came as part of the packaging in a delivery from the Funkie Junkie Boutique - waste not, want not, you know!  It's quite shiny so I wasn't sure how well it would take the images, but I'm delighted to say it worked very nicely.


I think it's such a beautiful image that the only stamps I was prepared to use alongside it were from my favourite floral set, the Autumn Leaves silhouette branches.  I like that they're slightly thorny, not straightforwardly 'pretty'.

Serena is stamped in Color Box Archival in Khaki Green, and the stems are in Ranger Coffee Archival.


As well as being shiny, the bag is also translucent, so there's a lovely ghostliness to the image... according to the light she's either there or not quite there, a quality which I love!


On the tag inside, the Serena image is stamped in the same ink, but this time onto tissue paper.  I did some wrinkle-free distress on the tag surface using Bundled Sage and Frayed Burlap, so there's a textured inkiness already there... and then I glued the tissue-stamped image down, getting some actual wrinkles involved as I did so.


(I tried to keep Serena's face relatively wrinkle-free, however - a girl's got her pride after all.)  I love this technique which I discovered while playing recently.  It gives a great vintage look, almost like fabric.


On the reverse of the tag is another Stampsmith stamp, this time a quote very close to my heart.  I've always loved it and was so happy when I saw that it was available - it's pretty time-consuming to stamp such a long sentiment letter by letter!


Again, I've stamped it on tissue paper, and before sticking it I blended some Bundled Sage over the tag first.  I edged the tag with Frayed Burlap, and I also wiped it lightly over the creased surface of the tissue paper to highlight the wrinkles a little.


The tiny rusty heart here, and the one on the outside of the bag, are cut from some rusty experimenting I've been doing as part of the Andy Skinner Timeworn Techniques course online.  (You can see the results of another experiment here, and there'll be more to come I'm sure.)


In fact the tiny tags are also backed onto the rust, but I forgot to turn them over so that you could see.  And on the back of the large heart it says "LAUGH", since that's the most important thing for me within a friendship...  The words are stamped with another of my £1 alphabets - incredible bargain buys from The Range; I have three different fonts.


I attached them with very fine burlap twine, as the piece seemed too delicate for the bulkier regular one.


I loved making this, so I'm thinking it may not be my last entry in this month's Bags and Tags challenge!


I'm entering this in the following:
The Stampsmith's September challenge Bags and Tags with a Stampsmith stamp
The Fashionable Stamping Challenge at the moment is Anything Floral or Handmade Flowers
Simon Says Stamp would like us to Put a Stamp On It
Hels Sheridan's Sunday Stamper challenge is Stamped Flowers at Ink on my Fingers
It may not qualify, as I didn't actually buy the bag, but it did come from the Funkie Junkie Boutique, and so I would like just to share it at the Sunday Share at Frilly and Funkie
Another go in the Heck of a Challenge inaugural Anything Goes

The most I can do for my friend is simply be his friend.
Henry David Thoreau

Friends are those rare people who ask how you are and then wait for the answer.
Anonymous

Friendship exists, clear and absolute from the beginning.  You don't make friends, you recognise them.
Isabel Paterson

WOYWW 170

I'm going to post and run, I'm afraid (two posts in fact if you fancy a browse...) but our lovely hostess Julia Dunnit at the Stamping Ground feels brevity is the soul of wit for these What's On Your Workdesk Wednesday posts, and for once I'm going to oblige.  Here's what's on my workdesk today... and if you visit Julia's list, you can go and visit lots of other crafty workspaces, and nose around to your heart's delight!


I'm doing the Andy Skinner Timeworn Techniques course online at the moment - and this is  something I'm in the middle of applying the Verdigris, or Aged Copper process to.  


It did look like this to start with, so it's going okay so far... but there are at least three more stages before I'm done!


Have a wonderful W, especially if you're hopping, and I'll try to catch as many Ws as possible later today...

The things most people want to know about are usually none of their business.
George Bernard Shaw

Monday, 3 September 2012

Musical Notes

Hello all - so happy and grateful you stopped by.

I've been quite a busy bee recently creating things for other people for weddings and birthdays and so on.  So on Sunday morning I decided I was going to make something just for me... and here it is, a music book...


I've been so enjoying working with Tim Holtz's Kraft Resist techniques, and absolutely love the results.  There's one particular 12x12 paper that has always attracted me, but I've never known quite what to do with it.  On this particular morning, it suddenly became blindingly clear to me - cover a music book with it... so I did.

Since I'm entering this in the Compendium of Curiosities Challenge I can't go into details about how I treated the paper... you can find it all on page 41 of the book or you can check out the man himself in action by clicking the video link in my previous entry for the challenge.


However, even a 12x12 wasn't large enough for this book, and I didn't want to use up two sheets of my stash on one book, so on the back I created my own version of the Kraft Resist paper... and I think it's probably within the letter of the law to tell you a bit about how I did that.

I absolutely adore resist technique - something so relatively simple achieves really gorgeous results.  Essentially you create a resistance to ink, allowing you to blend and stamp as much as you want, and you can always get back to whatever you've resisted with.


I'm very happy with my bluebird... he's on the paper anyway, but I had a lovely time getting the colours right, and embossing his face.


Love his shiny beak and beady eyes!


A resist can be anything non-porous - you can use clear embossing, multi-medium or other glues, acrylic paint (once dry).  As long as it's non-porous, ink won't soak into it - that's to say it will resist the ink, and remain untouched.

Well, not necessarily untouched, but protected enough that if you wipe over afterwards with a damp cloth, the resist will be revealed again shining through whatever you've been doing over the top.


I used an embossing resist for my paper.  I stamped various images in black archival onto some kraft cardstock.  Then, I stamped my Kaisercraft manuscript music in Versamark Watermark, a clear embossing ink, and embossed using Ranger Clear embossing powder.  That provided my resist on my homemade Kraft Resist, and from there, I'm going to have to let you use your imaginations or I'll be breaking the other set of rules!

I cut down the edge of Tim's paper with some decorative scissors so as to have the boundary between the two papers be less straight and brutal.

I used Multi Medium to stick my papers to the book covers, and then used tissue tape to give the whole thing a 'finished' look.  I love tissue tape, so I was determined to have it on this "me" project!


And since I'm a WordPlayer, I had to have some wordplay on the cover, so this book will be for notes about music, songs and lyrics, but also possibly for some notation - some actual musical notes - so the title covers it both ways.


It's stamped onto some music torn out of an already-falling-apart songbook, and inked with - guess what - Vintage Photo Distress Ink... well, I wasn't going to leave that off a project that's for me!

The treble clef is the Memory Box die which I've embossed with some Vintage Photo Distress embossing powder for a rusted look.


I'm absolutely thrilled with the outcome - it not only pleases me visually, but it has lovely texture too when you hold it (another benefit of resist technique).

One of the many things I love about it is that you get very different effects at different angles of light - but that's quite hard to get over in photographs, but I hope these show you something of what I mean...


And I'm happy I made the effort to really get the papers down into the ridges either side of the spine... it wasn't easy to get it to stay put, but definitely worth it in the end.

Thanks for dropping in to Words and Pictures today.  It's always a pleasure to have some company on the journey, and your lovely comments honestly make my day.  See you again soon, I hope!


I'm entering this for the following:
Simon Says Stamp and Show are asking us to Read All About It
Our Creative Corner are daring us to Resist the Resist - I can't - and to add some Wings
Lovely Linda Ledbetter extended the Kraft Resist challenge for another week over at Studio L3
And for a hatrick on the Resist challenges, I'd like to add this to Frilly and Funkie's one too!
Crafty Cardmakers are having a challenge calling for Winged Things
Even though I forgot the 'before' picture, I'd like to enter this for the Alter It challenge at The Stampman
Gingerloft are having a challenge called Birds of a Feather for this fortnight
And I 'd like to make another entry for new challenge Anything But A Card and their Anything Goes

No bird soars too high if he soars with his own wings.
William Blake

Be like the bird who, pausing in her flight awhile on boughs too slight, feels them give way beneath her, and yet sings, knowing she hath wings.
Victor Hugo


Sunday, 2 September 2012

60th Birthday Album

Hello all, and a happy Sunday to you...  So glad you've found the time to stop by.

I'd like to share some pictures with you of an album I made for my uncle for his 60th birthday.  You've already seen the card, made on mountboard, to be framed and hung.  There's also a Configuration Box which was a joint gift for my uncle and aunt together (she'll also turn 60 this year), and which I'll share some time soon.

This album I made over the summer, with pocket pages which could be filled with stories, memories, pictures and memorabilia... Last week we, as a family, gathered those bits and pieces, copying, printing, and then I did some distressing to all of it, so that the whole thing could be handed over on Bank Holiday Monday at the party.

So here it is...

It's handmade completely from scratch, using the BoBunny Weekend Market papers.  They're lovely strong cardstock, so I was able to use just the papers themselves, folded and adhered, to make the pocket pages.  


I folded a half page of card into zigzags to provide the structure onto which to glue the folded pages - I hope that you can see what I mean in this photo on the right. I then also used glue tape along the bottom edge of the folded papers, et voilà - pocket pages!

For the covers, I stuck the paper to some mediumweight chipboard, for added sturdiness.  I've used Weekend Market for a masculine album before - I think it works really well.


I made the spine using a faux-leather technique which I first came across in this video by JAnnB Designs.  I love the texture.


I kept the 'leather' quite loose as I glued it, so that there'd be plenty of leeway for opening the album up.


Let's take a quick spin through the pages.


Each pocket uses a different paper from the collection, and there's additional stamping on some.  For each of them I made a co-ordinating tag, decorated front and back, and either the page or the tag - or sometimes both - has a sentiment stamped, and usually embossed, onto it.  (As well as that, on each tag I then handwrote a quotation we'd specially selected for my uncle on his 60th - but those are not there in these photos.)  I'll leave you in peace to take a look...


Oh, sorry, just one thing... I wanted a nice neat finish to the album, so rather than put ribbons or tabs on the tags themselves, and onto everything else I knew would be going in the pockets - which could have ended up looking a bit messy -  I cut a little triangle opening into the top of each pocket so that you can pull out what's inside easily.


I'm back!  Hope you managed to navigate your way through the album pages. 

Most of you will have recognised that most of the stamps are Tim Holtz, with a sprinkling of Pink Paislee and 7 Gypsies ones thrown in, also my favourite Autumn Leaves silhouettes.


There's a good tag example here at the end: the perched birds, here on the left, are on the reverse of the Journey tag, and - once flipped over - there they are in flight in the picture to the right, with the embossed Journey sentiment.


And in this final photograph you can see the pockets with all their extra stuffings, though I haven't shown you those here, because it's mainly very personal and therefore private.

This album was such fun to make, as the papers are a real pleasure to work with, besides being very gorgeous to look at.  

Thank you for spending some time here today, it's an absolute pleasure to have your company. I hope the rest of your day is filled with joy and peace.  See you again soon, I hope! 

I'm entering this for the following:
Top Tip Tuesday are celebrating their second birthday with a Birthday Gift challenge, and I'm offering a tip: when making pocket pages, make sure you can get hold of what you put inside - either by putting tabs or ribbons on the inserts, or by cutting an 'access dip' in the pocket itself.
Anything But a Card, a brand spanking new challenge blog, are kicking off with an Anything Goes
Another brand spanking new blog, Heck of a Challenge, are also running Anything Goes to get us started
Creavil are asking us to Make It For A Man - done!
Simon Says Stamp are also having an Anything Goes challenge

And for the quotes today, I'll share a couple of the ones I wrote onto the tags for my uncle.  
60? ... who's counting?!  Happy Birthday!

Old wood to burn, old books to read, old wine to drink and old friends to converse with.
Alphonso of Castile

When I was young I was amazed at Plutarch’s statement that the elder Cato began at the age of eighty to learn Greek.  I am amazed no longer.  Old age is ready to undertake tasks that youth shirked because they would take too long.
W. Somerset Maugham

Praise they that will times past, I joy to see
My self now live: this age best pleaseth me.
Robert Herrick