I'm travelling into a new way of working, a new country, a new language, and a new hobby which I'm passionate about. Come with me for some of the journey...

Showing posts with label kraft glassine. Show all posts

Friday, 11 December 2015

A Blustery Day


Hello all!  I'm here with my second offering for Rachel's lovely Create A Scene theme at Country View Challenges this month.


And, yes, I know we're well into December, but I'm clinging on to the last of autumn just as some of the trees are clinging on to their last leaves.

This altered jar celebrates just this moment, when the last of the leaves are torn from their moorings by a strong wind, and hurtle through the air for one final dance before falling to earth and becoming the mulch of humus (no, not the chick pea sort!) to nourish next year's new growth.


Trees and branches are a bit of a theme here this week, especially bare ones.  You may already have seen the Those Who Wander tag, and there are some slightly bushier versions on their way at the weekend.


The branches on this jar were created using one of Tim's new punches - the little branch.  It makes a great bare tree if you're working in this smaller scale, and you can layer it up to get a bigger tree too.


I started very simply... To get my cloudy sky, I simply spritzed a bit of DecoArt Mixed Media Mister in White Shimmer around the jar, and tilted and dabbed with paper towel until it was dry.  I love the misty autumn morning look.


The houses are cut with the fabulous Townscape On The Edge die.  They're made from kraft card, stamped with a tiny alphabet stamp and inked for a grungier look.


It took nearly two whole townscapes to get round the whole jar.

The leaves being blown gustily around are punched from some wax paper, so they're slightly more translucent than the kraft houses and trees, which gives them a more delicate look...


... especially when you light the candle inside.


The candle inside?  But of course... why else would I create my scene on a jar?!


I tied some raffia around the top.  I'd completely forgotten about raffia.  I used to use it all the time, but it had somehow slipped out of my mind.  I was reminded of it by Lisa Minckler's astoundingly lovely altered jars, and went straight to get it out of hiding!


And round at the front (if a round jar can have a front) I added some autumn gatherings.  When I shared my wandering tag earlier this week, I told you I was using leftover leaves... well, this is what they were left over from.


They're cut from kraft card and stamped with some more of the tiny alphabet...


... and I added a Philosophy Tag, altered with alcohol inks.


One of the pleasures of this is seeing the warm glow once it's all lit up...

And again, I'm sharing a couple of different lighting variations over the course of the post so you can get the general impression of the effects.  Check out the shadows the houses cast too!

I hope you like it, and I hope you'll be inspired to come and Create A Scene with us at Country View Challenges this month.  As always, there's a generous prize voucher from our sponsors, Country View Crafts, with the winner randomly selected, and the honour of being one of our Top Three or our Design Team Member's Special Mention also at stake.  Hope to see you there soon!

A cold wind was blowing from the north, and it made the trees rustle like living things.
From A Game of Thrones by George R.R. Martin


Friday, 30 May 2014

Queen Bee ATCs

Hello all!  It's time for a new challenge theme over at A Vintage Journey.  Our host this time is the fabulous Jenny, a.k.a. Buttons - and she has a real treat in store for us... she's challenging us to Get Some Texture!  To read the full challenge guidelines and see the amazing inspiration the rest of the team have conjured up for you, pop over to A Vintage Journey.

But, before you go, here's my offering to get your creative engines started...


This pair of ATCs is full of texture, using Tim techniques and products.  There's a Queen Bee/Royal Jelly kind of vibe going on, I think you'll find!


I stuck some of the amazing Wallpaper papers to some really thick card and cut them using the ATC and Corners die.  There's a lovely thickness and heft to this pair.

Over that I blended some Peeled Paint Distress Ink through the Latticework stencil (done on the left, not yet on the right!).


I added clear embossing powder and tapped the back pretty firmly so as to clear quite a lot of the powder before heating.  

That gives you a lovely pobbly effect, rather than smooth glossiness.


After some playtime with some moulds and UTEE, the crown and bee were left sitting around on the table for a couple of weeks awaiting a home...


... suddenly it looked as though they might have found one!


With them in mind, I stamped the large bee and the crown to complement the UTEE shapes.


They're stamped in Coffee and Jet Black Archival, blended onto the stamps as I went.


I added some flourishes in Peeled Paint, and all that stamping got clear-embossed too.


The two hearts are kraft glassine, embossed using the French Script folder, then sanded for even more texture and given a dusting of Picket Fence Distress Paint.


I used the Shattered Kraft Core to cut some strands of ivy from the Spring Greenery Decorative Strip Die, and followed Tim's excellent tip of sanding the die-cut before you remove it from the surround.  

Especially with a delicate die like this, it means you can distress without distress!


Once they were trailing across their respective ATCs, I glued them down by just the stalks, so that I could lift the leaves for a dimensional look.  I love the texture of the Shattered card.


Around the edges I added some Peeled Paint Distress Embossing Powder - this has such a great mossy look, and a rough touch to the fingertips once you've released the textured particles.


Everything got a dusting of Picket Fence, and then a splattering of the same.  The Liquitex Splatter Brush has been one of my favourite Tim recommendations - such fun to play with, and it adds such fabulous splashes of random texture!


A couple of ChitChat stickers and we're done. 


So that's my pair of ATCs for you.  Hop over to A Vintage Journey and see what the rest of the team are packing for this leg of the journey, and I hope you'll be inspired to come and play along with us this month.  


Do make sure you read the challenge guidelines carefully, as well as our Travelling Instructions, in order to qualify for the prize, generously sponsored by Country View Crafts.

Thanks so much for stopping by.  I'll see you again soon, either here or elsewhere in Craftyblogland!


The men of experiment are like the ant; they only collect and use.  But the bee... gathers its materials from the flowers of the garden and of the field, but transforms and digests it by a power of its own.
Leonardo Da Vinci

Friday, 26 July 2013

Golden Memories

Hello everyone... Well, it's been another week of sneak peeks here at Words and Pictures so far, but I'm here with an actual project today!  I'm not sure it's really me, but it's nice to experiment occasionally.

It's another canvas with a combination of Artistic Outpost stamps and Pion Papers (like the romantic canvas of last week).


This time I've used the wonderful Bluebird plate with some of the Pion Vintage Garden papers.

I started with a piece of white corrugated card, but things started to gather and grow, and in the end it needed a larger canvas as the base.


The Artistic Outpost images are stamped on some of my tea/coffee-dyed tags.  I love these birds over the music manuscript...


... and they seemed perfect with the little Pion birds.


The bluebird boy is fast becoming one of my favourite images (he put in an appearance on my little hanging recently), and I edged his tag with some of the lovely typescript stamp from the same set.


That text also appears on the other little tags...


... and on the bunting in the top corner.


The flowers are by Wild Orchid, layered with some cheesecloth...


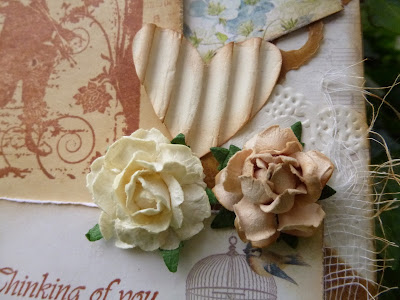
... and a little heart cut from the white corrugated card - inked of course - to link with the other side of the canvas.


I cut some kraft glassine with the Tim Holtz Doily, and also layered in some other pieces of kraft glassine in various places to add a bit of depth to the colour palette.


I added the lovely Thinking of You stamp to this little postcard from the papers.


And I just love this tiny little bird on the stamp...


I altered one of the Idea-ology bookplates with some layers of Distress Paint, wiping back and adding layers until I was happy with the look.

My trusty Hero Arts alphabet was pressed into action for the word Memories, stamped on another bit of tea/coffee stained tag, to go inside it.


There are doilies layered in too, and where they overlapped the edge, I folded them around to add decoration to the edges of the canvas.


Also around the edge I added music manuscript washi tape.


I not only like the look of this, but it came in very handy for securing the bunting too!


So there are my Golden Memories - hope you enjoyed the tour.  Thanks so much for stopping by, and I'll be back touring around Craftyblogland with a bit more time soon, I hope...


Don't forget you've still got time to join in with the Artistic Outpost Referral Program this month.

All you need is at least one AO image to qualify for the prize draw.  Hope to see you there, or elsewhere very soon!


Memories warm you up from the inside. But they also tear you apart.
Haruki Marukami

True nostalgia is an ephemeral composition of disjointed memories.
Florence King

I'd like to enter this in the following:
At the Wild Orchid Challenge where they are playing Blues and/or Purples
A second entry at this month's Hobby House Challenge where the theme is Vintage
At the Fashionable Stamping Challenge they are looking for Flora and Fauna


Saturday, 6 July 2013

Rough Around The Edges


Hi all and welcome, with an especially big welcome to the newest followers - I'm absolutely delighted you decided to join the journey.

I'm here to share a tag inspired by some playing around I did with rustification the other day (more about that very soon), and by the arrival of my first ever Stampotique stamp - the wonderful Moth Fab, a lucky bid on ebay - yay!

And it seemed only right to create a piece that would fit in with the current Stampotique Designers Challenge, which is to Recycle It.

And we go from oodles of colour back to the rusty neutrals that give me so much pleasure.

I started with corrugated cardboard, ripped from one of the packaging boxes I keep under the table.  And I gathered up washers, muslin and various other bits and pieces lying around the craft room to subject to some rusting.


While they were busy oxidising, acidifying, or whatever it is they're doing, I gave the cardboard a rough coat of white paint, and then added Vintage Photo Distress embossing powder in tiny amounts around the edges.


I distressed a paper doily with some ink and then grabbed some kraft glassine paper, discarded from a previous make, for my next layer up, and then - all rusting done and dusted - layered in a scrap of the now rusted muslin, fraying the edges for an even more lived-in look.


Moth herself (well, I had to have the one named after a character in Shakespeare, didn't I?) is stamped on an old book page, which I've then torn and inked to frame her.  I added a little snippet of lace left over from my Love of Vintage canvas which was lying on the table - inking it, and fraying it a little more as I went.


The words came to me as I was playing (and no I wasn't suffering from a hangover!), and seemed to fit perfectly - not only with what was appearing on the desk in front of me, all distressed and frayed and decaying, but also with my mood in recent weeks, when I've felt very unsettled and uncertain quite a lot of the time.  

(I've started to get the bit back between my teeth now.)


I stamped them onto one of the leftover tags from a previous tea-dying session which had been lying around for ages and which, at some point, had got itself a rough border of gesso'd brush strokes. 

Since this was becoming all about the edges, I stamped around the edge of the tag, so that all the words also got a touch of the gesso'd area.


I layered some of them onto some rusty tin wire net from The Funkie Junkie Boutique, teasing and twisting the edges for a lovely grungy effect.


The Idea-ology flowers, thoroughly rusted (fastener and all!), and some differently-sized washers, also thoroughly "decaying", add the metal touch to the tag.


I'm a little bit sad that the act of gluing everything down robbed me slightly of some of the fabulous dimension from the creased glassine and wrinkled material that the tag had when I was in the layering up stages... but overall, I still love the look of the thing.


A little bit more of the rusty muslin tops the whole thing off, tied together with some rusty wire, curled around some dowelling.


I had an absolute ball with this... I'd forgotten how much I love altering things for a rusty look.  And all the fraying really tickles me.  And of course I love the book pages...

Part of the trouble with all this crafty adventuring is that there's always something new to try (and I strongly feel I'm still in exploration and discovery mode with it all), and while that's wonderful, it's easy to let the things you've really gelled with slip into the background.


Well, they're all here with a vengeance: book pages, stamping, distress, ageing and good old layering, and it felt good to just play again.

I may still be feeling a little rough around the edges, but I'm ready to start living closer to the edge...

Come to the edge, he said. 
They said: We are afraid. 
Come to the edge, he said. 
They came.  
He pushed them... 
and they flew.
Guillaume Apollinaire

I'd like to enter this into the following:
Recycle It at the Stampotique Designers Challenge
Anything Goes at Simon Says Stamp and Show
Show Us Your Metal at Try It On Tuesday