Hello all! I hope you are all doing okay, and staying safe and well.
It's time for a new challenge over at A Vintage Journey, and our wonderful host Astrid is looking for Rustic Charm.
It's time for a new challenge over at A Vintage Journey, and our wonderful host Astrid is looking for Rustic Charm.
You'll find all the challenge details over at A Vintage Journey, along with a wealth of rustic inspiration from some of the Creative Guides. But before you go, let me show you my rustic plant pots.
Sometimes simplicity is all I want. Despite my usual layers of mixed media complexity, the things I like to have around me tend towards the minimal, the simple, the rustic.
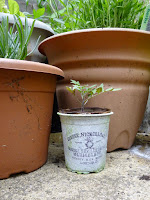
These altered pots make me so happy -particularly now they each have a plant of their own in (which you'll see at the end of the post).
I'll quickly show you some process photos and then share some pictures of the the finished pots in place. Here they are in their original state. As I said over at A Vintage Journey... cheap, shiny plastic.

First step was an undercoat of DecoArt Chalky Finish paint in Primitive (a nice stony colour). I applied it with a natural sponge so you're already getting some nice texture to replace that plasticky sheen.
Next I used the same sponge to add the DecoArt Crackle Medium (formulated for the Chalky Finish paints) in various thicknesses and left that to dry overnight.

Over that went a layer of mostly Everlasting (White) Chalky Finish, with a little of the Primitive mixed in at times, and once that had done its crackle magic I had this delicious aged, weathered finish.
The label stamps are from a giant set by Iron Orchid Designs. They're not cheap, but I'm thinking that these stamps can be used to alter all sorts of things from pots to jars to boxes and more to make some really saleable items, so I'm definitely thinking of them as an investment.
I considered stamping direct, but in the end took the safe option of stamping onto tissue paper and glueing it down with some matte medium. Already happy!
Time for a bit of garden distressing now... and we're back to the natural sponge to apply three shades of PaperArtsy Fresco Finish green, building from Hey Pesto to Lawn to Winter Green.
Over time, I'm sure they'll gather some more earthy colour quite naturally, so I didn't bother adding that myself!
I already love how they look amongst the terracotta and white (earthy, dirty white!) pots which are housing our flourishing herb and vegetable plants.
Each of the labels is different, of course, and with my undying love of different vintage fonts and historical detailing, I'm so pleased I splashed out on these stamps.
I already have plans for some of the endless glass jars I've been hoarding!
The two larger pots are about 5 inches tall and across, and the smaller ones are about 3.5 inches.

Even where I managed to glue the tissue paper on completely crookedly, I still like the imperfection... This one would go in the "Seconds" section in the pottery shop (where I would happily buy it at a reduced price!).

And those mossy greens work beautifully against the real greens of the surrounding plants.
Now they have plants in, they make me even happier! Some of these are only temporary... the tomato seedlings will have to move into bigger pots quite soon. I'll just have to get some more seeds going, won't I?!
I'm really happy with the rustic simplicity of these. I have a feeling some more plastic pots might be meeting a similar fate pretty soon. It's very satisfying to do.
Do hop over to A Vintage Journey to see the Rustic Charm created by my fellow Creative Guides. We hope you'll be inspired to join us somewhere down the road this month with some charming rustic creations of your own. In the meantime, thank you so much for stopping by today. Stay safe, stay well, and I'll see you again soon.
Simplicity is the ultimate sophistication.
Leonardo da Vinci
Everything should be as simple as possible, but not simpler.
Albert Einstein
I would like to share these at the Bleeding Art Challenge where the theme is Anything Mixed Media Goes all the time
The Simon Says Stamp Monday Challenge would like you to Make Your Own Background - the weathered crackle is a simple background, but it's the right one to showcase these stamps I think
At the More Mixed Media Challenge the theme is Anything Goes + Optional Purple - I'm not taking up the option yet, but I will try to later in the month
There's another Anything Mixed Media Goes opportunity at the Creative Artiste Challenge Blog


