I'm travelling into a new way of working, a new country, a new language, and a new hobby which I'm passionate about. Come with me for some of the journey...

Showing posts with label Crafty Individuals. Show all posts

Sunday, 18 May 2014

Dragonfly Fragrance

Hello all (possibly for the second time today).  Yes, I know... we're double hopping again - May has just been that kind of month, but I couldn't turn down a chance to guest with the Fashionable Stamping Challenge.  Sorry!


Just a quick heads-up that I'm over at Our Creative Corner today with a creation using products from our generous sponsor this month, Crafty Individuals.  

Here's just a little sneak peek preview... I'd love it if you had a moment to pop over and check it out.


And if you missed today's earlier post - the Parfumerie Collection for my guest spot at Fashionable Stamping Challenges - I hope you might have a few minutes to take a look at that too.  

As it chances, I also used Crafty Individuals stamps for this project... how's that for serendipitous timing?!  You don't have to go far, you can see it right here at Words and Pictures.


I just wanted to thank you all so, so much for your amazing feedback and support.  I can't tell you how much it means, especially given I've been in a bit of a slump.  (I know there's lots to see here, but almost all of it was done before coming away... I've honestly been struggling to get anything finished for the last few weeks - other than dollshouses of course!)  This crafty journey simply wouldn't be the same without you, so thank you.

Imagination is everything.  It is the preview of life's coming attractions.
Albert Einstein

A hopping bonus... anyone who wants an update on some of the changes at Small Worlds, check out Cestina's Dollshouses.  I'll be filling you in on the houses I've been doing soon...

The Parfumerie Collection

Hello everyone - I hope you're having a wonderful weekend.  I'm so pleased you've dropped in, as I can share my happy news with you.  I was delighted to be invited to be a Guest Designer over at the Fashionable Stamping Challenges - it's a challenge site I've loved since I set out on my travels in Craftyblogland, and it's a real privilege to play alongside the wonderful Fashion Stampettes.

Not only that, but I was offered the chance to pick the theme so, purely selfishly - as I felt at the time it was a while since I'd been properly dimensional - I challenged them to create or alter a Three Dimensional Object.

Well, having thrown down the gauntlet, I had to come up with a three-dimensional object of my own... Well, I did.  Several of them in fact.  Without further ado, I give you... The Parfumerie Collection.


I'm afraid I'm a bit low on "before" pictures, and even of step-by-step photos, as I got wrapped up in the process itself.  We are, nonetheless, in for a photo-heavy post, so you might want a cup of tea... or perhaps a glass of fine champagne?


I like to imagine the finished toilette collection gracing the dressing table of an 18th century lady or madame, ready to hand as she's preparing to host one of her renowned salons, where artists and intellectuals gather for stimulating conversation.


There's a pretty fine line between society hostess and courtesan, of course... What could be more seductive than a woman of scintillating wit, great beauty, and with every inch of soft skin divinely scented!


You might first need some soap - if you're of the minority who feel regular bathing is not injurious to the health.

It's just a little wodge of paper inside, I'm afraid - imagination is all here!  The tissue paper around it is dyed with Bundled Sage and Iced Spruce Distress Inks and Stains. 


All the labels are stamped in Sepia Archival ink onto Specialty Stamping Paper.  

With stamps as exquisitely detailed as these, by Crafty Individuals, that extra bit of fine detail which the paper gives is worth every penny it costs!


The Eau de Toilette bottle in fact once held alcohol.  It's one of many alcohol miniatures I have stashed awaiting alteration (years in the collecting, I hasten to add!).

There's something particularly elegant about the shape of this one, so it was a perfect choice for this collection. 


There are various crackle effects in use throughout the collection.

I believe that on this one I used the DecoArt One-Step Crackle, over a coat of their sealer.


Then I added DecoArt Blue Mist and Ice Blue acrylics over it.  They were slightly diluted, so as to keep the translucence of the glass.  

You can see the glow as the sunlight illuminates it here.


For the lid, I used a decorative button from my stash, altered with the same paints, and a touch of Tarnished Brass Distress Paint, and there's some Idea-ology bead chain and a tassel around the swan-like neck.  


(I'm sure our elegant courtesan has a swan-like neck too, plenty of room for dabbing the eau-de-toilette to attract the lips of the rake as he's whispering gossip in her ear.)

The metal filigree piece, from The Funkie Junkie Boutique, seemed perfect to go behind the label.


The small powder container is one of my moisturiser pots (empty, of course, and thoroughly rinsed out), again hoarded for months awaiting its moment in the candlelight.


The Blue Mist and Ice Blue came into play again to alter the colour, but applied quite roughly to get a textured, distressed look.


As with all the pieces in the collection, I layered inked book pages, some lace, and then added some metal embellishing, altered with various paints to make them all co-ordinate.


For the final piece in our toiletry set, the Cologne bottle, I do have a part-way photo.  

This glass bottle is originally from Germany and contained coffee milk.  You've seen one like it before in my black and gold PaperArtsy Christmas candle collection.


Well, this one had been the subject of some Tim Holtz experimentation.  

He shared a technique to apply Rock Candy Crackle Paint to glass, and this was where I tried it out... then it just sat there, awaiting the next step.


It turned out the next step was some Blue Mist and Ice Blue paint.

In fact, the places where I over-applied the RCCP, so that it slid down in globules, now became rather fabulously funky - creating really cool additional texture and interest on the surface of my bottle.


I used a metal rose for the lid, glued onto another button from the stash, and again altered with the DecoArt paints as well as some Tarnished Brass Distress Paint, sanding back to the metal in places too.


The Idea-ology Ornate Plate on the front got the same treatment, and I attached it using some frivolous ribbons, with another one around the neck to match.  


I'm quite certain that our courtesan decorates her powdered wig with the most frivolous of ribbons, so it seemed appropriate.


I hope you've enjoyed this brush with history - a particular historical vignette that I'm very fond of.  I think I'd've made an excellent salon-hostess (and probably a pretty good courtesan too, come to that!) and I suspect I might have been more at home in the 18th century than the 21st. 

I hope my Parfumerie Collection will inspire you to create or alter a three-dimensional object of your own (one will do!) and join in over at the Fashionable Stamping Challenges this fortnight.

Thank you so much for stopping by.  I'll see you soon, either here (later this morning, in fact) or elsewhere in Craftyblogland.  Have a wonderful Sunday!

Odours have a power of persuasion stronger than words, appearances, emotions or will.  The persuasive power of an odour cannot be fended off, it enters into us like breath into our lungs, it fills us up, imbues us totally.  There is no remedy for it.
From Perfume: The Story of a Murderer by Patrick Süskind

Having borrowed Madame's toiletries for this Mixed Media make, and with the added Metal embellishments on each piece, I'd like to enter this in the M Challenge at the Simon Says Stamp Monday Challenge.
At the Craft-Room Challenge the theme is Recycle - the bottles and the moisturiser pot are all in the mix.
And the All Crafts Challenge at Craft My Life are playing Anything Goes But No Cards.
At PanPastel UK the new theme is Florals - quite apart from the floral fragrances inside, there are flowers on the labels, as decoration and as one of the lids!
Craft Hoarders Anonymous are inviting us to use up Ribbon, Lace and Twine - with not only ribbon and lace but all those hoarded bottles and pots - well, it seems like a match made in heaven!

Tuesday, 12 March 2013

Quoth the Raven

Hello everyone, lovely to have your company here at Words and Pictures.  It's Tuesday: time for a new challenge at Fun With ATCs, and our theme for this fortnight is Gothic.  There's lots of inspiration from my fabulous team mates, so get your spook on and come and play along!


I've kept it quite simple this week, allowing this wonderful Crafty Individuals stamp to do most of the work.  It's a fabulous Edgar Allan Poe-ish image - I just love the looming tower, the dynamic raven, and the barbed wire criss-crossing it.


What's also great about it is that it's just marginally larger than ATC sized (2.5 x 3.5 inches is what we're looking for) so I was able to mount it onto thick chipboard and fold the borders of the image over to decorate the edges too.


I stamped in Versamark Watermark ink, and then embossed with Stampendous Fine Detail black embossing powder.  

I'm incredibly impressed with the "fine detail" achieved with the powder - it really is a very detailed image, and the powder has captured it perfectly.


I used Distress Markers to colour in the church tower, softening with water applied with a water brush to get a subtler look.

And then I simply blended Chipped Sapphire DI over areas of the image, leaving the moon glowing white, and keeping some highlighting on the raven himself.  I considered colouring him black, but decided I preferred the ghostly look!


I also thought about doing some spritz and flick to zhuzh up the background, but again decided on the simple route, leaving the image to shine.  

And if you catch it in the right light, it really does shine - almost to invisibility... which also seems suitably strange and Gothic, in accordance with our theme.


There have been so many glorious entries to recent competitions at Fun With ATCs - it's a real joy to visit them all, and it's incredibly hard to whittle them down to our top picks each time...  I hope you'll be keeping us all on our toes again with your Gothic ATCs - you'll find everything you need to know right here!  Thanks so much for stopping by, and I'll see you again soon, here or elsewhere in Craftyblogland.

It's a massively long poem, so I'm going to leave you with just the last couple of verses of The Raven:

`Be that word our sign of parting, bird or fiend!' I shrieked upstarting -
`Get thee back into the tempest and the Night's Plutonian shore!
Leave no black plume as a token of that lie thy soul hath spoken!
Leave my loneliness unbroken! - quit the bust above my door!
Take thy beak from out my heart, and take thy form from off my door!'
Quoth the raven, `Nevermore.'

And the raven, never flitting, still is sitting, still is sitting
On the pallid bust of Pallas just above my chamber door;
And his eyes have all the seeming of a demon's that is dreaming,
And the lamp-light o'er him streaming throws his shadow on the floor;
And my soul from out that shadow that lies floating on the floor
Shall be lifted - nevermore!
Edgar Allan Poe

Thursday, 17 January 2013

Beautiful things

Hello all and welcome to Words and Pictures... I'm so happy you've stopped by.  As promised, I'm following up with my second "lacy" altered box... and this is the one I'm really happy with.  The idea arrived as part of a DT project for which I needed to use particular papers, but even as I was making it I knew that this one had to happen, so here it is:


And for anyone who'd like a quick "before" shot...

This huge cigar box (13 x 8 x 2.5 inches) has been around for I don't know how many years, as you can probably see from its slightly battered state.  (Cuban cigars, and according to the label on the bottom it came from Selfridges - can you imagine how much that must have cost?!)


Anyway, as I said yesterday, I'd been mulling over ideas for the Simon Says Stamp and Show challenge which, this week, is Lace Love.  I'd already thought of using the Tim Holtz Vintage Lace Decorative Strip Die, which was one of the very first dies I bought, and is still one of my absolute favourites.

I was also working on a DT piece for the new eclectic Paperie challenge which is Altered Boxes, and the two just sort of collided.

And as soon as I'd finished the tiny box with coloured lace, I moved straight on to this.


I seem to be on a stash storage kick - not surprising, given the house clearing I'm really supposed to be doing at the moment - but honestly, this is helping!

After last week's altered tag tin, this week I've created storage for my "beautiful things" - lace, special ribons and flowers.


I already have great boxes that all my metal and wooden bits and pieces are sorted into, and I do have a small box for ribbon reels, but all the "soft" stuff has just been in various carrier bags and baskets, so it was time they had a home.

So here's how it came together.


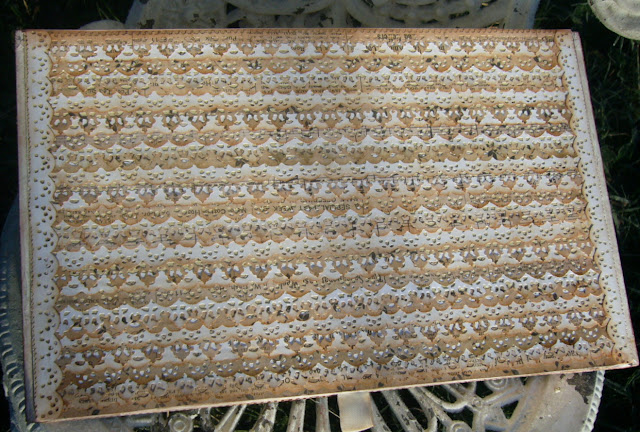
I gathered some papers from the Kaisercraft Timeless collection with delicate motifs in neutral colours - text, music, flowers - as well as some plain white cardstock, and set to work with my trusty BigShot.  Here's the lacy chaos which ensued!

Then I had to painstakingly sit with my tweezers making sure that all the punched holes had been fully punched - for once, I actually had the television on whilst crafting... but this really didn't require much brainpower or mindfulness!


Next, it was out with the Vintage Photo DI and the blending tool.  Every strip got a touch of inky distressing.

Once that was done, I spent quite a long time arranging the strips in a sequence that worked to show them off to the best possible advantage.


(For anyone who cares about such things it's a strict rotation of the three lace patterns; alternating white/pattern; and making sure it's not the same pattern twice in a row.)

Obviously I then made sure they weren't going to get mixed up again while I got busy with the rest of the altering!


The first stage was a good coat of paint, of course, then I could start to play...

For the exterior walls of the box, I decided to use my "laciest" stencil to do some textured lace around the base.

So I started applying Ferro through the Crafty Individuals Beautiful Border mask, but I hadn't gone very far when it became clear that it was a bit too stiff and unwieldy for such a delicate design.  I switched to the DecoArt Decorating Paste, and that was much easier to apply.


I did two sides and then read the label to see how soon I could do the rest, and it said 4-12 hours drying time - well, blow that for a lark!  No patience, me, I'm afraid - so I very gently used the heat tool, and that seemed to do the trick with no problems.  I was careful not to overheat each area, so as not to get the puffy blistered effect - not what I wanted today!

Once it was dry, I went over the whole box with Snowflake Fresco paint.  You can't beat the shabby, chalky effect the Fresco paints give you, and it's also great for stamping on which, as anyone who knows me will tell you, is pretty likely to happen at some stage of a project!


Next up, Vintage Photo DI again... blended onto the textured areas, and around the corners and edges to distress them.  I love that the slightly battered, worn look of the box is accentuated by the inking.

And I did indeed do some stamping, using my favourite script stamp from the TH Apothecary set, stamped in Frayed Burlap DI.

Leftover strips of lace were pressed into action along the top edges, and that was that for the walls.


The most time-consuming part of the whole process was the sticking down of the lace strips on the lid... trying to keep them straight, trying to get them the perfect distance apart so that they overlap but are still showing off their best bits and so on.


I used the Studio Extra Time Slow-Drying multi medium - it gives you lots of time to lift and replace so that you can make sure your alignment and positioning is exactly how you want it.

I used it to give a couple of coats over the top of the whole lot to give it some durability, and a bit of protection to the lacy edges.  But the long drying time also meant that, even after those coats, I was able to run a knife under the tips to lift them for the dimensionality and movement I wanted to create.

And, I have to say, as you do the first few rows it doesn't look like anything very much, but in then end I think it's absolutely worth the hassle!


I added a twist of crinkle ribbon (uncrinkled), attached to the inside of the lid using some spare lace, so that there would be a tag to get the lid open easily.


Even though I didn't crinkle it, it got a little sweep of Vintage Photo DI, of course!


I wanted some dividers for the interior, so I took some more of the same Kaisercraft papers and covered pieces of cardboard (old packaging) which I'd measured and cut to the required sizes.

I decided not to repaint most of the inside, as it's already got a soft, weathered paper lining.


But I did add a bit of matching trim to the top of the back wall.  I thought of doing that to the side walls again, but realised that it might well interfere with the closing of the lid.

Then it was time to decide what to do with the inside of the lid...


This had an embossed label, like the one on top, and I was delighted to see that, even after my shabby chic coats of paint, there was still some of the embossing showing through - so I had to take advantage of it!


I buffed over the whole area with some Vintage Photo DI, and then used Treasure Gold in White Fire to highlight some of the raised areas.


I used the script stamp again, and added my favourite Stampology floral corner in Coffee Archival, but there was still something missing.


Ah... words... and it didn't take long to find the perfect Tim Holtz sentiment - what could be better for a box of beautiful things?!

And, of course, one of the best things is that I was able to provide very precisely for my storage needs... the right size and shape compartments.


I do realise it means I have to use some of it before I can buy any more, but I think that's probably all to the good!

For now, I'm just happy to have it all out of the random plastic bags and in one place where I can find it and access it easily.  That it all looks so pretty is simply a lovely bonus...

Do check out the Altered Boxes challenge at eclectic Paperie, hosted by Marjie Kemper, and with a great prize on offer!


Thank you so much for spending some time here today - I'm so grateful for your company and your feedback, and I look forward to seeing you again soon - either here, or elsewhere in Craftyblogland!


I'm entering this in the following:
Simon Says Stamp and Show who are playing Lace Love
Our Creative Corner have a Shabby Chic theme
At Happy Daze they would like us to Recycle It 
At the Allsorts Challenge they are asking to see Dies and Punches


Have nothing in your house that you do not know to be useful, or believe to be beautiful.
William Morris