I'm travelling into a new way of working, a new country, a new language, and a new hobby which I'm passionate about. Come with me for some of the journey...

Thursday, 20 June 2013

Candy Winner


Thank you so much to everyone who joined in, especially for your kind words and good wishes.  You're all LOVELY!!  

I wish I could send you all a candy thank you - when I win the lottery, okay? - but for now, sad to say, there can only be one winner.

It was too complicated to do a random generator number - what with some people leaving more than one comment and some only wanting to say hello, not join in - so I did it the good old-fashioned way.

To build the suspense a little further...


Here you all are, typed out and waiting to be cut up...


Into the bowl... eyes closed to make the draw...


And...      the winner is...

... the lovely Nicola of Paper Profusion - congratulations, Nicola!  

Please email me (link in the sidebar) with your full address, and I'll get it in the post as soon as I can.

Love and thanks to everyone.  I'll be back in the morning with a project in a colour combination which takes me full circle back to last June, and I'll hope to be round to visit soon.  Happy crafting!

I awoke this morning with devout thanksgiving for my friends, the old and the new.
Ralph Waldo Emerson


Wednesday, 19 June 2013

The Good Ole U. S. of A.


Hello and welcome everyone, with an especially big welcome to the new followers - it's great to have you on board.

It's bloghop time at Artistic Outpost again.  The whole team have been creating projects with an Americana theme, so do have a hop around and have a look at the inspiring work of my amazing teammates.  Here's the full line-up:

Tracy EvansLinda Coughlin, Alison Bomber, 

Initially, I was a bit wary of the Americana theme - what do I know?  And did I really have the stash for it?

But then I delved into my childhood: I was brought up on The Waltons and Little House on the Prairie (amongst other things, obviously) so I guess it's predictable that my make has a nostalgic feel! 

I've mostly used images from the wonderful Kudzu Kafe and Home plates - new to me and already in love with them - with a few other old favourites mixed in.  I'll point them out as we go...


I used an MDF ticket to create my hanging.  It's about half a centimetre thick, so it's good and solid; sturdy enough to hold all the doodads (new favourite word!) collected up from around the hoarded stash supplies.

And I'd also like to say, I absolutely didn't plan for a red, white and blue colour scheme.  It was going to be all subtle vintage sepias and buttermilk - but once I started gathering the doodads... it was a done deal!


I started by creating a weathered look for the background using PaperArtsy crackle glaze and acrylic paints.  As well as Fresco Cheesecake, there was some DecoArt Buttermilk involved.

Then the first stamp into action was the fabulous ticking pattern from the Kudzu Kafe set, stamped in Faded Jeans.  

Can you see where I'm going with the names of the colours so far?!


The fabulous pick-up truck from the Home plate was stamped in Sienna Archival ink (okay - Italy snuck in... should've used Barn Door I suppose) and given a coat of clear embossing powder for glossy dimensionality.  

I used Distress Markers to blacken the tyres (tires in US-speak) and add the steely blue highlights.


The "Kafe" is one of my favourite bits of stamping ever, though it was also one of the scariest.  

I inked up the stamp with Coffee Archival, and then - quite roughly - added some other colours onto the stamp as best I could with the edges of the ink pads: Library Green for the tree, Sienna again for the awning, and some Stormy Sky Distress ink for a touch of glassiness in the windows and tiles on the roof.

I then had to stamp direct to my beautiful background... if it all went wrong, I'd have to paint over, or start again on the other side.


As it is, I'm delighted with the result.  And I love the look of the house with the truck "parked" on some padded tape out front.  (I suppose next time I could do a trial stamping on some scrap paper first - why do I never think of that until afterwards?)


My vintage ephemera comes from a variety of sources. 

The sepia advertisements are all Artistic Outpost - the Kudzu boy is, pretty obviously from the Kudzu Kafe set; the Old Grist Mill - again obviously - from the Old Grist Mill set.  I've clipped them on with some jewellery findings.

There are some number plates from one of the Tim Holtz stickers sets (Destinations, maybe - sorry not at home, so can't double check which).  

There's an Idea-ology Cash Key - so cute, and the red stickers were just the right colour red.


And I added a couple of game pieces which came in a job lot of stuff from Ebay, and which I wasn't sure I would ever use.


The White Mountain Freezer advert is again from the Kudzu Kafe set - are you starting to see why I love it?! - and the train one is from the SteamPunk plate.  

The tiny wooden stars came from the fabulous Trace at inkypinkycraft as part of a swap we did before Christmas.  

You will have spotted the whole "wooden stars and ticking stripes" look, I'm sure... 


I added a couple of 3D postmarks by Wendy Vecchi.  

The Detroit one was a pale toothpasty green, so had to be doctored with Salty Ocean Distress Paint to tone in with the rest of the make.

And the drive-in theatre ticket is another Tim Holtz sticker (Salvage? - sorry, not sure again).


Gingham ribbon and some raffia at the top to hang it up by, and we're pretty much there... 

I hope you've enjoyed this little tour round my Americana hanging.  I certainly ended up loving making it far more than I'd expected to. I had a ball!

Do hop round and have a look what the rest of the team have been up to... If you get lost along the way, you'll find all the details here.


For now, thank you so much for stopping by, and I'll be round to see what you've been up to very soon.

As you read my stories of long ago I hope you will remember that the things that are truly worthwhile and that will give you happiness are the same now as they were then. Courage and kindness, loyalty, truth, and helpfulness are always the same and always needed.
Laura Ingalls Wilder

Although the years of my boyhood and youth on Waltons Mountain were a time of uncertainty and desperation for millions, somehow, in our home, we were sustained by a sense of being safe and secure.
Narration by John Boy Walton from the TV series

Home is the nicest word there is.
Laura Ingalls Wilder

And I couldn't possibly leave you without this, from the Waltons... Goodnight everybody!


Since I ended up unexpectedly with the red, white and blues, I'd like to enter this in the Independence Day challenge at That Craft Place Challenge Blog.
And at Fashionable Stamping Challenges, they'd like to see Something New/A New Style - well the stamp sets were new, as was the Sienna Archival ink, and so's the red, white and blue colour scheme - out of my comfort zone, but very happy with the results.
And I'm linking up with Anything But A Card at the Stampotique Designers Challenge.


Celebrating...


This is a sticky post, and will stay at the top until 19th June.  
Please scroll down for new projects.


You'll find my Blogaversary Candy post here...
Make sure to leave your comment by 12 midnight (BST) on the 19th June.


It's always good to remember where you come from and celebrate it. To remember where you come from is part of where you're going.
Anthony Burgess

Tuesday, 18 June 2013

Industrial Flower Power

Hello all, and welcome to Words and Pictures where it's time for the new fortnightly challenge theme at Fun With ATCs... and this time it's Flowers.

I know that will be music to the ears of many of you, so I hope you'll be able to find time to play along... it's only 2.5 x 3.5 inches of creation, after all!  There's lots of inspiration from my amazing teammates right here, and let me share mine with you now.


I'm playing on that Sixties' phrase "flower power", but there's no hippy dippy stuff round here - it's full on industrial power, and industrial grunge florals!  Because of the patina on the petals, they change a lot according to the light, so I've given you several variations of location!


I started with some heavy duty greyboard and cut it with the Tim Holtz ATC die - is there nothing these dies won't cut?!

I covered it with metal foil tape, and pounced alcohol inks in all sorts of rusty colours all over it.


Then I ran it through the Diamond Plate embossing folder.  Slightly sticky moment part way through the BigShot as I wondered whether, even with one flap fewer than suggested in my sandwich, I might have given it too much to do; but slow and steady won the race.

A coat of black acrylic paint came next, which I then rubbed back to reveal some of the colour beneath.  And finally some touches of DecoArt Quinacridone Gold translucent paint - fabulous rusty glow to this one.  I'm pretty happy with the "urban decay" look.


I considered using a cola can for the flowers, as I've done before, but then I thought I'd like to enter the Stampotique Faux Metal challenge, so I played with black cardstock instead.  


I started by giving it a hefty spritzing with Pewter Perfect Pearls mist, which already gives a pretty cool metallic look on the black card.


Then I used the Tattered Flower Garland decorative strip die on it, and ran the resulting flowers through the Riveted Metal embossing folder.

I added some small cogs and gears (some Idea-ology, some 7 Gypsies) and fastened them with the Mini Fasteners - so cool with the tiny screw heads.


I rubbed on black paint and Quinacridone Gold with my fingertips until I had a distressed look that pleased me.  And the mini fasteners got a touch of the QG too.  

It wasn't until I was looking at the photos on the computer that I realised that in some of the pictures  the petals are so reflective that they're picking up the bright green of the ivy around them - an extra bit of decay that I'm not responsible for!  


The words are Idea-ology Alpha Parts to which I added a very light dusting of Ranger Antiquities Rust embossing powder.  

If you heat the Alpha Parts enough, they start to melt and twist a little bit, which I think works brilliantly for the sense of decay that I was after.


I can't wait to see what you come with for the Flowers challenge at Fun With ATCs... you have a whole fortnight to play from today - so do come and join in.


As usual on a Tuesday, I'm also over at Artistic Outpost today, so I'll hope maybe to see you there, or somewhere out there in Craftyblogland - thanks so much for stopping by!

He is happiest who hath power to gather wisdom from a flower.
Mary Howitt

I'd like to enter this in the Faux Metal challenge the Stampotique Designers Challenge.  Although the background is foil tape and the gears are metal, the flowers themselves are faux!
And at the Country View Crafts' Challenge they want to see Die Cuts - I've got the ATC die and the Tattered Flower Garden decorative strip die both in action here.

Sunday, 16 June 2013

That Vintage Look

Hello everyone!  I was so happy to be invited back by Calico Crafts to do another Guest Spot this month, and here's the first of my two projects for June.  

I know some of you saw it yesterday over at the Calico Crafts blog (which I really recommend for a visit if you've never been - there's a fantastic regular DT sharing gorgeous inspirational makes), but I wanted to join in with The Button Challenge at Simon Says Stamp and Show this week.  

So it's here a little earlier than it might otherwise have been, and there are a few extra photos!  And if you need another reason - it also serves as an additional nudge to come and play the Recipe Challenge over at Our Creative Corner.  I shared my actual DT piece - Embrace Imagination - yesterday, but as it happens this also fits the bill: from List A the lace, from List B the metal, and from List C the inks and paints.

Okay, enough with the links, onto the make...


I've loved the Kaisercraft texture stamps from way back at the beginning of my crafty journey, and I'm a big vintage fan, so when I saw the latest set of releases in the same size format, it was love at first sight.


I've combined them here with Kraft tags from Ranger, some old book pages and lots of gesso and ink to create a canvas celebrating that vintage look!


It all started very simply: I glued some torn book pages to the kraft tags using multi-medium.  


Then I added a random area of gesso to each one.


I stamped the images using Staz-On black ink, and then used Distress Inks to give that aged look.


The tags are topped off with some Cotton Crochet Lace and Ivory Jute Twine.  I also added lace to the bottom of a couple of them.


At this point, I was still working out what to do with my lovely tags - make them into a book? a hanging? an accordion wallet?


In the end, it turned out to be a match made in heaven when I found a long canvas tucked in a corner of my room (from The Works, I think, and at half price, a bargain £1.99!)


I stuck some more book pages to some grungeboard and used the Tim Holtz WordPlay die to cut out the lettering for my little phrase.


A touch more inking to give the letters a bit more of a distressed look, and an inky edging for the canvas itself and we're almost there...


I used some wooden flourishes from my stash (they're from Crafty Emblies) to give a bit more dimension to the piece.


The final touch was to add these fabulous metal buttons from Artemio - they're from the Oldies Vintage range, so they're perfect for a vintage look.


Because they're proper buttons, they've got quite substantial loops on the back, moulded from the same metal, so there's no cutting them off.


Instead, I used scissors to poke a hole in the canvas in the places where I wanted the buttons to go.


This would probably have held them in place perfectly well, but I added a dab of glue to each of them just in case!


Hope you like my celebration of the vintage look.  If you're tempted by any of the ingredients, you'll find the links below.

I'll be back with another project for Calico Crafts later in the month.  Do check out their store - there are lots of lovely and unusual stash goodies to be found!


Thanks so much for stopping by today.  Oh, and don't forget there're just a couple more days to sign up for my Blogaversary Candy.  Have a great week everybody!

Happiness is not in the mere possession of money; it lies in the joy of achievement, in the thrill of creative effort.
Franklin D. Roosevelt

Click on the links to go shopping:
Ranger Inkssentials Kraft Tags #8
Kaisercraft Vintage Texture Stamps: Bird Cage, Windsor, Perfume, 36, Coat Rack, Dress Form
Claudine Hellmuth Studio Gesso
Oldies Vintage Style Antique Buttons
Antique Ivory Cotton Crochet Lace
Ivory Jute Twine
Staz-On Ink Pad - Jet Black
Claudine Hellmuth Studio Matte Multi Medium
Tim Holtz Grungeboard
Book pages, Distress Inks and canvas from my stash

I'm just in time to enter this for The Button Challenge at Simon Says Stamp and Show... only just!

Saturday, 15 June 2013

Embrace Imagination

Hello everyone!  I'm very happy to be here with my second post of the day (if you're after the Calico Crafts Guest Design link, it's here)... and delighted to present my DT make for this month's Our Creative Corner challenge.  Over at OCC you can check out what the rest of my amazing teammates have created for this mid-month reminder, and here's my offering.


The Recipe Challenge hosted by the brilliant Jenny (a.k.a. Buttons) is such fun - if you haven't played already, then do give it a whirl.  And if you have already played, come and have another go (to a maximum of three entries only, of course).  There are three lists of ingredients, and you have to use at least one from each list, and let us know what you've used.

List A - Lace, Fabric, Ribbon
List B - Metal, Wood/MDF, Clay
List C - Inks, Paints, Stains


Since I'm only with my crafty stash for half of each week at the moment, those days are under quite a lot of pressure to get done what needs to be done.  

So it was pure pleasure to work with these lists, and just have some play time with some of my favourite things.  No surprise that it ended up being a tag, I guess!


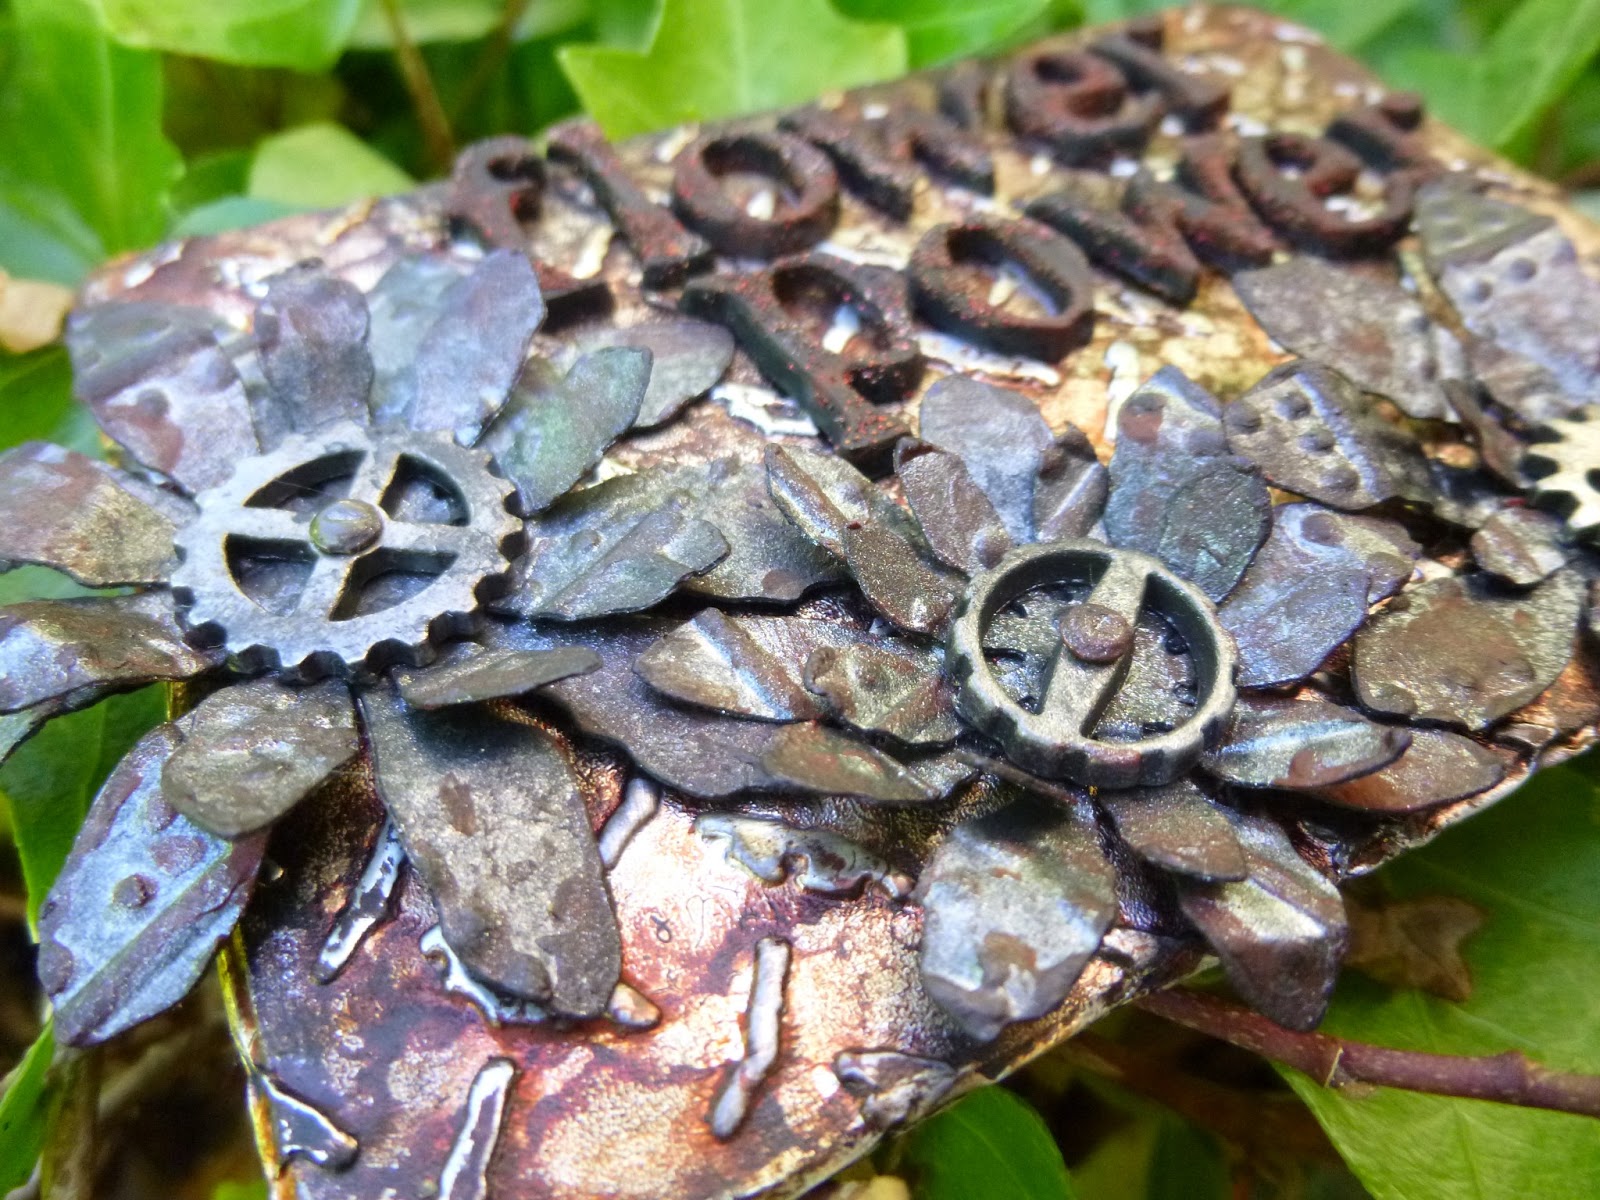
I used A Ribbon, B Metal and C - the full trio - Inks, Paints and Stains, and had a fabulous time.  To be honest, I can't even remember how I started - it looks as though it's wrinkle-free distress technique, with some ink blended over the top.  

And I know there's Broken China and Rusty Hinge Distress Ink involved, and I'm pretty sure some Vintage Photo got in on the act.  But again, the details are rusty (hinge!).  


I certainly did some stencilling, blending ink through the gorgeous Crafter's Workshop Harlequin mask.

And there's some stamping using Broken China Distress Paint with one of Tim Holtz's texture stamps from the Ultimate Grunge set.


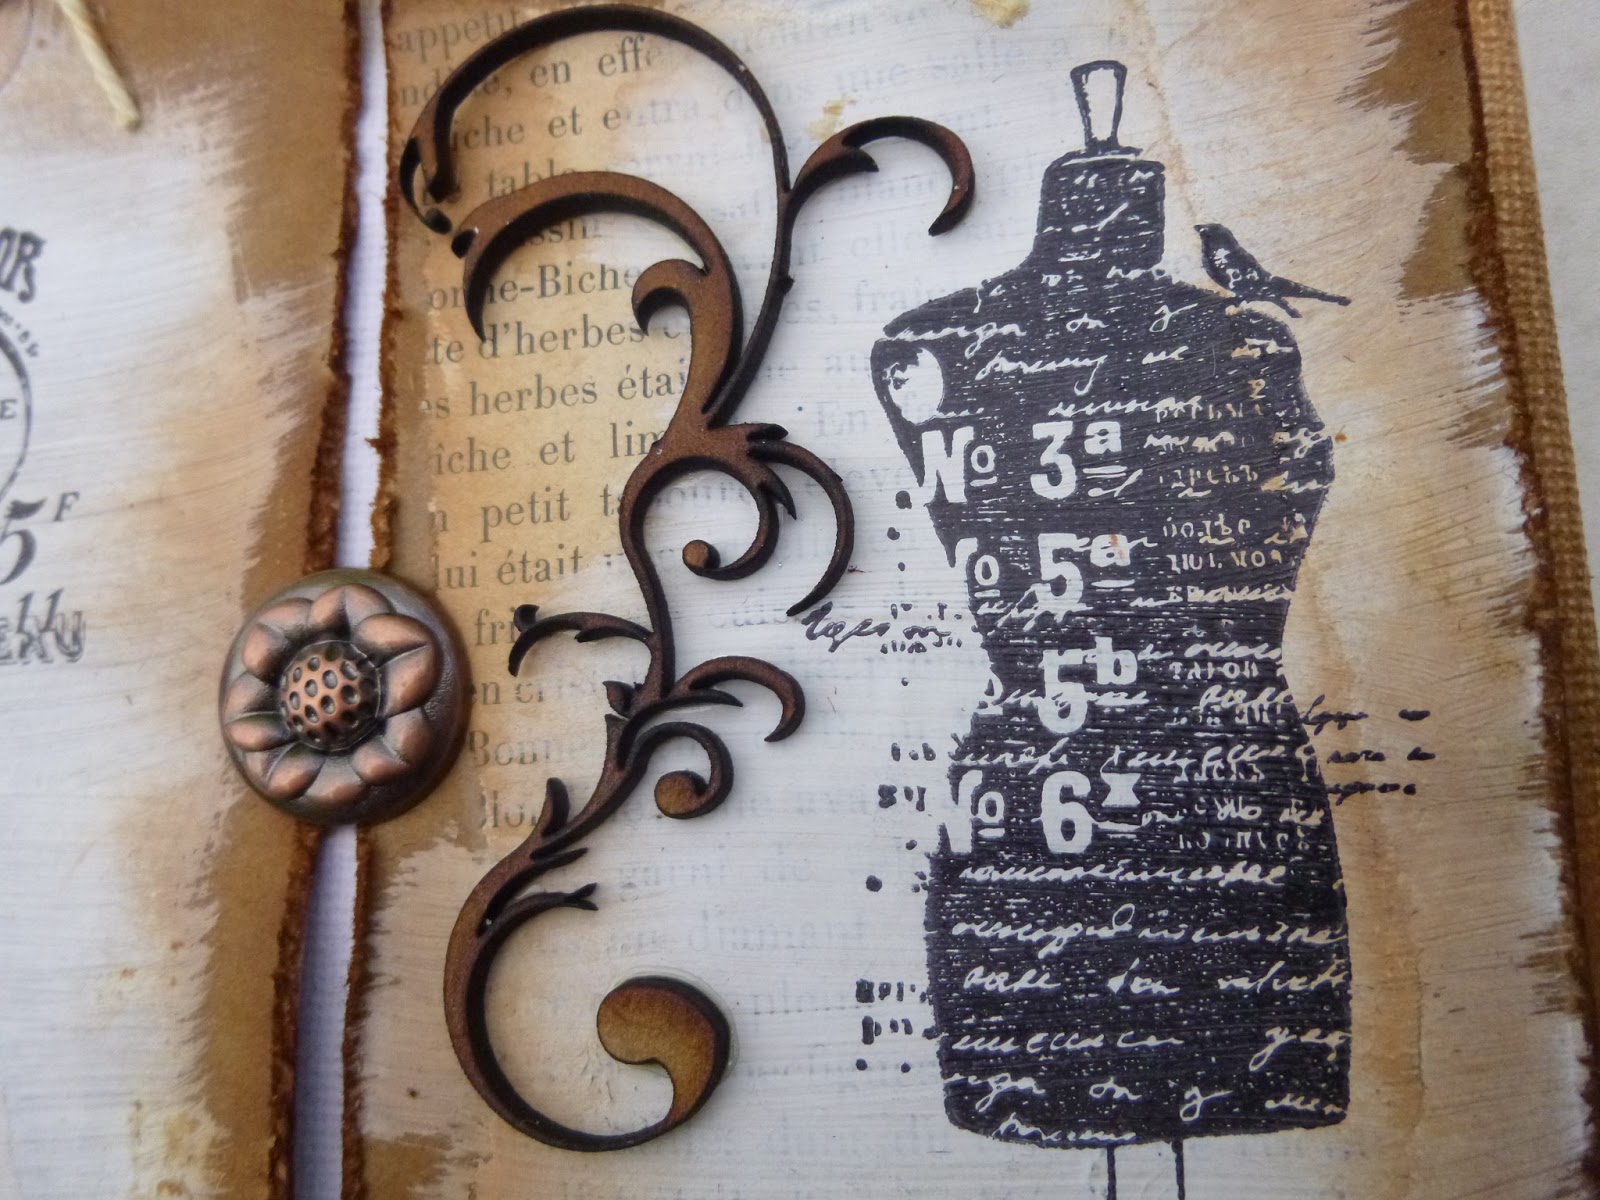
I used my "most-favouritest" text stamp of all, from the TH Apothecary set, to add some stamping texture, and some of the magnificent rub-ons for added detailing.


I coveted this La Blanche stamp from the very first moment I saw it, and was lucky enough to get it on offer recently.  Inking it up for the first time was just as pleasurable as I'd hoped. 


Since the background is quite busy, I decided to add some detail clear embossing powder to my Black Archival, so that the image would have extra impact from the glossy dimension the embossing gives it.  


The metal pieces are mostly from Idea-ology, but I think some elements from the Papermania Chronology collection may have snuck in there too (that clock face, for instance).


And I inked up some Idea-ology Chitchat Stickers to go in my Ornate Plate.  

I didn't want to cover up too much of my background (which delights me) by sticking a whole oval of paper inside there.


Then, of course, there are the ribbons... some seam binding dyed with inks, paints and stains.  


The lighter ribbon tying them together has some Distress Paint in the mix, which gives it that slightly more opaque look.  

The main strands are done with inks and stains, and have that fabulous translucent glow of colour as a result.


Well, I hope that's provided some inspiration.  As I say, if you'd like to see the rest of the mid-month projects, they're right here, and well worth a visit I can tell you.  And then you'll find all the challenge details and the linky (as well as the first half of the inspiration projects, of course) here.


And if that's not enough inspiration, it so happens that my Calico Crafts project also fits the Recipe bill (Lace, Metal, Inks and Paints), so if you've time to hop over and see that, it would be grand!

Thanks so much for stopping by.  I'll see you out there in Craftyblogland.

Logic will get you from A to Z; imagination will get you everywhere.
Albert Einstein

Invitation
If you are a dreamer, come in, 
If you are a dreamer, a wisher, a liar, 
a hope-er, a pray-er, a magic-bean-buyer... 
If you're a pretender, come sit by my fire 
for we have some flax-golden tales to spin. 
Come in! Come in!
Shel Silverstein


I'm just in time to get this in as a second entry in Tag Time over at Fashionable Stamping Challenges.
And I'd also like to add it to the Anything Goes challenge at The Hobby House Challenge Blog.