I'm travelling into a new way of working, a new country, a new language, and a new hobby which I'm passionate about. Come with me for some of the journey...

Showing posts with label bottle. Show all posts

Wednesday, 27 January 2016

Bottling It Up

Hello all.  Thank you so much for your lovely response to my Wanderlust Travel Journal.  I hope I'll be able to return some visits over the next few days - I've been a bit distracted lately (all with good things, don't worry - just time-consuming).  I'm back today with my second inspiration offering for Brenda's wonderful "Inspired by Bottles" theme at Country View Challenges.


You've only got a few days before the end of the month, but I hope this might nudge you in to action.  Although there are already lots of great projects, it's always the more, the merrier!


I got a job lot of vintage bottles on Ebay for a very good price, and some have already put in an appearance.

I suppose serious collectors might get antsy about altering old glass bottles, but there seem to be a lot of this type around - and I do have others in my collection which I wouldn't dream of altering!


These were actually pretty simple to do... 

First, a couple of coats of gesso to seal and give some tooth.


Then I stamped the gorgeous Graphic 45 vintage label stamp on to tissue paper with Archival ink.  

(The two in this photo are in fact some others I was also playing with, painted with white crackle paint rather than gesso, and both stamped on natural kraft-coloured tissue paper, but in different coloured inks.)


Of the two I've ended up with here, one is stamped on white tissue paper and one onto kraft tissue paper, but both stamped in black ink.  For some reason I can't find the early stages photos of these ones.  


I couldn't decide which I preferred out of the two tissue papers, so decided to go with one of each.


After all, if they've been standing around for decades in different places with differing amounts of sunlight falling on each of them, they'd have faded differently in any case.
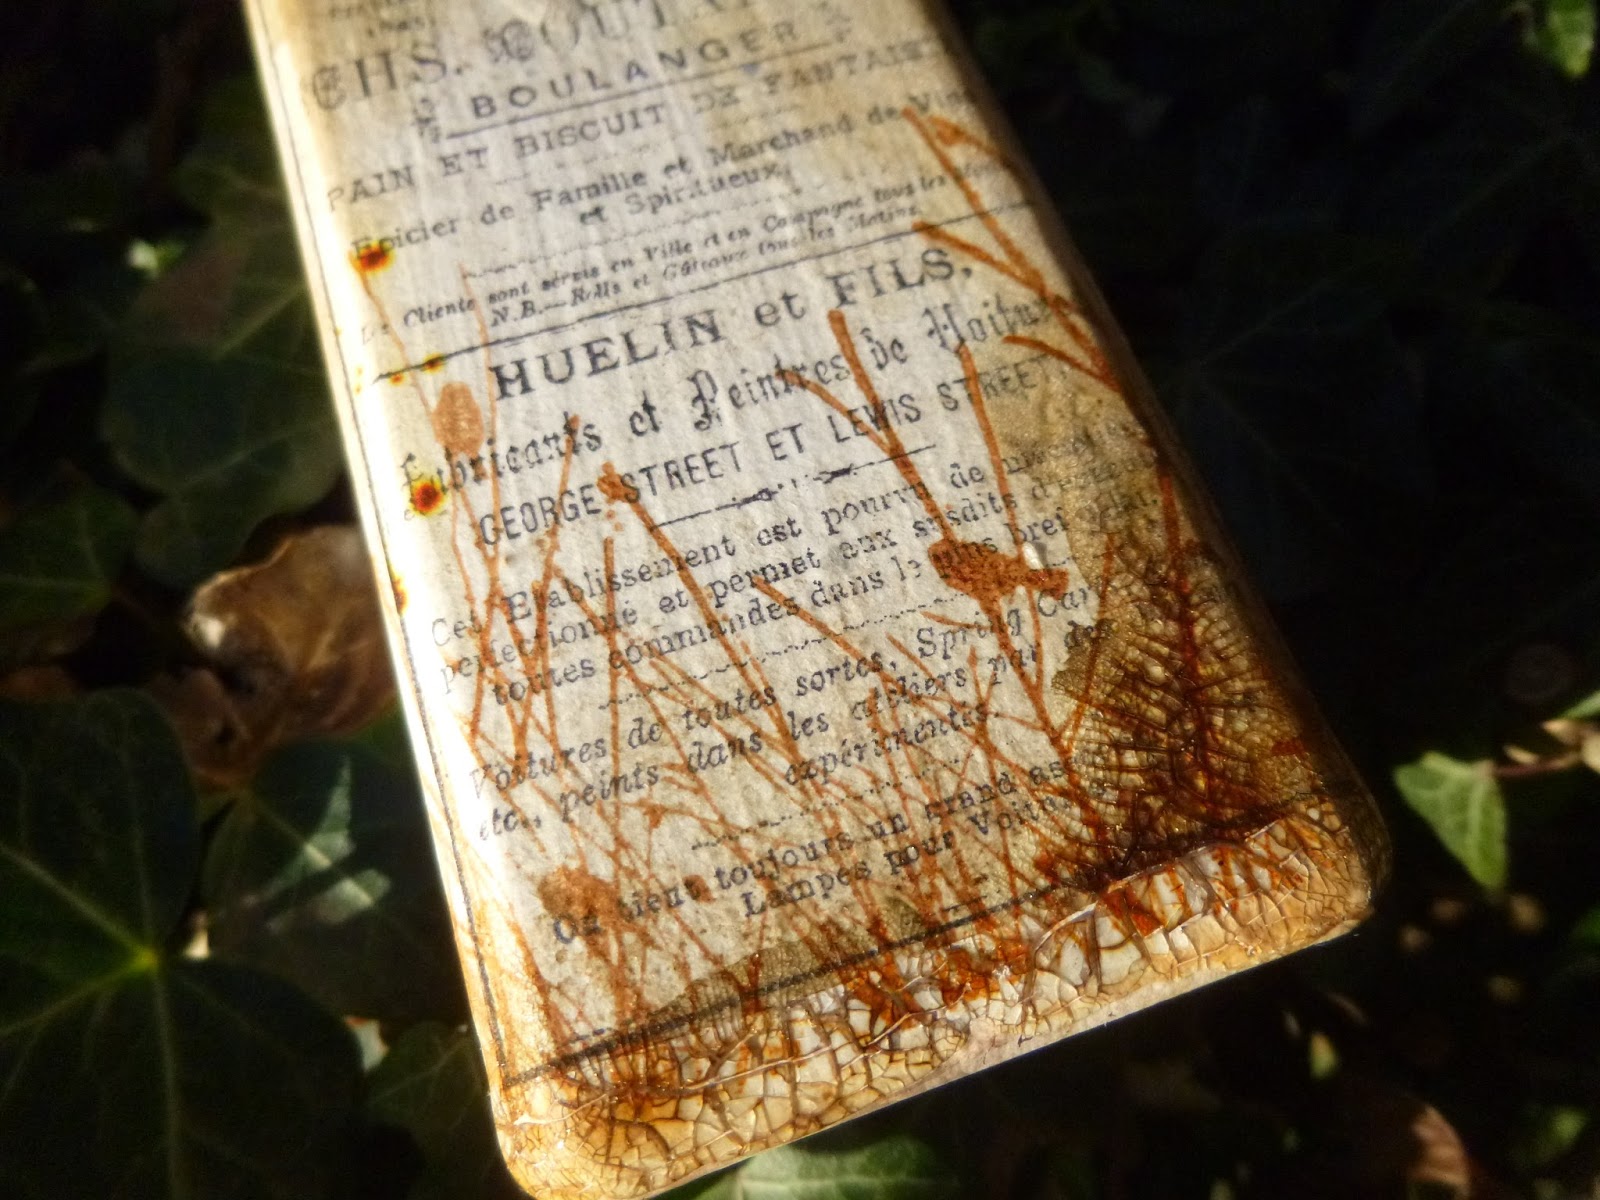


I stamped my favourite PaperArtsy "birds in the grass" along the foot of the bottles.  It just makes me happy!


After that, I applied DecoArt Crackle Glaze in places, just using my fingers mostly.


And once that had crackled nicely, I used various Distress Inks and DecoArt paints to highlight the crackles.


A couple of Idea-ology Muse Tokens are attached with rusty wire...


... wound around the necks of the bottles.


I thought about putting a coat of Ultra Matte Varnish over the top, but the crackle is showing no signs of going anywhere, and I decided I rather liked the gleam of the glaze in the sunlight.


And I really love that embossed lettering along the sides of the bottles too - so glad it has plenty of exposure despite all the ageing. 


And that's pretty much your lot for today.


I hope you like my "antique" bottles, and I hope you'll be "Inspired by Bottles" and come and play along with us at Country View Challenges.


As always, there's a prize voucher on offer from Country View Crafts, and the honour of being one of our Top Three or our Special Mention for the month.  Hope to see you there!

He who pours water hastily into a bottle spills more than goes in.
Spanish Proverb

Wednesday, 26 August 2015

Making Magic at Anything But Cute


Hello all!  I'm very excited today to be able to invite you over to Anything But Cute to see my Guest Designer project for them.


I was delighted when Pamellia contacted me, but also a little daunted as the team there create such amazing work.  It was up to me to choose what to create, but I couldn't resist the beautiful moodboard for the Making Magic theme this month, and so that's what inspired my altered bottles.

They became green and gilded magic potion bottles... 

I'm only sharing a quick look here at Words and Pictures today, so f you'd like to see how they came to life, please hop over to Anything But Cute for the full details.  And I hope they might inspire you to play along there this month if you haven't already.


Thanks so much for stopping by today.  I've got some more exciting guest duties to share with you tomorrow, so I hope you'll be back soon!

The world is full of magic things, patiently waiting for our senses to grow sharper.
W.B. Yeats

In a bit of serendipitous timing, I'd like to offer these up at Frilly and Funkie with A Touch of Gold.

Friday, 15 November 2013

Angels and ArtAngels


Hello all!  Thank you so much for stopping by today.

It's Our Creative Corner time, with some mid-month creations from the other half of the team, including our new DT member, Astrid.

So if you haven't yet played along with Claudia's wonderful Steampunk Tic Tac Toe challenge, you'll discover lots of amazing inspiration at Our Creative Corner today, and you can find all the challenge details and join in the fun here.

I'm here with an Altered ArtAngel, who has in fact had me in something of a devilish thrall for the last few days - possessing me with an idea which proved very difficult to turn into reality.

If you look at the face which appeared, you'll see why I'm in two minds about her origins - divine or demonic?

Perhaps best to think of her as a Diva: she's certainly been highly demanding, including requiring a very long post and photo shoot!  (Remember you can click on the photos for a closer look if you need one.)


As soon as I saw the Steampunk Tic Tac Toe board, the top row called out to me - Wings, Gears, Wire - and I knew immediately that I wanted to create a wire-work crinoline skirt as part of whatever I'd be making.

I figured it might be a bit fiddly... but as it turned out, it was one of the simplest things about this make.  That's not to say it was simple - just that everything else seemed even trickier.


My next thought went to all the bottles I'd refused to throw out during the recent house move.  Time to prove there was a reason for hanging onto them by pressing one of them into service.

This one held White Balsamic Vinegar (which I thoroughly recommend by the way!), and after a good dose of washing up liquid and steel wool to remove the labels, I started to build my layers.


I embossed some sticky-backed aluminium foil using the Alterations Gears folder and stuck it around the bottom half of the bottle.


I also die-cut some cogs and, having used wax paper to make it easier to get them out, I thought I might as well use that as well as the paper versions.

I stuck those to the upper half of the bottle, curving them around the corners and neck to add interest.


Then I gave the whole thing a quick coat of gesso, to give all the different textures "tooth" to hold whatever I decided to sling at it next...


Paint, obviously... lots of it, mainly DecoArt, starting with the Traditions Blue Green Light and Aquamarine...


... and then dry-brushing Indian Turquoise and Spa Mist around the place.


There were many other layers, but towards the end I added some Fresco Translucent Pea Coat from the bottom upwards, as well as some Treasure Gold in Sapphire and Aquamarine.

I think the ArtAngel's mischievous side intervened, because I had intended to add some embossing powders to the bottle too, but by the time I'd remembered that, there was too much other stuff already in the way!


I wove the crinoline structure out of silver garden wire, and it was just as fiddly as I'd expected it would be.  But once I could see that it was going to work, I was happy to persevere.

It was very fine wire, which meant it was easy to manipulate, but also meant it would occasionally snap mid-twiddle - very annoying (ArtAngel in action again?).


Once the weaving was complete, I added a tiny twirl on the end of each stalk - wrapping the ends around a piece of dowelling to curl them.


I gave the whole structure a coat of DecoArt Metallics Worn Penny.

It really is the colour of a worn penny - exactly as it says - and with a lovely metallic sheen to it.


Time to get the wings under way... I had a Tic Tac Toe line to complete, after all, and the Gears and Wires were already well catered for.


I cut the Layered Wings out of aluminium (a cut-up Coke can, since you ask), and embossed them with the Wings folder.  I wanted them made out of metal so that I could bend and shape them easily if necessary later.

They also got various layers of paint to match what was going on with the bottle.


The idea of a clock face for the ArtAngel's face happened quite early on, but when I held up the largest Idea-ology clock against the bottle neck, I got a strong message through from her that it was simply not large enough.


Something considerably more imposing was required.

I happened to have the interior of a die-cut Weathered Clock lying on the craft table (left over from my art journal page earlier this week).  I lay the Idea-ology clock face down on it, and inspiration struck - more gears needed (definite external input, I'd say... ArtAngel up to her tricks again).


I grabbed several cogs and gears and started to create her hair.

It's one of those eighteenth century wig affairs, piled high, and with some little ringlets either side of the face too, courtesy of some curly rusty wire!


I obviously couldn't have the hair mounted on boring cardboard, so it was out with the paints again, this time given a layer of the DecoArt One Step Crackle.  

Once it was fully dry, I splurged Faded Jeans Distress Stain over it so that it would seep down into the crackles to highlight them.


I played around with eyes and mouths for ages, trying this, that and the other, and in the end I yielded to the strongest impulse, which was this rather alarming configuration, with frowning Idea-ology paper clips and an ambiguous game spinner for the mouth.  

I can't help but feel that this wasn't entirely my decision!


Finally some adornment.  

I'm delighted with her ruff.  I'm aware it makes her rather more Elizabethan than truly Victorian or Edwardian - which would be more appropriate time periods for Steampunk - but I couldn't resist it.  

It's another bit of salvage from the house move - one of many ring-bindings ripped out of notebooks which were headed for the incinerator.


The ruff got a coat of the Worn Penny, so that it would tie in, and I added one of the Tim Holtz tassels for extra decoration.

On a piece of the ball-chain, I added another little cog, a large game spinner (the other hand from the clock face?), and a Muse Token stating the ArtAngel's strong claim to being Unique!


Things were simpler to start with, but ArtAngel kept wanting to wear more!


She didn't make life any easier when it came to the photo shoot either... ArtAngel is very difficult to capture in her full glory.


Anything too fussy in the background really didn't work; the shine on the crackle background kept obscuring the crackles themselves...


It seemed to me that her frown got deeper and deeper the harder I tried.


Almost no light variation that I tried could really capture the detail of the embossing at the same time as the delicate wire crinoline.

In the end, I just had to go with lots of photos, rather than trying to hit that special one that does the job in one go.


It's been another mammoth post here at Words and Pictures - but, given the number of very short sneak peeks lately, I hope you'll forgive me.  

If not, I'm just going to blame the ArtAngel in any case, so there!


If you're still eager for more inspiration, do hop over and see what my amazing team-mates have been up to over at Our Creative Corner, and I do look forward to seeing what happens when you play Steampunk Tic Tac Toe - you have until the 28th of the month, so I hope to see you there.

Oh, what may man within him hide, though angel on the outward side!
William Shakespeare

If I got rid of my demons, I’d lose my angels.
Tennessee Williams

Every angel is terrifying.
Rainer Maria Rilke

I'd like to enter my ArtAngel for Bonnie's fantastic Art Dolls Challenge over at eclectic Paperie (my old stamping ground - nice to be back for a visit!)