
I was absolutely thrilled to be picked out as having Caught their Eye over at Top Tip Tuesday with my Big Top, and then I realised that it meant I would be invited to do a Guest Designer spot for them - even more exciting - if a little scary! It got even scarier when they told me that the Challenge for the fortnight I'd be playing would be One Layer Cards. I have done one for a Less Is More challenge, but the required simplicity is the complete opposite of the project I won with and, as regular readers will know, I'm generally a more-layers-the-better kind of girl!
A One Layer card generally seems to be defined as a folded piece of cardstock with the image(s) stamped directly onto it; minimal embellishments are allowed, but I do welcome a challenge, so I decided to be a purist about it.
Okay, without further ado, let me show you the One Layer wonders I came up with. Yes, that's plural - three, in fact, I'm afraid... well, if you're going to restrict me to one layer, I'm going to end up with more than one card!
 As you can see, these three are variations on a theme... well, variations on a stamp, I suppose. With CAS (Clean and Simple cards) I think it's highly advisable not to put all your eggs in one basket, at least not if you're a CAS novice.

With layered work if something goes wrong you can always stick something over the top, or add a layer of paint or tissue tape to distract the eye. With one layer, if something goes wrong, you're pretty much done for. If you've read my previous CAS post, you'll know I speak from bitter experience!
Far better, for me anyway, is to have a number of things on the boil, and then you've got a fallback position if disaster strikes!
These were all part of my insomniac creativity a few nights ago... evidently 4 a.m. is a pretty productive time!
The stamp is one I got on ebay for silly money - £2.99 for this beautiful 12.5x12.5cm stamp by Magenta of Canada - I'm so glad nobody else seemed to want it! It's one of my very few wood-mounted stamps. While they're absolutely beautiful objects, the clear stamps are so much better for storing - you can fit many more of them in to the same space!

The first one I worked on has a potential Top Tip - a refinement to one of my favourite ways of applying ink to a stamp.
Rather than all one colour, or the precision of colouring the stamp with Distress Markers, this method has the deep pleasure of unpredictability built in.
You apply a sweep of a number of different Distress Ink pads (colours you've selected to complement one another) direct to the craft mat, and then take the stamp on a little wiggly walk across them, pressing down to pick up ink several times.
You can then give them a light spritz of water or, as I did, breathe heavily across the surface of the stamp.

The moisture allows the inks to blend a little on the stamp. I find the spritz a bit hard to control - you can end up with a very watercoloury effect... pretty, but with a stamp of this detail not so good. So, for a detailed stamp, the hot breath does the job really well.
To be honest, given the time of night I was playing, I can't remember exactly which colours were swept onto the mat... Vintage Photo is there, and Broken China I think, and maybe Bundled Sage?
For the Tim Holtz sentiment, I applied the same (again... I think they were the same!?) colours direct from the ink pad to the stamp.
 For the next I stamped all in one colour, Forest Moss. I decided to have a play with the Distress Markers, colouring in, and was kicking myself for not having stamped in Archival since now I wouldn't be able to use water with the Markers without messing up the stamped image.
It turned out - as it so often does - that this was a happy accident. I enjoy turning the Markers to watercolours, but in this case they've been left with the full concentration of colour, and I really like the end result.
I built the blending in from the edge using Antique Linen and Vintage Photo leaving just the centre section with a wholly white background.


Funny how the one I was just messing around with ended up being my favourite of the three!
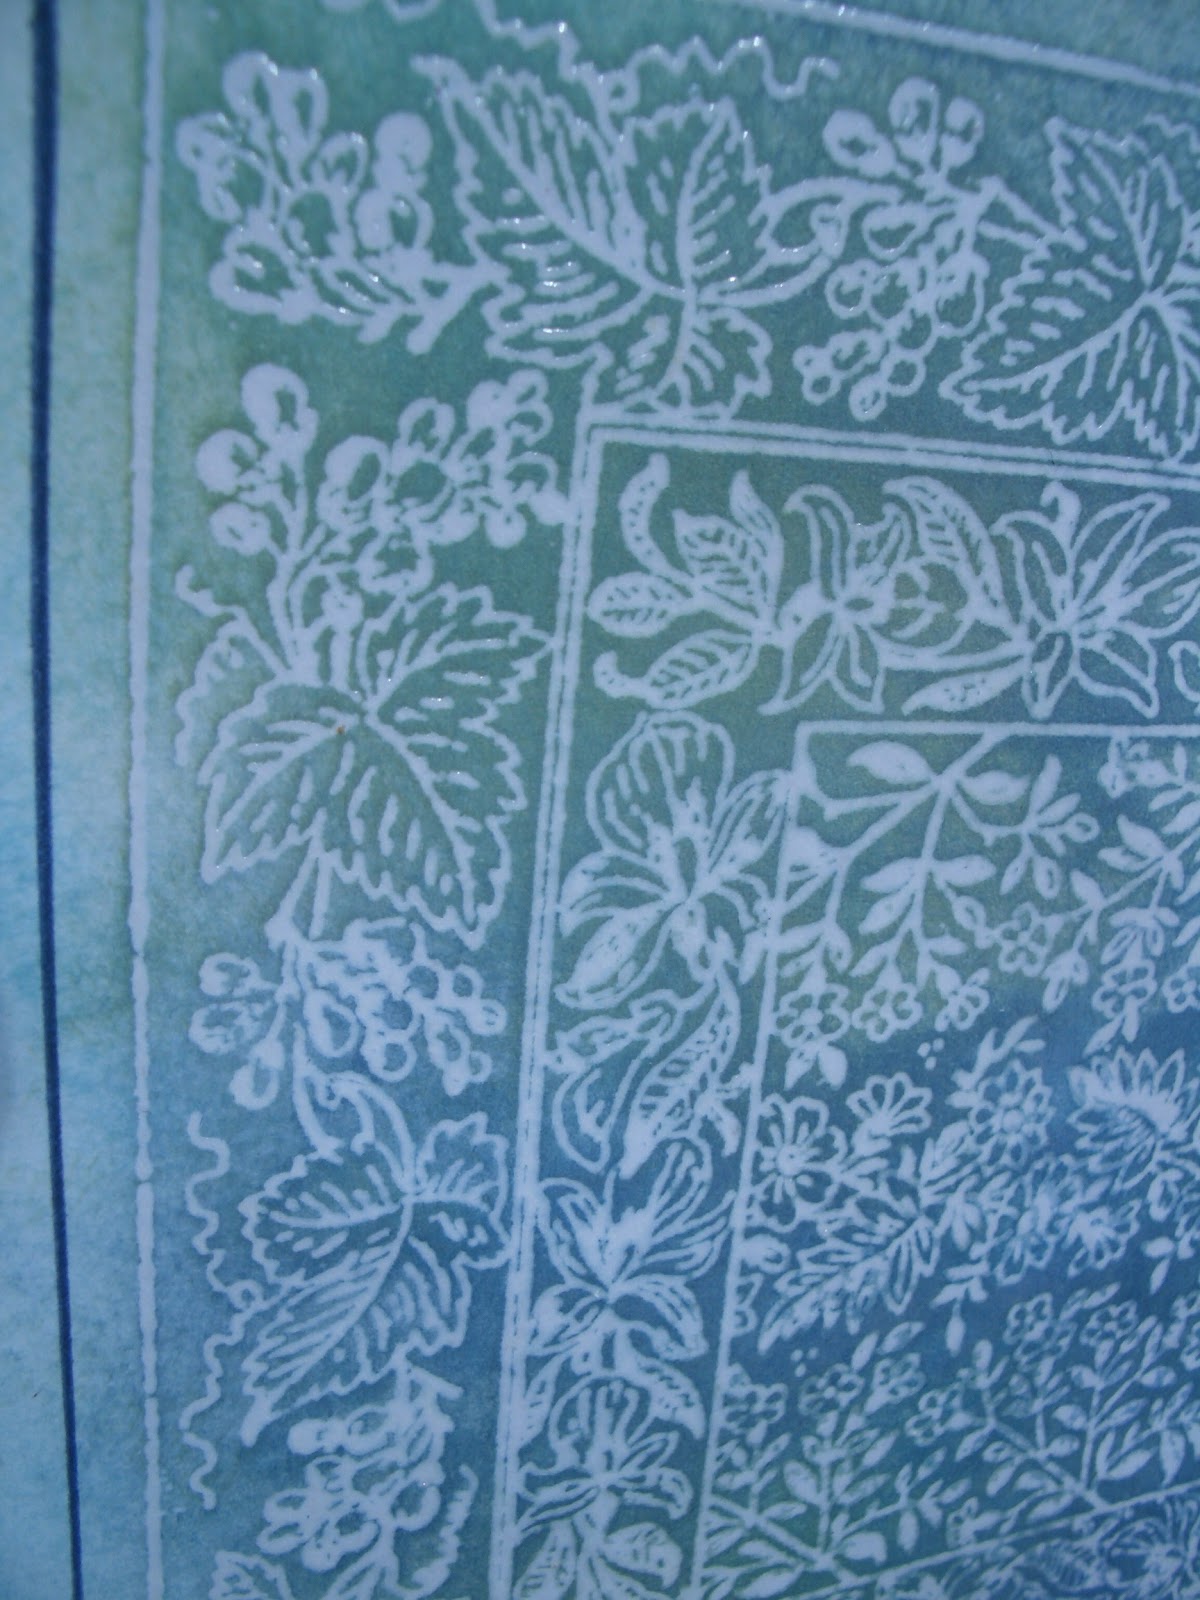 And then the last one was made with one of my favourite techniques, and colours I love. It's stamped onto white cardstock using Versamark Watermark, and then embossed with Stampendous Detail Clear embossing powder. I thought it would be necessary to go with the Detail powder as the stamp is so detailed.
I then inked over using a blending tool, with shades of Faded Jeans, Bundled Sage and Peeled Paint. I don't have the Peeled Paint ink pad, so instead I coloured a patch of ink from the Distress Marker onto my acrylic block, and used that with the blending tool too.
So I think, in the end, I'll offer this one up as my Top Tip. If you've succumbed to a full set of Distress Markers, but don't have all the ink pads, you can still blend with any of the 37 Distress colours by using your acrylic block (or any non-porous surface) as a palette.

The sentiment was key on this one, as it really is what I was doing in the early hours of this particular night. It's from a Personal Impressions set, Creative Thoughts, designed by Lindsay Mason. And since I loved the sentiment, I chose to stamp it in my favourite blue - the Chipped Sapphire.
The whole card still looked a little naked somehow. It needed finishing off. My gut said a border was needed, but it needed several deep breaths before I set off with the Chipped Sapphire Distress Marker and my trusty wooden ruler. As I said, if you get it wrong on a one layer card, there's no going back - it's back to the very beginning.

Thankfully, I was very happy with my fine, delicate border. I like that it adds one extra frame to the concentric squares of the stamp (though my border is not precisely concentric, as it doesn't share the same centre as the rest - sorry, that's my inner word-pedant leaping out to cause trouble!).
Many thanks for joining me today here at Words and Pictures, and I hope that I've given some inspiration for creating One Layer cards. Do hop over to see what the Design Team at Top Tip Tuesday have got to offer - it's fabulous! Plus there's a brilliant tutorial full of great ideas and inspiration too... and do join in the fun yourself this fortnight.
I am only one, but still I am one. I cannot do everything, but still I can do something; and because I cannot do everything, I will not refuse to do something that I can do.
Helen Keller
There can be only one...
from the film The Highlander
I'm entering the middle card in CAS-ual Fridays' challenge this week, which is Square Cards
And I'd like to enter the third card into Twisted Tuesday's challenge Are You Blue? - with a twist of one other colour
23 comments:
And you do one layer to perfection too...gorgeous stamp, love the coloured one with inks, so pretty..
Luv CHRISSYxx
Fabulous, gorgeous stamp as a long time stamper wood backed does it for me every time. You have made 3 fabulous cards each so different and interesting. XOXO Zoe
I'm with you Alison, one layer cards are hard but you pulled it off. Three, no less lol. You've done an amazing job and it's been a delight to have you guest design with us at Top Tip Tuesday. Love your work & blog!
Hugs
I Agree one Layer cards are not my thing either but I LOVE yours and you have done us proud with 3!!! cards and love your colours too! thank you for joining us and your DT spot was we deserved! hugs me x
Hi Alison. One layer cards are hard to do but you have done a wonderful job. I love them especially the rustic coloured one. It reminds me of a vintage tapestry. Super stamp. What a great find. As always a fab post TFS.
Regards Florence x
These are lovely, we've not really tried one layer cards since starting card making. Maybe we should have another go.
A very hard task for me as well! You did awesome! Love the stamp!
Awesome creation!
What an amazing results, Alison!
Great artwork!
greetings, Alie :-)
Beautiful cards, I think my favorite is the blue one. So soft, love the color combination. Love your words and tutorial.
One layer is a very tough challenge... I love how you skirted it by showing all these lovely varieties. Projects like this really demonstrate why stamping is such a great art form and outlet... and how versatile one stamp can be. I love what you've done with it. Congrats on your guest spot!
I've just popped over to say thank you for stopping by my blog and leaving such a lovely comment. I'm really glad that I did as you have some lovely creations on your blog.
Claire x
Thanks for showing us three delightful cards - and a tutorial as to how you achieved those beautiful effects.
Reminds me that I have one of these stamps (if not two) and it is about time they came out of hiding and had another airing.
Thanks so much Alison for sharing your delightful work.
Hugs, Neet xx
Hi Alison this is fabulous. I love this one layer design. Will certainly come back and read this again as I am desperate to return comments and have a mountain of other things to do. TFS......hugs Annie x
Absolutely beautiful! You do amazing work! I thoroughly enjoyed looking around your blog! Thank you for stopping by to visit me as well! :)
Amazing work Alison
Love it
Greetings Janny
I know I always say wow when I come over here, but WOW. Love how all of these turned out so different and all so beautiful in their own right!
Shelby
The sentiment is one to remember. I love how the one you played more with ended up your favorite. I think I followed your steps well enough to try this beautiful technique. I have used the spray and stamp before but I don't ever color in my stamping. I like the idea of using the versamark more. Found you through WOYWW but ended up down here :) Blessings, Lisa
Love how your one layered cards turned out, they are always hard for me! Thanks for playing along this week at Twisted Tuesday Challengs!
Amazing cards! The square one is my fave too, your coloring is to die for! Such beautiful fall palette!
Thanks so much for playing with us this week at CAS-ual Fridays :D
Wow...what beautiful cards!! Works of art...just gorgeous!! Thanks so much for being a part of the challenge this week at CAS-ual Fridays:)!!
omg - i remember these Magenta stamps. I used to have one of them. they were fascinating to play with. you can cut out all the layers and intertwine them like spellbinders dies.love the variety of designs you've created with them.l
WOW again lol. Love the cards you have done, I don't know why you was worried as there fantastic, mind you I love to nosy at the less is more challenge blog but think I have only entered twice, I love to see them but I just don't get them right. When I first saw the post I thought they were embroidery samplers so that shows how precise they look. I think the stamp you have used is gorgeous at such a bargain and I also love what you have done with the distress markers, your ideas are amazing. My real names is Kerry lol which I love but just to be different I also started using Kezzy while blogging as it's my older sisters nickname for me when she wants something lol lol. I shall hopefully catch up with your wonderful posts tomorrow. Hugs Kerry xxxx
Post a Comment