
It's another long dollshouse post today but, as I said last time, for once I'm not apologising for the length. I really want to document this work for myself and for Small Worlds (my mother's dollshouse museum in the Czech Republic, for anyone still catching up - find it at Cestina's Dollshouses). It's a delightful bonus that anyone out there is enjoying it!
So, as promised, we move to a very different kind of dwelling today. This Greenleaf house is making its debut at Small Worlds this season, having been kindly donated by our very good friend Susanne von Campenhausen.

It was her dollshouse in her youth but now, as she's the mother of four boys, it had been lying neglected in the attic for years. She thought this might be a better way of life for it and, in a way, it's coming full circle as it was Cestina who helped source it in the first place.
I'll try to let you in on how one decision led to another (sometimes without me having much choice in the matter) and began to weave a new story around this house.

Susanne warned us it was in need of some attention... and that's what it got.
Here's how the inside looked when I first started on it.

And here's what you've got now...
(By all means, click on the photo for a larger view, but obviously I'll be showing you close-ups as the post progresses, so don't panic if you can't see properly!)
For character purposes, the exterior has actually become more rather than less dilapidated!

It was in a reasonable state on the outside, apart from some missing crenellations, but was in a rather bland cream, and the roof tiles were plain wood (not generally a recognised material for roof tiles on houses of this type!).
It didn't help that, in the new layout, it ended up standing next to another cream house with wooden tiles.

So I got painty with it, and as I got painty, it started to take on character and tell me stories.
What if some of those broken crenellations were to stay broken? What if the exterior of this house were in need of some tender, loving care?
I wanted to go for a coppery patina on the roof tiles... and that gave the house even more of an Addams Family air... so I decided to go the whole hog and distress that bland cream paint. Washes of black give it more of a sense of age. I rather like the dramatic look. (I hope Susanne does too!)
That drama on the outside eventually started to inform the story of who lives inside... but more of that as we go.
First a quick little journey through the stages of the roof - just in case I should want to re-create the look, or something similar, another time.

The first stage was rather terrifyingly bright and cartoon-like! Like something out of Disney...!!
I used lots of greens on my palette for this: from the PaperArtsy Frescos - Limelight, Guacamole, Hey Pesto and Tinned Peas; from the DecoArt Americana range - Citron Green, Teal Green, Hauser Light and Mint Julep; and from the DecoArt Traditions Range - Blue-Green Light and Aquamarine.

It's those last two that really up the brightness stakes... but copper once it gathers a patina of age and decay does have that very full on colour intensity, so it had to be in the mix.
I took a deep breath and went on to the next layer...

You can see the next layer just being started in the "Disney" photo above, on the eave on the far right - time to add some coppery tones.
I used a bit of Ten Second Studios Verday Copper in a couple of places, but decided that was too expensive to use on the whole roof (even though I got it in a sale - I didn't want to use it all up!).

Instead I used a combination of DecoArt Burnt Sienna and their Dazzling Metallics Worn Penny (brilliant paint!), and made my way across the whole roof again.
It's only when you're painting it all three times over (at least) that you realise this house is more roof than house!

That's a lot of masking tape you need too - far too many places where roof and house or roof and crenellations coincide.
Anyway, that was the copper stage... an improvement, but still - as you looked across the room - way too in-your-face.

So it was out with the good old wash of black acrylic.

You can see that the black immediately gives it a lot more depth and age.

And it was some accidental drippage of that black wash onto the bland cream walls....

...that made me decide to go down the weathering route for the walls too.

Of course the white paintwork also needed to be a little less perfect...

So many nooks and crannies on this blessed roof!!

I weathered it more on edges and corners, and under windows where you'd expect water damage to be most evident.
And I came to the conclusion that it was worth all those layers and all those different paint colours on the roof in the end.

I think the overall effect is pretty cool. And dramatic, too, as I said earlier... so (in your best Lloyd Grossman impressions now, please) "Who might live in a house like this?".
Let's find out...

Susanne had passed on the furniture she had collected, all now in shoeboxes and much of it in urgent need of repair. I spent a day with it spread out on my craft table, bringing it back to life.
As well as repairing, I decided to do a bit of altering. Out with the paints!

Dollshouse furniture (the less expensive sort) often seems to come in a bizarrely vivid shade of orange, pretending to be wood - see the side table to the left.
So while I was sticking chairs, tables, beds and a grandfather clock back together, I decided also to see if I could get more of a walnut look, rather than these cheap veneerings.
The cabinets have already started on their journey with some coats of Raw Umber and washes of black paint.

Then with a coat of varnish (DecoArt Triple Thick Gloss Glaze) you start to see that lovely antique lustre that good wooden furniture should have. The writing desk is almost there...
Once the clock has its head back on, that will get the same treatment.
The piano in the background above was a sort of shiny dark red (aiming for mahogany, I guess, but not really succeeding). I decided I would transform it to a glossy black, inspired by the piano owned by Susanne's parents, which she and I and her sister used to play on.

The delicately pale pink chairs had faded to a lustreless oyster, and the glue stains were showing quite badly in places.
(I was also aware that the wallpaper I'd selected for the sitting room would make them look even more out of place.)
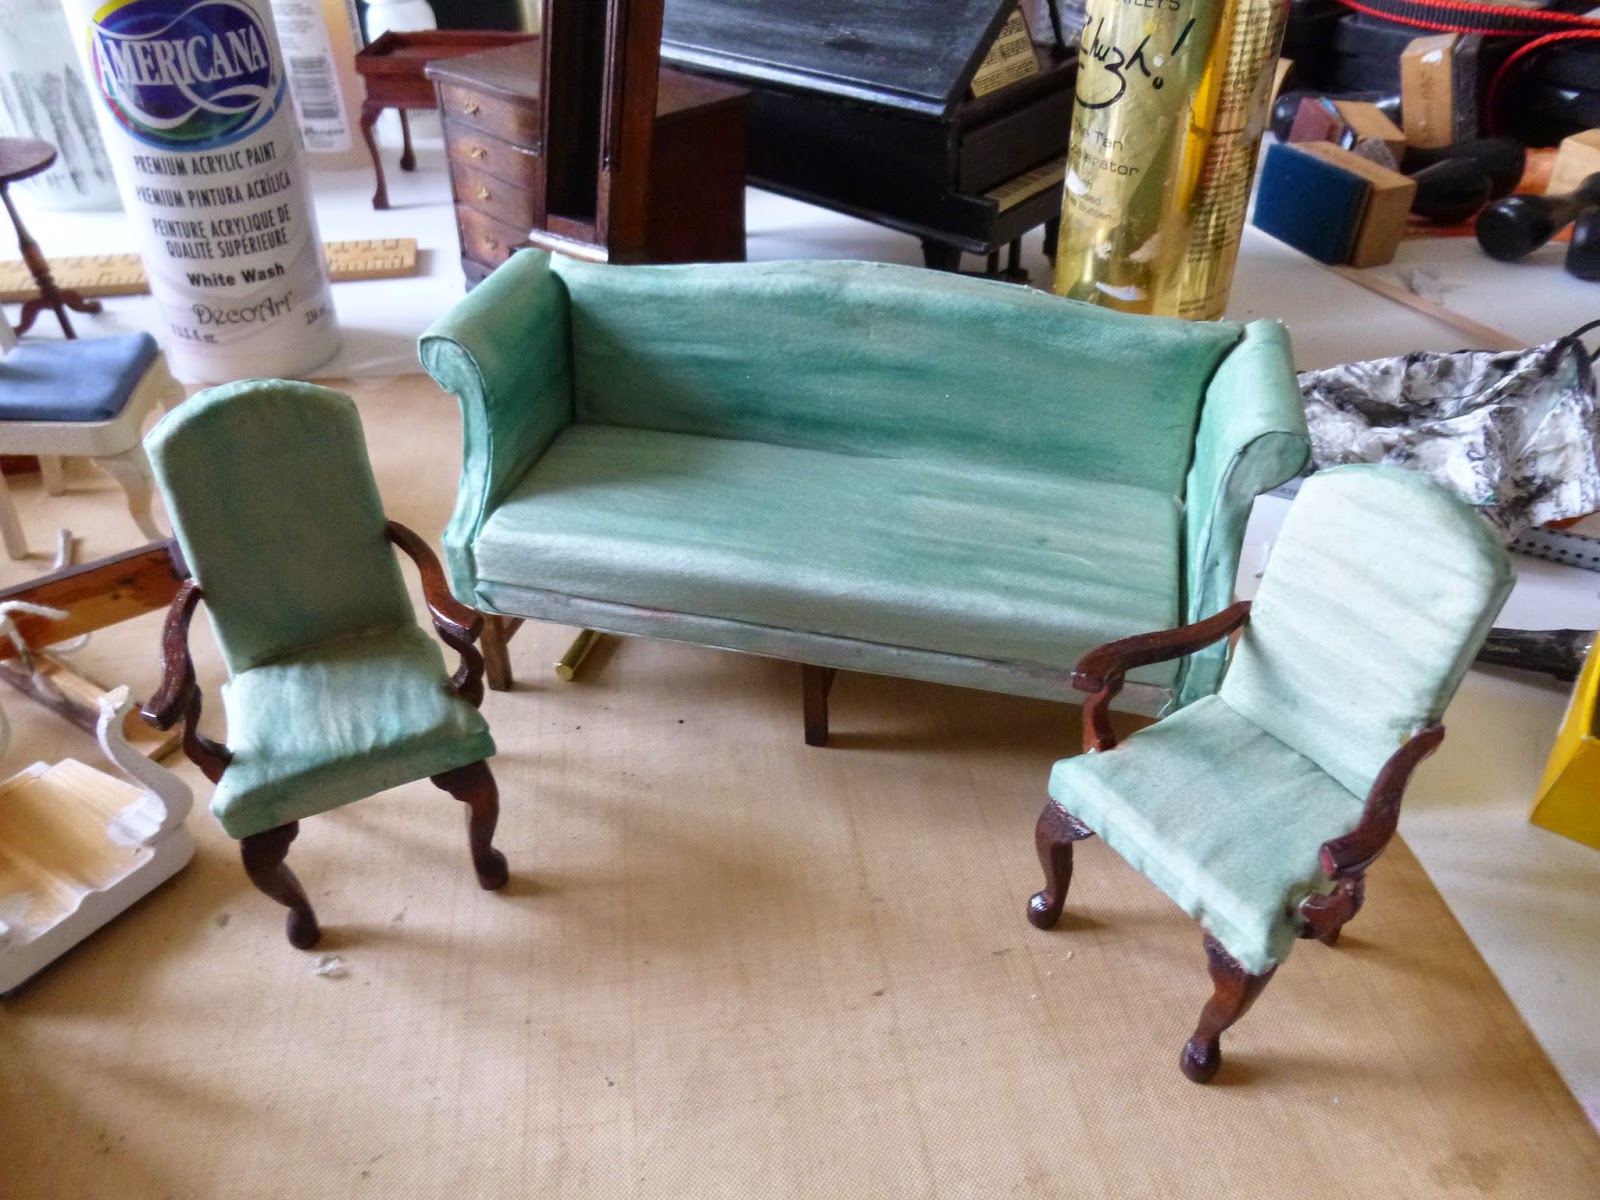
I experimented with applying Iced Spruce Distress Stain direct to the silk and ended up loving the result. It looks like shot silk close up.
I painted the wood for that richer feel too. A whole new look!

The dining room chairs were in the biggest state of disarray - must have been some very heavy guests at some point!
As well as sticking them back together, I had to make a few pieces to fill in the gaps.

I had to alter the colour of the seating cushions which had faded too.
One had gone missing altogether and, although there was some spare material in the shoebox, it was several shades darker (having been protected from the light all those years), so I just tried to get them to match.
They're now all the darker shade of teal on the right (a mixture of Broken China and Evergreen Bough Distress Stains).

Getting the beds back together was one of the trickiest bits... all that woven string getting tangled.
The one on the left is propped up while the glue dries... and they also had some paintwork done.

Once done, they looked so cool I didn't really want to cover them with mattresses!
I've always wanted to create a proper attic, full of unwanted things, so I decided that one of them would lie in the extensive attics of this house, with the strings still exposed.
Over the next few weeks, any glue gun strings were carefully preserved to create cobwebs in the attic!
I put the repaired and revamped furniture into the house to see where to go next. Clearly we would have to add items from the 40-year hoard to complete the look, as you can see from the next few photos - but somehow I couldn't seem to progress with it. It's strange how hard it is to decorate and furnish a house until you know who's living there...

I was having trouble working out a room allocation. Susanne has a lovely family of Edwardian dolls, but how on earth they were all supposed to fit in the very limited bedroom space was, I confess, slightly baffling me.
And fitting the grand piano plus all the other furniture into that downstairs room was proving very hard. I stalled completely.

All this furniture is clearly period furniture, but the house itself really doesn't have a Victorian or Edwardian feel to it. The layout is all wrong - the open plan living space downstairs is much more of a modern way to live.
So I felt a bit stuck... until it dawned on me that plenty of people nowadays have beautiful period furniture in their houses, side by side with modern living.
(The prototype computer on the dining table didn't make the final cut, even once I'd painted the ink screen metallic silver. Top marks to anyone who can spot what it's made of!)
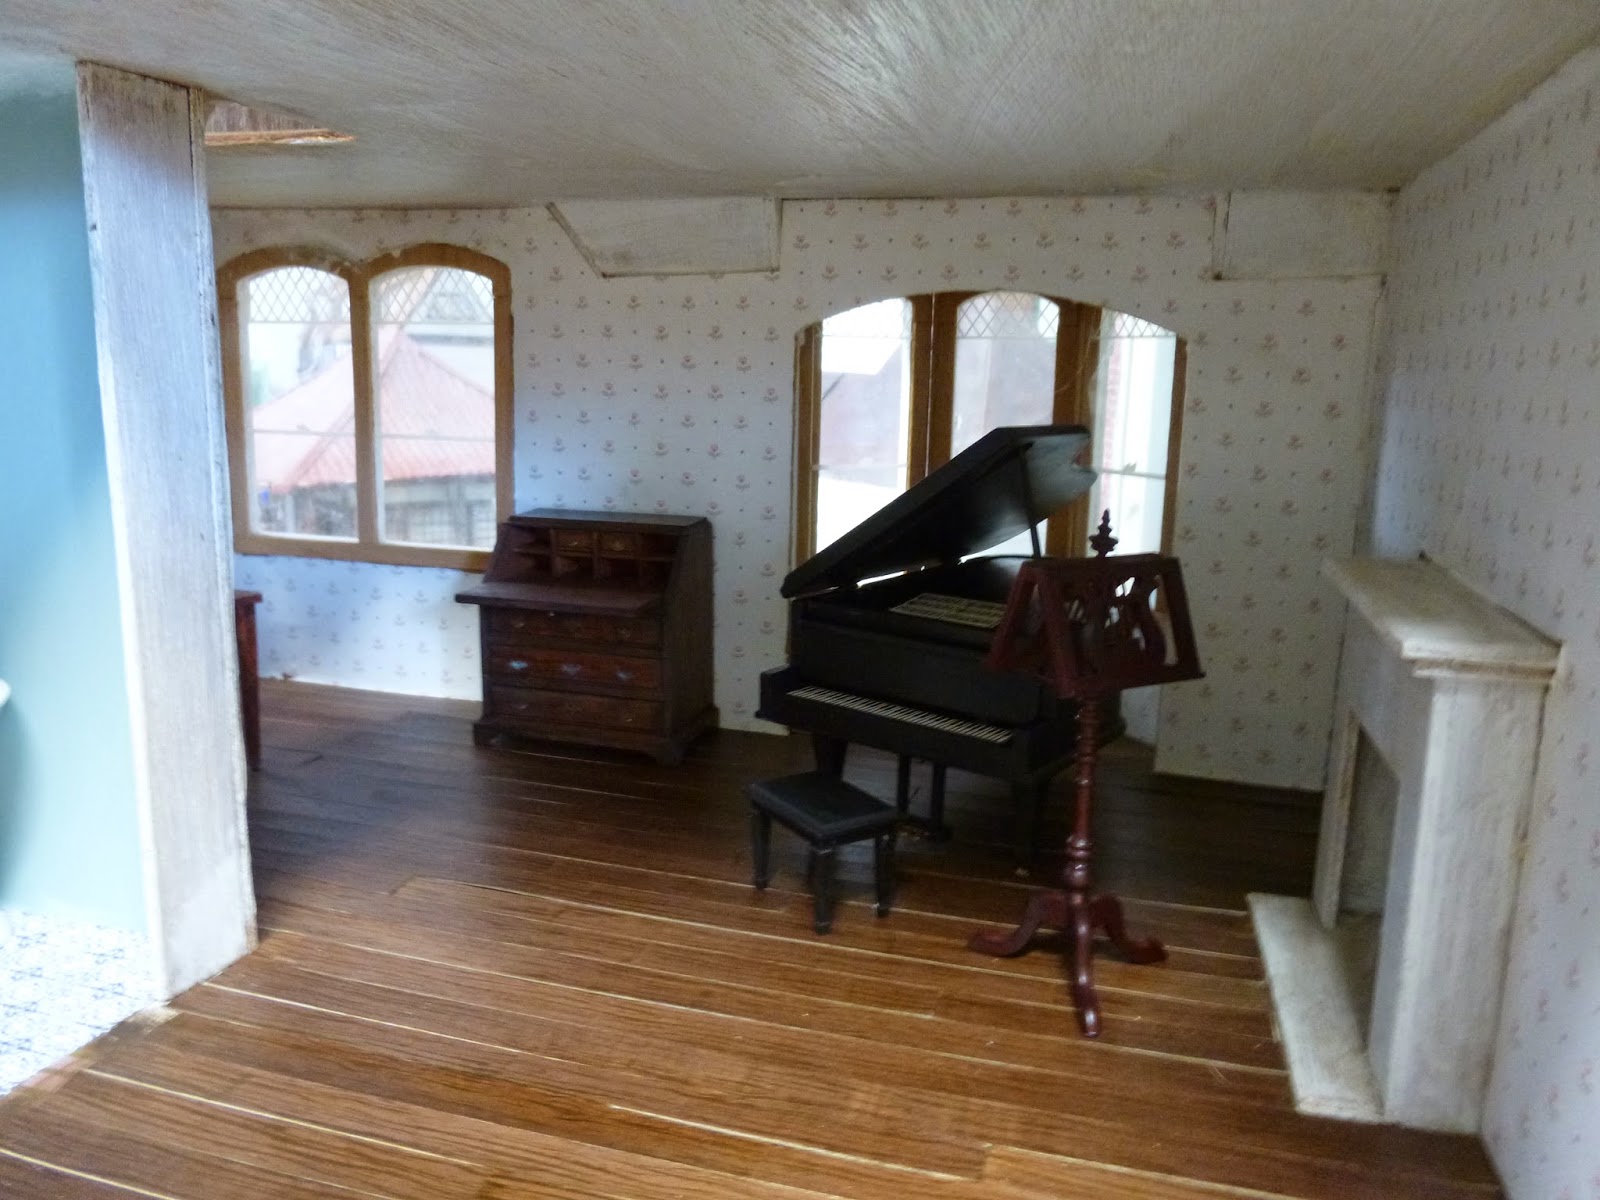
The breakthrough came when I gave the piano the space it deserved in a room all of its own upstairs - now the Music Room.

And if the attic was going to be a "forgotten" space, that left me with one single solitary bedroom - and not very large at that. It was becoming apparent that this house didn't seem to have room for a whole family.

So - apologies, Susanne! - the Edwardian family will now be housed elsewhere, somewhere more commodious, I hope.
And with that music room and the dramatic exterior, not to mention the items now banished to the attic, the until now rather shadowy inhabitant started to take shape for me.
And now I knew who she was, I was able to forge ahead with the transformation.

Let's start in that music room - probably my favourite room in the house. Oh, how I would love a room like this of my own! (Yes, I know that's greedy, and I have a craft room already - but that's extremely cluttered, whereas this...)
Here's how it was at the start of things...

... and here's how it looks now.
The copper wires (Susanne had wired the house to be lit) were ripped up, and I laid one of my handmade oak floors... good for the acoustics.
So she's a musician, clearly - a singer, I decided, and a successful one at that...

... though her own long and illustrious performing career is now combined with teaching - only the most promising of the next generation of singers, obviously.
Sometimes agents or directors will come to discuss future collaboration, or hear new work in development - there's a chair ready and waiting...

These rather beautiful golden chairs are from a series called Take a Seat, by Raine - resin reproductions of interesting or notable chair designs.
Cestina bought a whole lot when they were on special offer in The Works (cheap book and art supply store here in the UK - though sadly nothing like Michael's by the sound of it) and they've all been sitting in their boxes for more than a decade.
This spring, this pair and many of the others have finally found homes in various houses in Small Worlds.

At her writing desk, our opera singer has cards and letters from fans, from directors and conductors, and from grateful former pupils.
And fresh flowers, of course... always.
PaperArtsy fans will spot the card cut from the PaperArtsy postcard! And you can just see the corner of the Oriental sculpture placed for maximum feng-shui benefit at the top of the stairs.

There's another PaperArtsy card on the mantelpiece along with a cup warmer to keep her tisanes and decoctions at the right temperature for perfect lubrication of the vocal folds.
(I had a singing teacher who had an enormous mirror just by her piano - useful for checking posture and lip shaping. She's definitely an ingredient in this mix.)

There'll always be more details to add - next time I'm in the Czech Republic! - but it's already a room which has a really lovely atmosphere.
It's hard to capture with a photograph, but it gives me great pleasure to gaze at this one in real life (and imagine living and working in it).
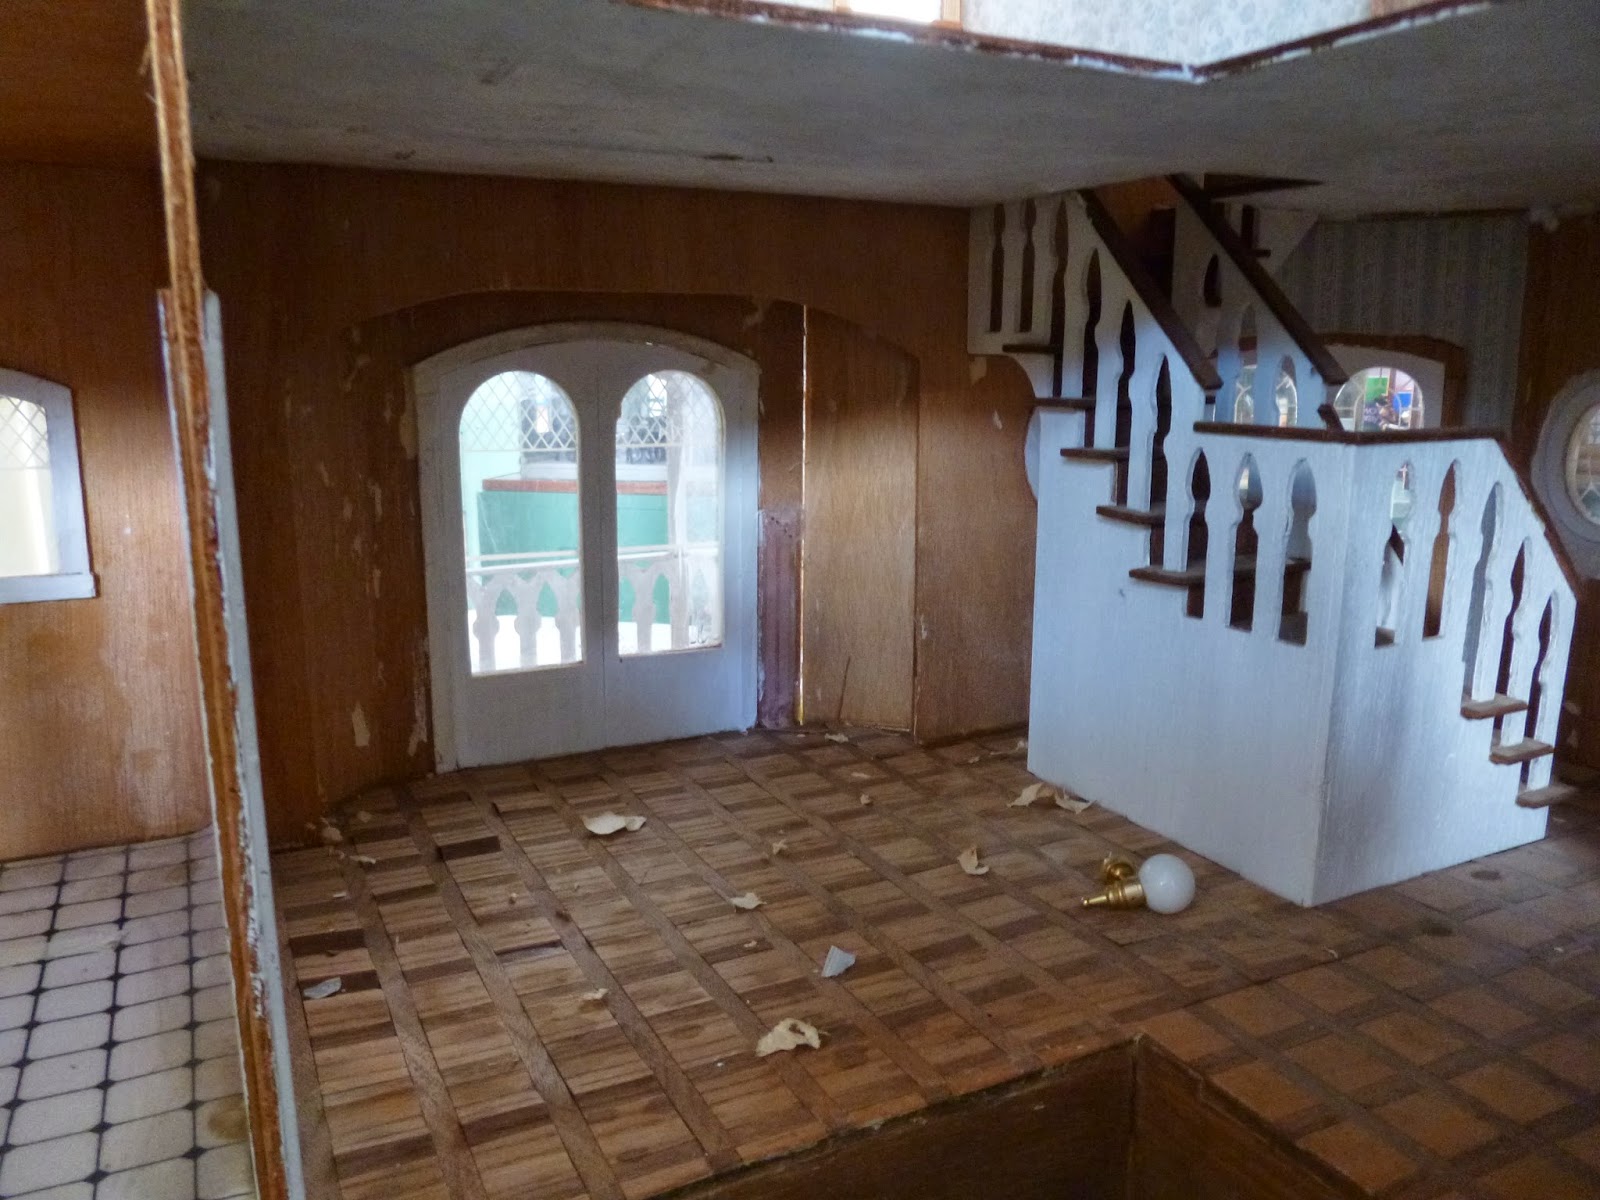
In the main living space downstairs, the floor had certainly seen better days.
I was planning to rip the whole thing up (the thought of handmade parquet was looming ominously) but Cestina persuaded me to try a restoration job.

So I did quite a lot of sticking down of individual tiles (not as many as if I'd made a new floor from scratch, of course), gave it all a good clean, and then coats of Walnut Ink solution and varnish to finish it off.

I think it scrubbed up rather well in the end, and makes a good setting for all that repaired and revamped furniture.
(Ooh - learned a lovely Dutch word for revamped or upcycled from the fabulous Alie - opgepimpt - literally "pimped up"!)

Tea is ready and waiting on the table, with some rather indulgent looking delights.
(This house required degree level wallpapering... insane numbers of curves and arches, and unreachable walls. I had to do the wallpaper at the top of the stairs by feel, running round to look through the window to see whether I'd got it in the right place. It's a kit house, and I think they think you're going to decorate it before putting it together.)

The silver tea service above was hauled out of the hoard (as were the profiteroles) and is actually made of plastic.
But the beautiful silver on the (now) gleaming walnut sideboard was all collected by Susanne, and is beautifully weighted, being made of metal.
The decanter and goblets are just gorgeous, and so are the elegant, slender candlesticks.

Two of those goblets are ready at hand on the occasional tables in the seating area. A special visitor last night, perhaps, or one due later this evening?


The bird cage you can see in the bay window required some thought. Susanne had the bird cage already, but there was nowhere to stand it or hang it. So I pressed a hat stand into action, repainting it and giving it a cardboard table top.
To disguise the cardboard, I added a silk cloth, dipped in diluted PVA glue to give the fabric enough weight to hang in place.

Ah ha - and what's that I see over the mantelpiece?
Would that be a Sizzix Ornate Frame die, painted with Florentine Treasure Gold Liquid Leaf and filled with mirror card?
Yes, it would!
And some more fresh roses, naturally...

More roses at the other side of the room - either she has many admirers or a standing account at the florists.
That's her great-grandfather in the ornate frame. I think he was also a musician, or perhaps a composer.
The frame started out a dull pewter - and while I'm quite fond of dull pewter myself, it needed a bit of a zhuzh to fit in with our diva's other belongings.


So there's some more Florentine Liquid Leaf, and then some washes of dark grey for some weathering, and finally a bit of highlighting with some Rub'n'Buff in Autumn Gold.

And what about this other photograph over on the hall table? He's a rather splendid looking silver fox. What possible significance could he hold in our singer's life?
And there's another wallpapering hazard - oval windows, what's that all about?!

That hall table was another piece of cheap plastic furniture hauled out of the hoard and "opgepimpt".
It's a drastic improvement in this case, I'd say, with its new gold handles and all!
I'll try to get a move on through the rest of the rooms...

The bathroom before...

... and after a coat of DecoArt Chalk Paint in Vintage on the walls, and a new floor.
The main bathroom suite was from Susanne's original furniture - a lovely ceramic set - but the room needed some additional furniture.

Back to the hoard for this motley collection - though they do have the slatted feature in common (only the three in front, not the cooker and sink - just lining up the jobs to be done)...

... and then back to the Chalk Paint - Vintage and Everlasting layered on for a shabby chic look.
Much better.
Now it's starting to look like the sort of bathroom my singer would have.

The flowers are one of Susanne's originals, but now there's also a mini jar filled with bath salts, and the bath oils are created from beads and jewellery findings.
And the tissue pot is another bead with some tissue paper tucked into the top.

I altered the toilet seat too - darker and sleeker than in the part-way photo above (which is also where the colour of the walls is most accurate - don't know what went on with the rest of these!).
Note the toilet roll and holder - something frequently overlooked in dollshouse bathrooms!

Since you've just had a sneak peek of some of the kitchen appliances, let's go in there next.
Before...

And part-way... All Susanne really had for this room was the range, and lots of beautiful copper cookware! Time to go digging!
Again, it was a case of trying to create a cohesive look out of very diverse pieces of furniture. I tried to make this plastic sink unit and the wooden dresser, both from the hoard, look as though they belonged in the same kitchen as the magnificent cooking range.


The DecoArt Worn Penny Dazzling Metallics paint came in handy again, to tie the drawer handles and taps in with the brass work on the range.

The sink unit is really too small scale-wise but that's all that would fit in the window bay and, with its added kickboard (made out of some more strips of wood, stuck to some more polystyrene packaging - oh, the glamour!) to give it extra height, it just about passes muster.
Oh, and that tall tap... a chopped up curtain hook again (you'll remember they bobbed up all over the Tudor Tavern too.

At the moment, this is the least successful room for me, mainly because it's so blinking small!
And with that window bay in the way too... there's almost no way to get in the necessary kitchen furniture, never mind to obey the magic triangle of cooker, sink and fridge (oops, no fridge at all yet, I've just noticed).
I came to the conclusion in the end that my singer really doesn't cook very much. For most of her performing life, she's never been at home for meals anyway. She eats out a lot, and also has an arrangement with a nearby chichi restaurant that they will deliver when needed. When there's a big dinner to give, she has it catered; that large showy range is mainly for heating things up.

Even though my singer doesn't cook, there were a couple of tea services amongst Susanne's accessories. I was in the transformation zone mode by now, so I altered them a little bit...
... not with paint this time, but with nail polish!

But she has got that rather elegant silver one out of the hoard to make up for it!

Nearly there... honestly!
You saw the bedroom in its part-way mode earlier in the post (I know, I know, it's a long time ago... you're forgiven), so let's go straight for a before and after.
Here I did rip out the rather tired floor, and added some hand-stamped, hand-inked, hand-varnished and hand-cut floorboards.

All there was to furnish this room was the bed, so again, I've added some pieces from the hoard.
And although the featherbed was nice and soft and fluffy, it really had seen better days, so I grabbed some silk from the fabric stash (it's the same stuff as I used for the bird cage table) and redressed the bed.
Again I used diluted PVA to keep the fabric in place - a tip learned from my aunt, Mette Breminer, when she came to offer her considerable expertise last year.
This won't look much to anyone proficient with fabric and sewing machines, but I'm very pleased with myself for managing to make the pillows. Regulars at Words and Pictures will know that such things and I really don't go together well. I give you: The Cheat's Way To Make Soft Pillows...


Yup, it's a square of handkerchief cut to size (check out that expensive bedlinen), some kapok stuffing and a piece of double-sided sticky padded tape laid on top. Then I just folded the hankie over to fit, folded the edges like gift-wrapping a present and glued it down. It's not as beautiful as what Mette would have made, but it'll do me!

Mirrors everywhere (though her walk-in wardrobe is clearly somewhere out of sight of our eyes)... with some more beads and jewellery findings and bits and bobs taking the role of perfume bottles and sprays.
I covered the dressing table stool in silk to match the bed cover too.
Okay, I thought this would be a shorter post than the Tudor Tavern... clearly I was wrong.


Finally - yes, finally - we move up into the attic.
You've seen a couple of shots of it in progress, and this will be one of those rooms which will be added to all the time.

Almost anything unwanted elsewhere in Small Worlds can probably find a home here in the long run...
The glue gun threads make great cobwebby strands across the unwanted items.

And you'll notice clues to another element in our singer's story - a cradle, a rocking horse.
Somewhere along the line, there's been a child in this house, and in her life. She hasn't always lived here alone.
I'm afraid she may have decided to put music first and - after the very public scandal and divorce - that child grew up in the care of its father and his family...

But having put her career first, she made the most of it... singing in opera houses and concert halls around the world.
So one thing that it was absolutely necessary to have in the attic was some glamorous luggage for her to travel with...
It's close to the stairwell obviously, for easy access (and the only things up there not covered with cobwebs) but it's a little battered and travel worn now, of course.

Unfortunately, there was no such thing in the hoard, so if I wanted it, I was going to have to make it from scratch.
Back to the polystyrene to create the basic shapes of trunk, suitcase and weekender bag.
Then some scrabbling in the fabric stash to find the bag of leather scraps.
Some of that copper electrical tape, used to wire houses for electricity, forms the bands across the trunk. And sliced in half lengthwise it also decorates the edges of all three pieces of luggage.


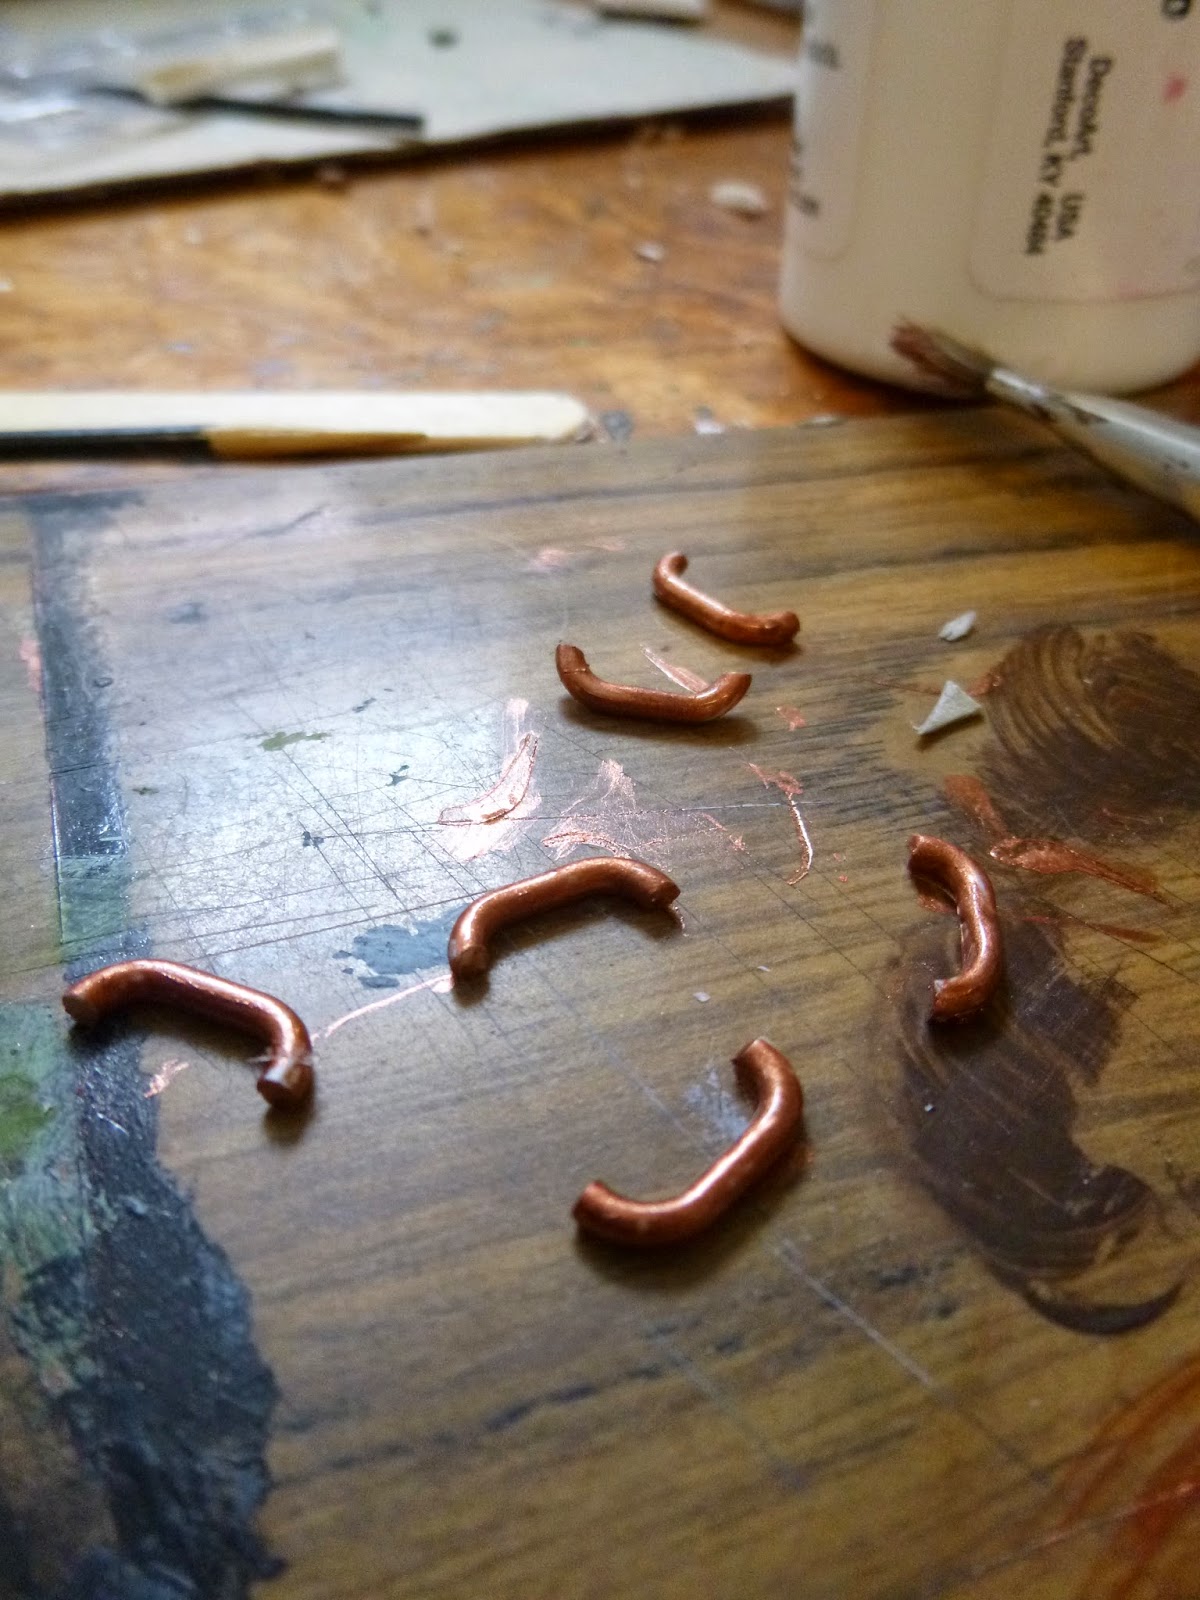
Those curtain hooks put in another appearance, cut to make the handles, and painted with the DecoArt Worn Penny again. And some white cake decorating wire, painted with Worn Penny, marks the opening and closing edges...

I clipped the metal folding bits off the back of some brads, painted those with Worn Penny too, and used them to form the latches and buckles.

In fact the decorative brads were of miniature cutlery (hence Cestina having hoarded them) - so I used the head of one of the forks to create the clasp on the trunk I thought the tines made quite good claws for the clasp.

So now my singer has a matched set of luggage, and - thanks to some distressing with black paint - it even though it looks as though it's been around the world a couple of times.
On some future visit, I'll be adding luggage labels and tags along with lots more things to fill the attic.
Thank you so much for your company on this second guided tour. There's one more dollshouse post to share the other things I've been busy with for the last few weeks, and then normal crafty service will be resumed at the weekend! See you soon!
Words make you think. Music makes you feel. A song makes you feel a thought.
Yip Harburg
The only thing better than singing is more singing.
Ella Fitzgerald
Since it's Anything Goes, I'm going to enter this over at the Simon Says Stamp Monday Challenge! No idea whether it really qualifies, but I'm taking them at their word that it's "No Rules; Just Get Creative". I was certainly getting creative with the skills and products from my crafty world, and I'd simply like to share that.