I'm travelling into a new way of working, a new country, a new language, and a new hobby which I'm passionate about. Come with me for some of the journey...

Showing posts with label weathered clock. Show all posts

Monday, 6 August 2012

Making time

Hello and welcome (back) to Words and Pictures.  A bit of insomniac creativity for you today - and I'm really going to try to keep it short and sweet...

I mentioned before that I'm getting ready for my brother's wedding: my main task is to create a wedding venue out of a scout hut - it's quite an undertaking (including various bits of craftiness, which I'll let you see after it's all over), and I have to admit it's giving me some sleepless nights at the moment - will I have everything ready in time, and will it work?!  So at 4am this morning, rather than lie there fretting about it, I got up to take my mind off it all in the best way I know how at the moment... I did some crafting!

I'm getting closer to my first Guest Design spot (it's for Top Tip Tuesday), and that's also been causing me some concern. Let's just say it's a challenge that's not exactly in my comfort zone... so the first thing I did at 4am was work through some potential ideas that had been swarming in my brain.  You'll get to see the results very soon.

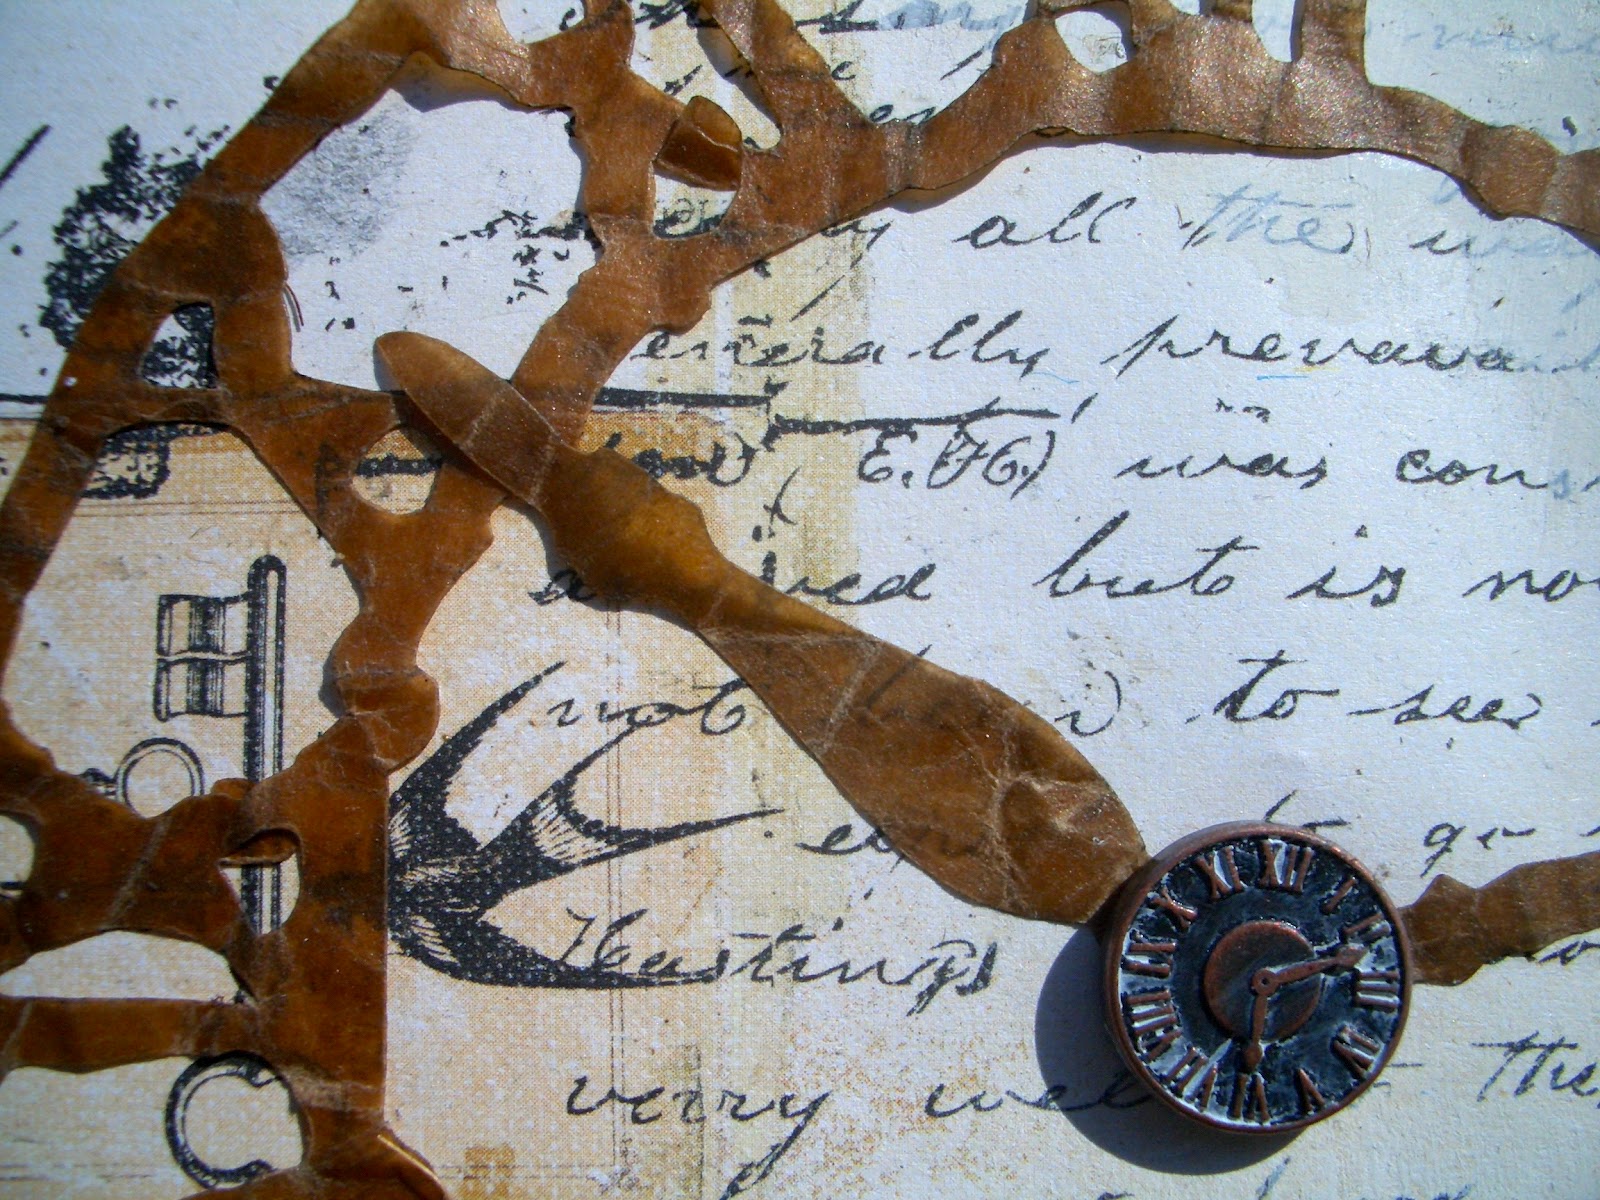
Then I came up with this - I guess it's pretty clear where my brain was at!

It's on a tag handcut in chipboard to the dimensions of the large tag on the Tim Holtz die (which I haven't got), so it's good and sturdy.

I'd had the stripes nagging at me since unpacking when, by chance, a bunch of scraps and offcut papers ended up lying next to each other while I was putting things away.  I glanced at them and thought that actually they should be allowed to stay together.

There's a ruler from TH Crowded Attic, some DCWV Tattered Time, some TH tissue tape which I'd backed onto tissue paper, a touch of the Simple Stories Documented collection, and some bits and pieces from the 7 Gypsies Conservatory collection... talk about mix and match!

Once I'd worked out the order and stuck them in place, they all got a coat of Picket Fence Distress Stain for that lovely muted look, and a bit of Walnut Stain distressing at the edges.


The Weathered Clock is die cut on fairly sturdy chipboard too, for strength, but also to get a bit more dimensionality to it.

It's covered with the 7 Gypsies paper, and the edges are done with Walnut Stain.  I had to use a cotton bud to apply the ink, rather than the blending tool, for the narrow gaps between Roman numerals.


The hands of the clock are secured with an Idea-ology long fastener, and they're set to the time I woke up!!

The words are stamped, edged, and mounted on some padded tape to lift them away from the surface of the stripes.


There's some more TH tissue tape, this time from the Nostalgic set (backed on to tissue paper and tinted with Walnut Stain), forming the ribbon at the top of the tag, and I also added some simple, natural twine.

I really enjoy the gentle neutrals playing off each other... I think I needed something calming given the time of day and lack of sleep - lime green and neon orange wouldn't have been comfortable to work with!


Okay, it's back to the wedding prep; no rest for the wicked - though I do hope there'll be a bit more rest tonight.  Much as I love crafting, I'm quite fond of sleeping too...

Thanks so much for stopping by today, and I hope that you find time to do all the things you love - and remember, if you're having trouble fitting everything in, you can always make time by getting up at 4am!


I'm entering this in the following:
The Time challenge at Vienna Impressions Inspirations
The Shabby Tea Room who are offering a lovely photo prompt, which you can see here on the right, and an invitation to use Soft Neutrals
I'm just in time, I hope, for the Crazy Amigos challenge Dies and Punches
Sugar Creek Hollow are playing Something Old, Something New (from your craft stash, that is), and given that I made this project to escape for a while from wedding preparations, it seems appropriate to join in!  The 7 Gypsies Conservatory collection was the first set of papers I bought for my stash, early this year when this whole thing began for me.  And the 'ribbon' is made from one of the latest additions, a part-roll of one of the Nostalgic set of Tim Holtz tissue tapes, part of a lot I won on ebay while away, and have just enjoyed unpacking and playing with for the first time.

So little time and so little to do.
Oscar Levant
Yeah... if only, Oscar!!


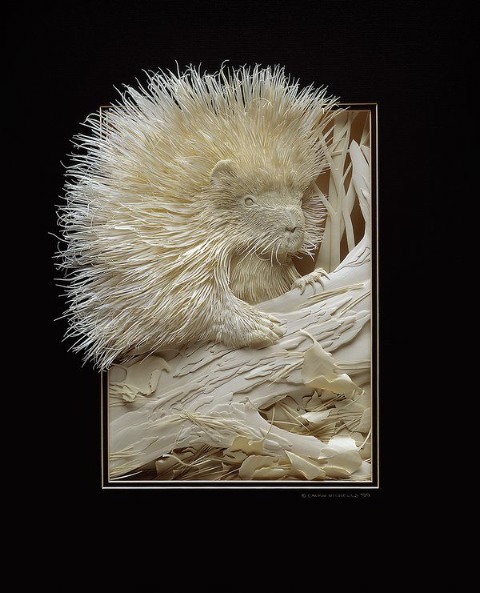
Just a little something I wanted to share - if you've never come across Calvin Nicholls Paper Sculptures, do go and have a look.  I sat looking at them in awe, jaw hanging.  Here's a little taster... unbelievable papercrafting!

Tuesday, 24 July 2012

Time flies...

Hello and welcome - to visitors and followers old and new!  I have a sense at the moment of time flying away from me... the summer break I carved for myself out of a chaotic and difficult year is drawing rapidly to an end.  I'll be leaving the Czech Republic at the end of this week, and every second now is precious before the return to the turmoil.  I'm trying very hard to stay in the present moment and enjoy it, rather than worry about all the things hurtling towards me.  

So the project I'm sharing with you today is something of a reminder for myself.


There's something so beautiful about clock faces, especially vintage style and Roman numeral ones, and yet when you search for quotations about time, so many of them are about its inexorable ticking away of our lives.  One of my favourite lines from Richard II (possibly my favourite Shakespeare play) is the bitter, melancholy realisation he has towards the end:  I wasted time, and now doth time waste me.

And then, on the other hand, there are the quotes which are about savouring, or living in the moment, and that rather more positive thought is the one I chose to match my lovely vintage clock faces with.

The piece is structured on an 8x8 sheet from Prima's Printery collection - a lovely combination of clocks and script - two of my favourite things, and there are even some keys thrown in for good measure!

I backed it onto some kraft cardstock for more stability, and then painted some gesso onto it in various places.  I kept it to quite a thin coat, so that the images beneath would still show through slightly.

One reason behind the gesso was that I needed to create a space to stamp the sentiment I wanted to use (using a little alphabet set I got for £1 in The Range).  It's stamped in Walnut Stain, though - as I've learned - when you stamp onto gesso it fades to a fabulous weathered look. And I love that you can still see the handwriting from the Printery paper beneath it.


One of the main features of my "canvas" is the large clock face cut in wax paper using Tim Holtz's Weathered Clock die.  The paper is crinkled and distressed with some Black Soot DI to dull down the colour a bit to tone in.


The dark demi-clock face beneath it is cut from the DCWV Tattered Time matstack - it has a slightly glossier finish, though I've distressed round the edge with the TH Paper Distresser (as I've also done with the Kraft backing, the Prima paper and pretty much anything else I could get my hands on!).


At the centre, the hands are held in place (besides the glue!) with a gorgeous brad from BoBunny - it comes in both their Weekend Market and their Et Cetera brad sets (and for all I know, in some others as well).

The brad got a little dab with some gesso too, wiped off, to just leave a little bit of a distress look to the clock face.


In the top right, over another gesso'd area, I blended Walnut Stain using my homemade clock mask (TH mask sheets cut using the same Weathered Clock die) to create a shadow clock.  This area also got a spritz of Heirloom Gold Perfect Pearls Mist to give it a vintage lustre.

The Grungeboard letters are from the Minis set, given a coat of sandy acrylic and distressed with Walnut Stain at the extremities.

I sewed some stitches of beige thread through the Idea-ology buttons but they are then (shh!) glued down.

There's a visual hint of another proverb in this corner if you're willing to 'read' it: a stitch in time...

The clock numerals paper arching over the top corners of the piece is again from the DCWV Tattered Time stack.

Down in the bottom left, I had some fun placing a trio of clocks, one Idea-ology, one within the paper, and one from, I think, The Bead Shop.  I juggled them for a while looking for the best positioning, but it wasn't until I brought my other framing element into play that I was happy with the result.

I'd thought right from the start that I wanted to use some strands from the disintegrating doormats here in the Czech house.  They are lovely woven mats, but now in a very distressed state themselves - and every once in a while a whole plait comes free, and I grab it for crafting purposes!

I did darken it slightly for this project with some Walnut Stain Distress Stain.


I had thought I wanted to do a full frame on all four sides, but that's now for a future project.


It wasn't right here... it needed to be just down in this corner, and once it was there, it was quite clear where the Bead Shop clock (now also with some gesso distressing) wanted to be.

I love that there's part of the fabric of this house (from which I haven't the slightest desire to depart, but events and work in the UK demand it) built in to this project!


You'll probably have spotted the final TH element - one of the Idea-ology Word Sticks... TIME, obviously.  I painted some white acrylic on and wiped the majority away, leaving the letters highlighted in the centre.

And then this vertical element is placed where the paper at the base of it all has a vertical divide between the script to the right and the images to the left.

Finally I cut some strips of mesh ribbon to provide an extra 'frame', and backed the whole thing with some more Kraft to make sure they stayed put!


So, there you have it... I'm working hard to find the space in every moment, and certainly when I'm crafting, I find that it is possible to enter 'the zone' of being really present and conscious.  Of course, I can spend hours at my craft table, but every one of the minutes feels like time well spent.

Thank you so much for sharing some of your precious time with me here at Words and Pictures today.  Your support and your feedback are a real pleasure, as are all the things I discover whenever I come and pay a return visit somewhere in Craftland!

I'm entering this in the following:
Out of a Hat Creations challenge this week, where the theme is Time
A second entry for the Allsorts challenge, Distressing
I'm joining the Sunday Stamper over at Hels Sheridan's Ink on my Fingers for More than Words
It's All About Vintage who are having an Anything Goes challenge this month

Clocks slay time... time is dead as long as it is being clicked off by little wheels; only when the clock stops does time come to life.
William Faulkner

But what minutes!  Count them by sensation, and not by calendars, and each moment is a day.
Benjamin Disraeli

You must have been warned against letting the golden hours slip by; but some of them are golden only because we let them slip by.
J.M.Barrie


Wednesday, 27 June 2012

Time or Travel

The Stampman Challenge this fortnight is Time or Travel.  Well, I'm already doing the Travelling, trying to start part of a life in a whole new country (I sort of wish my ancestors had been Italian rather than Czech - it'd be a million times easier to learn the language!), so I'm sticking to Time for the challenge.


This card has a fairly simple central image theme - I present to you, tah dah... the clock!  But it's developed in several different ways as it builds up.  And of course, for those of you who've been keeping up, it's my standby colour combination of brown and blue...

The first layer is lots of higgledy-piggledy stamping of Kaisercraft's Tic Toc stamp.  I really enjoy using this stamp with all its many and varied clock and watch faces.  It's stamped in Ranger's Archival ink in Cobalt onto plain cream smooth cardstock.  I've then added the Tim Holtz weathered clock in Archival Sepia a few times, in random (but carefully-spaced) places.  It's important that these base images are stamped with Archival inks because of what's to come.  You need an ink that's going to stay in place.


The next step is to put the clock mask in place.  


I tried and tried to get hold of the Tim Holtz Timeworks Stencil set.  On that, the clock mask is an exact copy (though larger) of the clear stamp, with the additional small dial in the middle, and the hands all built in.  I would love to have it (not to mention all those lovely steampunk cogs and gears), but it always seems to be out of stock, and I suspect it may have been discontinued.  


(Anyone who knows of a secret supply, do please get in touch!)  


Timeworks-less, I had to solve the problem myself.  What I do have is the TH Weathered Clock Die, so I got myself some of his Idea-ology Mask Sheets, so that I could make my own stencil.  These sheets are ready to be cut with scissors or a die-cutting machine; they're slightly tacky so as to hold in place when you're using whatever you've cut out; and they come with protective storage sheets, so that once you've cut a stencil or template, you can keep it and re-use it multiple times.


I'm aware that all this stuff trips off my tongue very easily.  Just a few short months ago, I didn't really understand what the die-cutting thing was about at all.  Since I know that some of my followers are even more scrapping-innocent than I was, I'll use a future post to show off my much-beloved Sizzix Big Shot - which is a die-cutting machine - so that you'll know what I'm on about.


Anybody for whom that would just be a grandmother-egg-sucking situation is welcome to sit that one out!
Here's the mask I was able to cut using the die.  You can see that the hands are completely separate, rather than attached as in the ready-made stencil.  On the one hand, that's quite nice: it means you can choose what time you want it to be.  On the other hand, with a mask it's a bit tricky, because you've got three bits you need to make sure are keeping still in one place while you sponge, or spray, or ink over them...


... which is what I did next. 

Using a blending tool, I layered Weathered Wood, Tea Dye, Vintage Photo, Faded Jeans and Walnut Stain Distress Inks onto the card.  There might even be some Chipped Sapphire in there!  You can see that where the mask is, you keep a lovely pale shadow clear of ink.  


Because the mask is transparent, you can see the effect you're getting even before you peel the mask away once you're finished.  


If you wanted it completely white (well, cream really), without the clocks either, you could simply stick the mask in place before you start stamping at all.  


The die is also crucial to the next layer of the card.  I cut the Weathered Clock again, but this time out of Kraft cardstock, and inked it with Weathered Wood, Chipped Sapphire and Vintage Photo using the blending tool.
Top tip - if you want you can skip the mask thing altogether, and use your cardstock die-cut as your stencil... then your ink does double duty, on the die-cut and on the paper around it simultaneously.  (That's fine as long as you're happy to have completely the same colours on both the clock and its background.)  Because I wanted slightly different colour combinations, I inked the card clock separately - but you can be sure I kept the piece of paper from underneath for use in a future project!


Once inked, I covered the whole of the clock with embossing ink, scattered clear embossing powder over it, and heated it to get the burnished sheen which I hope you can see in the pictures; it's perhaps clearest in the one at the top of the page.  The enamelling effect of the embossing also slightly darkens the colours.


The quote is from a Personal Impressions set, Creative Thoughts designed by Lindsay Mason, and is also on plain cream cardstock, distressed using Antique Linen and Vintage Photo.  I think it's beautiful, and completely right, and it's a large part of what I'm engaged on right now, which is to try to listen to my heart and my gut, not only my head - which likes to measure everything out and analyse it.  


The other project I've been working on, which I mentioned in an earlier post, explores that idea in much more depth.  You'll get to hear all about it, and see the project of course, very soon.


Thanks for taking the time to drop by.  If you like the look of it all, why not join up as a follower?   And if you're interested in buying or commissioning any cards, albums or other pieces, do get in touch by leaving a comment.  In the meantime, spend some time with someone you love, or doing something you love... without thinking about the time!


Time is the coin of your life.  It is the only coin you have, and only you can determine how it is spent.  Be careful lest you let other people spend it for you.
Carl Sandburg