I'm travelling into a new way of working, a new country, a new language, and a new hobby which I'm passionate about. Come with me for some of the journey...

Showing posts with label tissue paper stamping. Show all posts

Friday, 8 March 2013

PaperGirls


Hello everyone.  Thanks so much for stopping by here at Words and Pictures today.

I've got another piece to share with you using the wonderful new Artistic Outpost release, Paperboy... but this one focuses on the girls.

You saw them in the background (well, strictly it was the middle-ground) in the diorama, but now they get to take centre stage.

I got the tiny canvas and easel at The Works, where they'd temporarily been knocked down to 49p for a set.  Really wish I'd bought more than 2 of them at the time.  They're at the shocking price of 99p again at the moment, but keep your eyes peeled!

The canvas is ATC sized - 3.5 x 2.5 inches.


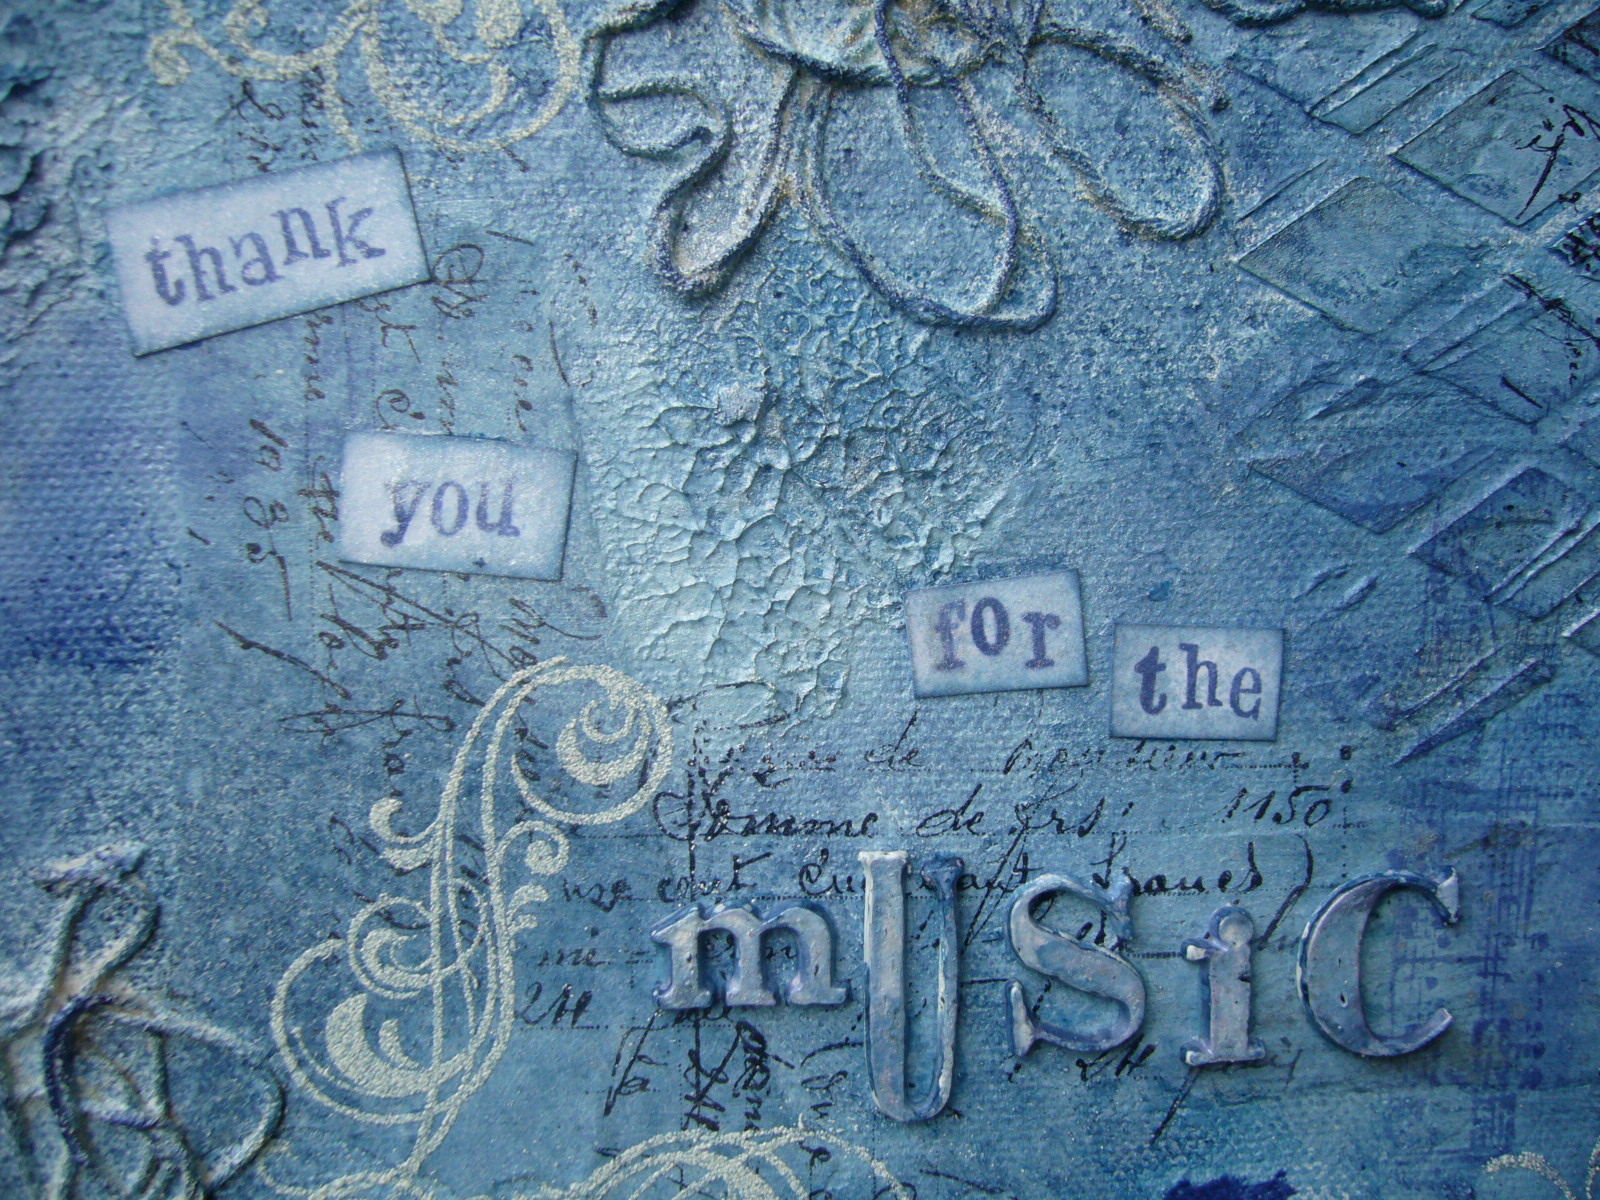
I used the lovely collaged words stamp to create some background texture, stamping directly onto the canvas - edges too - and then used Distress Inks to add some colour - Broken China, Faded Jeans, Vintage Photo and Gathered Twigs mainly, I think.


Around the edges of the canvas, I used Rock Candy crackle paint to create an antique-y textured look.


Once it was dry I went over it with some extra Gathered Twigs to work darker colour down into the cracks before wiping the surface with a baby wipe.

I kept the central area of the canvas relatively clear of colour and texture to leave space for my focal image.


The girls themselves, I stamped onto tissue paper in a mixture of Black and Coffee Archival inks, blended onto the stamp.


Better than risking not getting a full image on the canvas itself (fine if you want the canvas texture within your image, which I didn't really on this occasion; and also the canvas is obviously soft in the centre, so you have to work to get the full image evenly stamped).


I stamped the little sentiment on a separate bit of card, inked to tone in with the canvas, and mounted it on padded tape for some extra dimension.


The easel itself, just in plain wood when you buy it, also got a bit of shabbying up (down?) treatment with some white paint, and then some inking with the same DIs.


A couple of metallic embellishments, doctored with some alcohol inks, and we're done!

This one works in threes: three girls, three metal pieces, three words (just!) in the sentiment, and an easel standing on three legs, so I'd like to enter it in the Simon Says Stamp and Show challenge this week, By The Numbers.

There are three kinds of people: those who can count, and those who can't.
Anonymous


Sunday, 21 October 2012

Thank you for the music

Hello all, and a happy Sunday to you, wherever you are in the world.  So happy to have your company for a while here...

I'm listening to "Sunday music" as I type this, and sharing a canvas with you that, again, came out of playing while listening to music - as so many of my projects seem to have done recently.  So this piece also expresses some of my gratitude and joy for the great gift of music, and its inspiration.


I've been wanting to expand into canvases for some time - particularly inspired by the amazing Trish Latimer at Ink... Paint... Beads....  And I'm combining some of my favourite things again - my first love, stamping, especially with an inky, textured background and, in addition, the colour blue is quite a feature here.  


With the larger canvas I've been able to go a step further with the background, trying out some new techniques, and generally having a really good, messy muckabout!  I love the texture of the canvas showing through the ink and paint.  

It is, in fact, a canvas mountboard, 8 x 10, about £1 from The Range.  I thought it would be a good idea to find out if I enjoyed working on canvas with these cheaper versions before breaking into the piggy bank again for full canvases...  


Turns out I really love it!!  But I'm also perfectly happy to stick to the mountboard for now.  

I started by gluing down bits of book pages and music manuscript.  The print on these has mostly disappeared under the layers, but I still love that you see the edges, and that - thanks to the papers - there are places of smooth texture as well as the lovely rough canvas.


I then had a little play with some texture paste, and one of the lovely Tando masks I was lucky enough to win recently.  So cool, and so easy to get some really interesting texture onto the canvas.  And the mask is really good quality - it feels really strong as you use it. 

As well as scraping the paste through the mask, I also gave it a few cuts and strokes with an old credit card for added detail.  


In some places, I also just splodged some paste down, and then pressed onto it with an acrylic stamp block, lifting it straight up again to get these really cool textured patches.  

Of course, later it got extra definition from paint, ink and, in this case, some metallic Distress Stain in Pewter painted on with a brush.


I think it was at this point that I also grabbed some of the strings which are always lying around and stuck them on in little piles of random spaghetti.  They come off the cheap luggage tags I got.  

Sadly, I have now discovered that there really is a difference between them and the beautiful smooth Manila ones sold as craft tags - but I'm going to use up the ones I've got first!  Plus you get all these great strings to play with, of course...


I let all of that dry overnight, and in the morning I gave it a coat of gesso to knit it all together.  The next stage was some spritzing and spraying with Ranger Colorwash sprays as well as some Tattered Angels Glimmer Mist.  

I also added Distress Inks, using a blending tool, and some Perfect Pearls mica powder in Pearl for shading and highlights.  As mentioned above, I also used a paintbrush to add some Pewter Distress Stain direct from my craft mat - again to get some metallic highlights in places.


I then went in with the stamps - the text from Tim Holtz's Apothecary set, the music from the Pink Paislee London Market set, and some flourishes from Whimsy which I then embossed with Weathered White embossing powder.  

The flourishes are positioned so that they "grow out of" the random spaghetti - order out of chaos!


The focal image is stamped - in my usual way - onto tissue paper, and then glued into place.  


I love this ballerina from The Stampsmith, and I'm so delighted with the way you can still see the text stamping and the textures coming through the tissue.  


She's deliciously ethereal anyway as an image, and I hope I've enhanced that by having her hovering within the canvas in such a ghostly fashion!  


Finally, there's the sentiment - and I do realise some of you may have had an Abba song running through your heads for the duration, but that wasn't really my intention (although I love Abba, I was actually listening to Prokoviev!)... it was just a simple statement of gratitude. 


The letters are the black plastic Random Alpha Parts from Idea-ology, altered with some paint, alcohol inks and Perfect Pearls.  


Slightly strange fizzing chemical reaction at one point, but I splodged some paper towel on to calm it down!!


Thanks so much for your visit.  I'd love to know what you make of my first 'proper' canvas; every single one of your comments is deeply appreciated.  I'm off to do some Sunday browsing to see what you've all been up to...  See you soon!

A painter paints pictures on canvas.  But musicians paint their pictures on silence.
Leopold Stokowski

Without music, life would be a mistake.
Friedrich Nietzsche

I'm entering this in the following
Simon Says Stamp and Show... my Favourites are still stamping and inky backgrounds
The Stampsmith theme this month is With Gratitude, using a Stampsmith stamp
Unruly PaperArts are challenging us to Add Dimension to a Canvas

Sunday, 14 October 2012

Tint Tin

Hi all, for the second time today, if you've already seen my musical pages... but I wanted to get one final entry in under the wire for the Simon Says Stamp and Show challenge this week - I'm in love with Rustification!

So here it is, my altered tin:


Since it's been altered, there is of course a "before"...  A Snoepjes tin, from some Dutch sweets which I guess were eaten upwards of 30 years ago, but it's been being a 'useful tin' ever since.

However, the most recent things I've been keeping in it (metal shelf supports for a bookshelf not in use) have just gone off to a new life in the Czech Republic (with the bookshelf), so I grabbed the tin and got to work.


I started by messing around with alcohol inks, Hazelnut, Rust and Ginger I believe it was, dripping and blending them onto the tin until I liked the look.  Circular tins, not easy to control where the dribbles are going... fingers - very messy!


I like that the imperfections and scratches in this decades old tin give extra character to the surface texture.

I was originally inspired to try this effect by this amazing project by the extraordinary artist Die Amelie at Von Pappe II.  At that point I didn't own any alcohol inks... and she's the one I blame for my subsequent giving in!  

But there's also a gorgeous altered tin from Sarah at La-de-dah amongst the DT pieces, so I thought it should be rusty enough! 


For the inside, which was a dull gold colour (sorry, forgot the "before" picture!), I decided to revert to my nearly favourite material at the moment, tissue paper.  I stamped my Tattered Angels spray of branches and the Artistic Outpost leaf randomly across the paper in Coffee and Sepia Archival inks.

I can't seem to get enough of crafting with autumnal colours and images... so beautiful without being 'pretty-pretty' - maybe that's what it is?  

So with all the Fall colours, it turns out my tin (which I actually inked several weeks ago and then left to marinate in my imagination) will also fit perfectly into Our Creative Corner's lovely Fall in the Circle challenge, as well as the Fashionable Stamping Challenge's Shades of Autumn.  I love this time of year!!


I coated the inside of the tin with glue, and pressed the tissue paper down... again, circular tins don't really make life easy as far as this goes... 

But in the end I got the whole thing in place, with only one small tear which, tissue paper being pretty forgiving stuff, was soon remedied.


For the embellishment, I've included some of Andy Skinner's textured rust technique, some of my own recipe, and some actually rusty metal... talk about covering the bases!  

But that wasn't really the intention as I set out - I was just gathering stuff that I thought looked good together...

The tiny tag is one of Tim Holtz's Tiny Tabs and Tags, cut with the die, and then used to try out the Andy Skinner technique from his Timeworn Techniques workshop. 


I timed the workshop really badly as far as other work commitments go, and am basically going to have to do the whole thing solo now from the worksheets, but I did manage to fit in this one (and the weathered ivory, and a start on the verdigris - so I guess I won't be too hard on myself!).


On the reverse side it's simply the kraft cardstock that I cut the die from, stamped with the Stampology Silhouette Blossoms, which rarely get put away these days!


Then on one of the corrugated tattered flowers which came as a freebie with one of my Funkie Junkie Boutique purchases, I played again with my own rusty recipe.  If you want details, they're all on the Sonnet Mash Up post, so I won't bore you with them again.  


The flower is fastened with a couple of Idea-ology flowers and a long attacher, and then backed onto some frayed loose-weave burlap which, in turn, is backed onto some nice rusty metal mesh which again I've frayed and twisted at the edges.  


Another nightmare gluing-wise, like the bottles on my Halloween tags (there was some shouting at inanimate objects today)... despite the extra tooth of the twine wrapped around the lid to attach to.  


Anyway, least said, soonest mended - they say!


I'm so delighted (despite the shouting) to have been able to indulge myself with time at the craft table this weekend... there's more to share with you later in the week, including one very special post, about which I'm very excited - more on that on Thursday!!

But for now, I'd like to wish you a wonderful week, and thank you again for your time and company on this exhilarating exploration, as well as your support and the inspiration you provide out there in Craftyblogland.

Sunday clears away the rust of the whole week.
Joseph Addison

A sword, a spade and a thought should never be allowed to rust.
James Stephens

I'm entering this in the following:
Rustification over at Simon Says Stamp and Show
Our Creative Corner who are playing Fall in the Circle
Hels Sheridan is helpfully looking for Metal over at the Sunday Stamper this week
Shades of Autumn at the Fashionable Stamping Challenge


Sunday, 23 September 2012

Train Track Triptych

Hello all, happy Sunday to you!  Thanks so much for stopping by today... especially if you've done it twice - this is the second post of the day (the other's here)!

I've a triptych to share with you this time, inspired by the wonderful Artistic Outpost SteamPunk stamp set, with the emphasis on the Steam!  For work, I sometimes live in Stratford upon Avon and every Sunday during the summer, a traditional steam train sets off from the station there for enthusiasts to take a ride into the steamy mists of nostalgia.

I've been down to see it depart a couple of times (including taking my young niece and nephew), but even from my tiny little courtyard garden, I could always hear it chuff chuffing away, and then the oh-so-evocative whistle as it picked up speed.  It's one of the most romantic sounds, the sound of escape and travelling; the American train whistle does it too, calling you to vast landscapes and wider horizons.  So this is a triptych tribute to the "Golden Age of Steam".

First a front and back...


On the front you get a traditional vintage scene, and on the back a much more fragmented, abstract view of the steam locomotives, with tissue tape 'train tracks' cutting right through it.  


The Artistic Outpost stamps are delicious.  First I stamped some lovely circles from the Whimsical Melange set onto white paper.  

Then I did my favourite tissue paper stamping technique with the station and train (twice, so that I could have one going in each direction for symmetricality on the triptych), and stuck them over the circle background, nice and 'wrinklily'!  

I used a blending tool to add Vintage Photo, Weathered Wood and Stormy Sky DIs.  


I already knew the sentiment I wanted to add, a snippet of a poem by Hart Crane, so evocative... and (with my Words hat on) I just love those alliterative Ws, so I lined them up over one another to draw the eye, and therefore hopefully liven up the lips as you speak them.


To live up to the words of the poem, I added some additional puffs of steam by loading a paintbrush with white acrylic, and just a touch of mushroom paint on one edge.


The tops of the panels are cut using the Brackets On the Edge Die, and the gears are TH Idea-ology ones.  

I wanted them to echo the circles hovering in the ghostly background under the tissue paper, but with an even more engineering-y, industrial look.


On the reverse of the triptych I collaged torn pages from an old children's encyclopedia (another casualty from the massive house clearing that's going on in preparation for leaving the family home of 40 years).  

There was a double page spread illustration of a steam locomotive, so I made that my central image but broke it up across the triptych.


I stamped some more of the Whimsical circles, quite randomly, added some stencilled polka dots, and inked, all the time echoing the colour blending from the front side from browns at the base to blues at the top.  

I gave it a little spritz of Heirloom Gold Perfect Pearls Mist to get a vintage lustre.


For the hinges, I wanted to create some "train tracks" running across the back of the triptych.  I used some Tim Holtz tissue tape, the calendar, which has the straightest lines of the tapes I've got, so making the best train tracks.


It also has something of a train timetable feel, as well as marking the years that have passed since the great steam trains ruled those tracks.  I stuck the tape to some kraft paper, inked it, and gave it a good spritzing with Perfect Pearls in Pewter and Heirloom Gold.


So that's my train track triptych tribute to 'the Iron Horse'... somehow travelling on trains these days just isn't quite the same.  I had such fun playing with these glorious stamps... you'll definitely be seeing more of them!!


Since I'm in Stratford for most of next week (no steam trains this time of year, sadly), I won't be able to do any crafting (aaagh!), but I should be able to catch up on some blog visiting.  Looking forward to seeing you soon somewhere in Craftyblogland!

I'm entering this in the following:
The Artistic Outpost September challenge which is Anything Goes with an AO stamp
Second post of the day, and second entry for the Simon Says Stamp and Show challenge to Tape It Up
Hels Sheridan in her guise as the Sunday Stamper is inviting us Behind the Mask to use Masks or Stencils on our projects
I know it's slightly more Steam than Punk, but I'd like to offer it up for the Happy Daze challenge Steampunkery too


Nostalgia is like a grammar lesson: you find the present tense, but the past perfect!
Owens Lee Pomeroy

The only way of catching a train I have ever discovered is to miss the train before.
G.K.Chesterton

Wednesday, 12 September 2012

My heart is ready...

...and what am I gonna do?

Hello again to all visitors, old and new - it's wonderful that you've found time to stop by today.  The title and follow up at the beginning of today's post are the lyrics of a song which struck deep to my heart, and which wouldn't leave me alone, and ended up spilling onto some pages in my newly begun art journal.

I was taught the song (which is by Cindy Kallet) at a singing workshop led by the fantastic Andrea Small, a Natural Voice practitioner, a few weeks ago... and created these pages a few days later, when it was still going round and round in my heart and my voice, but haven't had the chance to share them with you yet.  So here we go...


The centrepiece stamp is from one of the new Classic Collection sets recently re-released by Stampers Anonymous at Tim Holtz's instigation (it's set #5 if you're tempted).  Her face is hauntingly gorgeous, and I find that the expression shifts in meaning according to one's mood or how you surround her.


Having stamped her on one side of the spread, I wanted her facing in the other direction for a different aspect on the opposite page, so stamped her on tissue paper and adhered it (fairly wetly, to get my favourite crinkled texture involved) back to front to get the reverse image.


For the right hand page I cut a mask to shield the face, and then followed my (ready) heart in stamping, painting, inking and blending.


There's gesso, acrylics, embossing, and stamped-in gesso, mainly using architectural elements from another of the Classic Collection sets, set #7.  Given that the whole page was fired and inspired by a song, the Kaisercraft music stamp also puts in a strong showing...


The masking means that you can create the background with great intensity of colour and stamping, and the face will always float at the front of the layers.

I added the flush of excitement to her cheeks and lips by some sort of internal compulsion, almost against my will... but once it was there, I knew it was right!


On the left hand page, I'd already put some stamping in place before sticking down the tissue paper face, so the Aged Mahogany sculptural flourishes "bleed" into her features.

I'm generally wary of Aged Mahogany - it's such a full on colour that it can get out of hand (overall, I don't seem to work with Brights very often)... but for the passionate connection I felt to the spirit of this song, that was the ink pad that found its way into my hands, along with Archival Coffee and Sepia, and Vintage Photo, Tea Dye and Walnut Stain DIs.

Following the presence of the darker, more contemplative image of the face on this left-hand page, the colours are more focused toward the browns than the hot reds and pinks, but that passionate colouring is still bubbling under the surface.


There's the soft glow of embossing too, which you can see I think in the photo here...


I absolutely love the texture available from the architectural flourish in Set #7... I stamped it repeatedly to get that texture spreading across the pages.


And the lyrics are simply questioning their way across the pages... each image facing up to the question and ready - I hope - to search for the answers...


Thank you so much for joining me here at Words and Pictures today.  Sorry for all the photos but, as with the song, something about these pages sings to me, and I wanted to try to share that with you.  

I'm entering this for the following:
The Craft Barn are having an Art Journal challenge at the moment
The Stampman is looking for Hot Colours
Try It On Tuesday are offering us an Anything Goes challenge
And Simon Says Stamp would simply like us to Put a Stamp On It

My heart is ready and what am I gonna do? 
My heart is ready and what am I gonna do?
My heart is ready and what am I gonna do 
Oh God! My heart is ready and what am I gonna do? 

My feet are ready and what am I gonna do?
Oh God!  My feet are ready and what am I gonna do?

My hands are ready and what am I gonna do?
Oh God!  My hands are ready and what am I gonna do?

My voice is ready and what am I gonna do?
Oh God!  My voice is ready and what am I gonna do? 

My heart is ready and what am I gonna do?
Oh God!  My heart is ready and what am I gonna do?
Cindy Kallet