I'm travelling into a new way of working, a new country, a new language, and a new hobby which I'm passionate about. Come with me for some of the journey...

Showing posts with label driftwood. Show all posts

Friday, 6 September 2019

There's not mushroom inside...


No, they're all over the outside!  And there certainly isn't much room inside as it's only a little box.  Sorry for the appalling pun... back to business now.

It's time for a new challenge at A Vintage Journey and the lovely Julia is asking us to Box It Up.  You'll find all the details of the theme along with some spectacular inspiration from my fellow Creative Guides over at A Vintage Journey.

My offering is a 3-inch Artist Trading Block covered in fungi in two dimensions and in three.

Tim Holtz's new mushroom stamps were an absolute must for me.  My mother, Cestina (of Cestina's dolls houses), is a fungi fanatic - at least partly owing to her Czech parentage (the Czechs are huge gatherers of wild mushrooms... it's all those fairytale forests in their landscape).


She's always complaining that there aren't enough mushrooms around here at Words & Pictures, though they have put in the occasional appearance over the years (quite recently over at PaperArtsy, or rather longer ago courtesy of Stampotique and I'm sure there have been others).  I thought these gorgeous tiny botanical images might finally shut her up!


It all started with one of Calico Craft Parts sturdy MDF boxes, and I cut 6 3x3 panels of watercolour paper to decorate it.


First of all, they got a smooshing of Old Paper and Antique Linen (for that old botanical sketchbook look)...


... but then I got tempted into a little more colour with some Tumbled Glass for the sky.


I only needed the fungi on four panels to go around the sides of the box, and I stamped them as though it was one long panoramic scene.


It works really nicely as all the illustrations have a grassy segment at the bottom so you can join them up very easily.


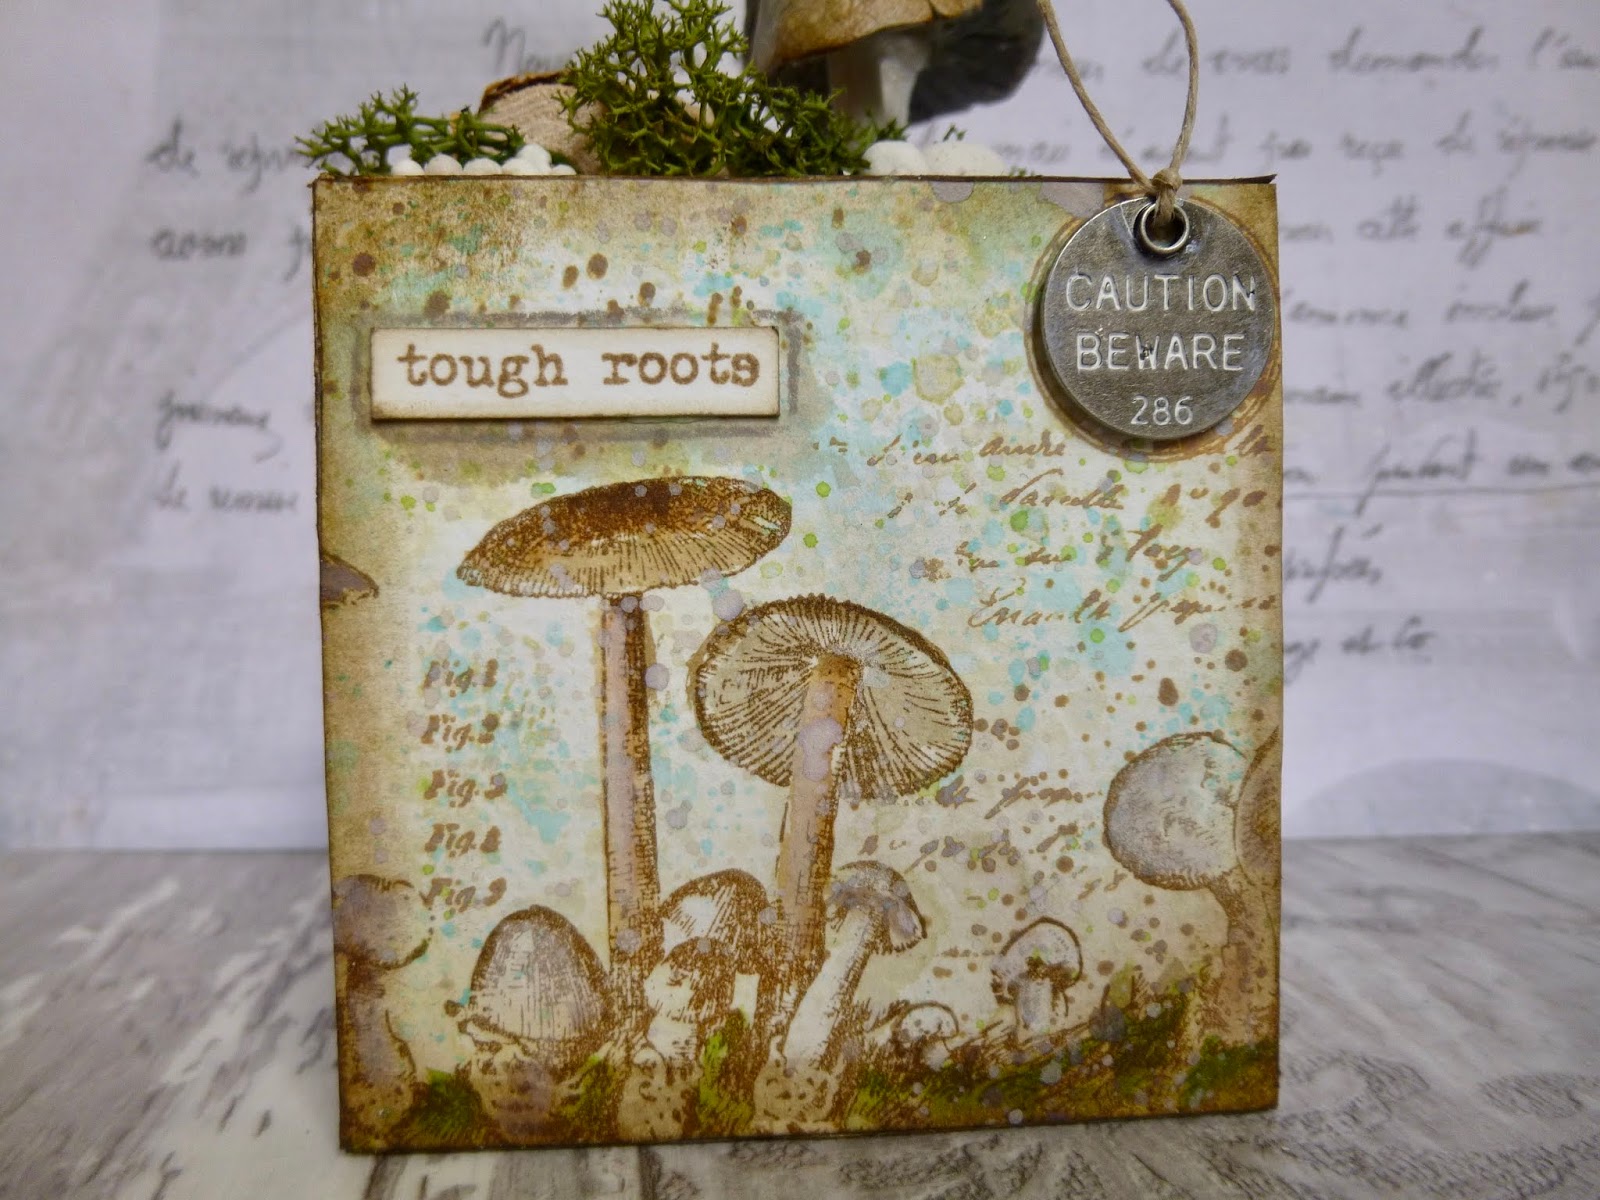
I had a lovely time "colouring them in" with a waterbrush, Distress Inks and washes of Fresco paints.


I decided to keep the mushrooms themselves in soft neutrals, from the palest of grey/beiges to a darker, nuttier brown in some cases.


And of course you get another touch of colour with those grassy knolls and tufts.


The background stamping details are all from the same stamp set - the tiny script, the specimen label and some of the delicate spatter is stamped too.


The top and bottom panels of the box got some more layers of smooshed Distress Ink and Oxide in various shades of brown to create a nice woodland floor.


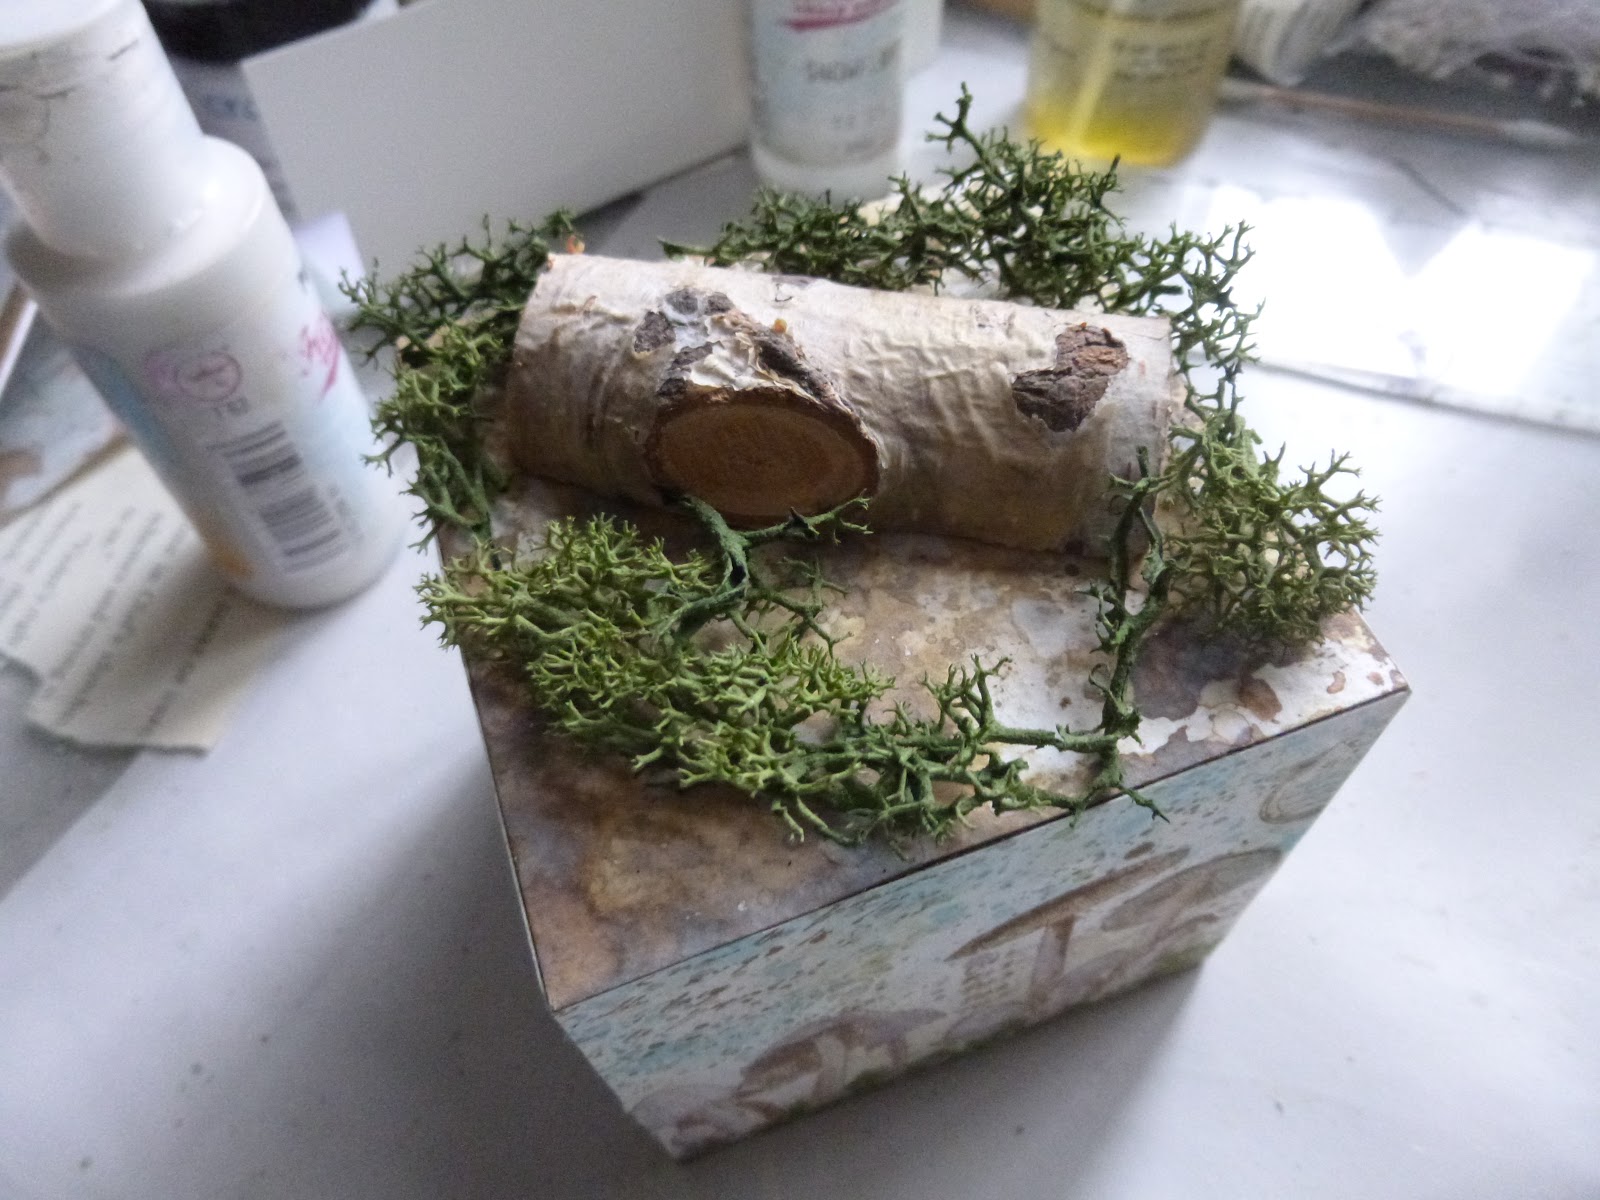
The moss and logs I used for my Stargazing Skeleton scene were still just by the craft table, so it was a pretty short step to deciding they would play a part on the top of the ATB.


But I really needed some mushrooms to sprout there too... out with the modelling clay.  This is a Fimo type clay, rather than air-drying, so it needed baking.  They're pretty ugly in the original colour (bought mainly for doll-making).


A few layers of Fresco chalk paints later, and a sweep of Archival ink for the final burnishing...


... and I'm really pleased with the finished look.


I even carved some gills into the underside of the mushroom heads.


I really like that you get the toadstool illustrations all the way around the box...


... and then the three dimensional scene echoing them on the top.


An Idea-ology tokens warns you to watch out which fungi you're picking for the pan.  There's a Czech proverb which says: All mushrooms are edible, some of them only once.


And I've used tiny phrases extracted from the quotes on my PaperArtsy EAB01 Trees & Flowers plate...


... just the odd word or two, which seemed right for the subject matter.


Fungi roots (or more properly, mycelium) can spread a long way underground.


What you see sprouting on the surface is a tiny proportion of the potential fruiting capability.


And you certainly do get fungi in lots of wild and crazy forms, even if the ones here are tamely beige!


I hope you like my box of mushrooms, and I hope you'll be inspired to Box It Up with us this month at A Vintage Journey.  As I said, there's lots more inspiration over there to get you going.

Thanks so much for stopping by today and I'll see you again soon.

I say, I say, I say (Not you again)...
My dustbin's absolutely full with toadstools
(How do you know it's full?)
'Cos there's not mushroom inside...
From Lonnie Donegan's My Old Man's a Dustman

At the Mix It Up Challenge it's an Anything Goes with an optional twist of a 3D project - done!
613 Avenue Create are playing Anything Goes with an optional twist of Pop Up or Exploding Boxes - my box is not quite a pop up, but there are mushrooms sprouting up!
At Moo Mania & More they are inviting us to Use A Stamp - I used several!
It's another Anything Mixed Media Goes at the Creative Artiste Challenge Blog

Friday, 31 August 2018

Thy sweet love remembered...


Hello all!  It's that lovely time of month - a Tag Friday over at A Vintage Journey... a chance for the Creative Guides to come out and play with a tag, but with no other rules or constrictions.

I made use of a jumbo tag background made months ago - some Tim Holtz paper stuck onto a piece of recycled cardboard.

I probably had some plan in mind when I started it, but work got in the way, and it has sat there awaiting inspiration ever since.

As it's such a large tag (4 x 8.5inches), I was able to use one of the larger size Paper Dolls couples, and once they were in position everything else sort of gathered around them without too much conscious decision-making.

There was plenty of internal story-telling going on though... I'll leave you to make up your own romantic versions of it.


Here's the background before anything started happening.  I've a feeling it may have been way back in spring that I first stuck the paper onto the cardboard...


.... sanded around the edges, and gave it a few swipes of leftover gesso.


The couple themselves are mounted on a few little wooden alphabet dice, from a pound-store set, which gives them a lovely dimensionality.

(I used the Zs and Xs - I'm unlikely to want them for actual words on future projects.)


I needed the dice because I really wanted the pair of them to perch on this lovely bit of driftwood - always a touch of romance about driftwood, I find.  They're about 3/8 of an inch proud of the tag surface.


There's a scroll tied with twine - a love letter, I'm sure...


... and the little bunch of lavender came from the birthday cake of our 101-year-old neighbour, Rose, at the beginning of August.  I remembered that it was still sitting in the kitchen and thought it would make the perfect romantic keepsake to add to the tag.

(See the 101st birthday present made for Rose by Cestina over at Cestina's Dollshouses - a miniature replica of her living room.)


Lavender is wonderful stuff to put away with your love letters to keep them fragrant, and to keep those carefully preserved fragments of lace safe from the moths.  (Hmm... a slightly less romantic thought there.)


Since I'm just back from working in Stratford upon Avon (more details of that in the next post), what could be more appropriate than a little touch of Shakespeare for the first words?

You can find the sonnet in full at the foot of the post.


The other nostalgic yearnings are also from the wonderful Idea-ology Clippings stickers.  It seems you can always find just the right little broken thought for your artwork.


They've had a little shadowing with pencil and ink - Dusty Concord Distress Ink and Shaded Lilac Oxide to echo the lavender sprigs.


A couple of other Idea-ology pieces - the clock, ticking away the time the lovers have to spend apart...


... the Muse Token which tells you all you need to know about their devotion...


... and the pen nib with which to record every precious moment spent together.


There are some tiny wooden hearts, crackled with DecoArt Media Crackle Paint, with some Pumice Stone Distress Crayon to highlight the cracks.


No need to tell you what they symbolise...


A touch of ribbon, tied with twine at the top, and we're pretty much done.


Thank you for your company today, and do hop over to A Vintage Journey to see what my fellow Creative Guides have created for Tag Friday.  I can hardly believe August is drawing to an end.  The year is flying, and I'll be back before you know it.  Until then, happy crafting all.


When in disgrace with fortune and men's eyes
I all alone beweep my outcast state,
And trouble deaf heaven with my bootless cries,
And look upon myself, and curse my fate,
Wishing me like to one more rich in hope,
Featured like him, like him with friends possessed,
Desiring this man's art, and that man's scope,
With what I most enjoy contented least;
Yet in these thoughts my self almost despising,
Haply I think on thee, and then my state,
Like to the lark at break of day arising
From sullen earth, sings hymns at heaven's gate;
   For thy sweet love remembered such wealth brings
   That then I scorn to change my state with kings.
Sonnet 29 by William Shakespeare


With its nostalgic romance of times past, I'd like to share this over at Tag Tuesday, where the theme is Time/Clocks

Thursday, 9 November 2017

Calico Joy Hanging

Encore Posts
I'm away again for a month or so.  There are some scheduled posts with new creations coming your way, but I'm also taking the chance to do some catching up here at Words and Pictures.   Projects which made their first appearances elsewhere for Design Team duties or Guest Designer opportunities, but which only had a sneak peek here, are being gathered together in the pages of my virtual scrapbook.  I'm calling them "Encore" posts and they're formatted differently (all the way down the centre), so you can spot them easily.
Please don't feel that you have to comment all over again!

I'm so glad you enjoyed my Mini Marvels and the Love This Life journal.  I'm on scheduled  Design Team posts and Encores at the moment, and so there may be a delay before I can pay some return visits... but I'm always grateful for your lovely comments.

So much has changed at Calico since this post was written that I've had to amend or remove some links.  The company has now been reinvented as Calico Craft Parts and, though I do miss some of the eclectic stock they used to have available, I think the range of high-quality MDF and wood cuts they now offer is simply fantastic.  So, where appropriate, I've linked to those new Calico products, but otherwise you'll have to go searching for the supplies involved here.  Here's (pretty much) what I wrote back in September 2014.
_____________________

Hello all! Thanks so much for stopping by. Apologies that my offering is late this month - my laptop collapsed on me - but I'm happy to be able to share it with you now. I've a simple rustic make for you today - a little driftwood hanging with colours starting to turn towards the burnished golds of autumn.


This make was inspired by the Calico Craft Parts Alphabets and Numbers which are now available in several different fonts.  Sadly this was a last-minute inspiration, and I didn't get around to ordering my letters in time to use them on this before I left, so I used some die-cut letters instead - but this is exactly what I plan to do with some Calico letters as soon as I'm back in the UK.


If you saw my Woodcuts ATC a couple of weeks ago, you'll know I've been having fun covering Craft Parts with book pages, and that's the look I went for here. The paper I used was from the Kaisercraft Timeless Collection, and I inked up the edges for an extra distressed look.


The words are mounted on three of the Driftwood Planks, which each had a dash of DecoArt Warm White paint so that the lettering would pop a bit more.


The touch of autumn gold comes from the Sun Daisies, a combination of White, Yellow and Golden Yellow flowers. They've also had a touch of Warm White for a shabby chic look.


I couldn't resist adding a few coils of Rusty Tin Wire to the mix...


And that reminded me that I still had some of the Miniature Grapevine Hearts, which also have rusty wire curled around them.
I added a couple of those as an extra feature.


The whole thing is strung together with some rustic Jute Twine, and I used strong masking tape to hold it in place on the back of each driftwood plank.


And that's it... I hope you like my joyful driftwood hanging, and it's hopefully not the last of the summer sunshine!
See you again soon.

_______________________

So that's our little trip down memory lane for today.  I hope there's at least some autumnal sunshine coming your way.  Thanks for stopping by and I'll see you again soon.

We are shaped by our thoughts; we become what we think. When the mind is pure, joy follows like a shadow that never leaves.
Buddha