I'm travelling into a new way of working, a new country, a new language, and a new hobby which I'm passionate about. Come with me for some of the journey...

Showing posts with label Graphic 45. Show all posts

Wednesday, 27 January 2016

Bottling It Up

Hello all.  Thank you so much for your lovely response to my Wanderlust Travel Journal.  I hope I'll be able to return some visits over the next few days - I've been a bit distracted lately (all with good things, don't worry - just time-consuming).  I'm back today with my second inspiration offering for Brenda's wonderful "Inspired by Bottles" theme at Country View Challenges.


You've only got a few days before the end of the month, but I hope this might nudge you in to action.  Although there are already lots of great projects, it's always the more, the merrier!


I got a job lot of vintage bottles on Ebay for a very good price, and some have already put in an appearance.

I suppose serious collectors might get antsy about altering old glass bottles, but there seem to be a lot of this type around - and I do have others in my collection which I wouldn't dream of altering!


These were actually pretty simple to do... 

First, a couple of coats of gesso to seal and give some tooth.


Then I stamped the gorgeous Graphic 45 vintage label stamp on to tissue paper with Archival ink.  

(The two in this photo are in fact some others I was also playing with, painted with white crackle paint rather than gesso, and both stamped on natural kraft-coloured tissue paper, but in different coloured inks.)


Of the two I've ended up with here, one is stamped on white tissue paper and one onto kraft tissue paper, but both stamped in black ink.  For some reason I can't find the early stages photos of these ones.  


I couldn't decide which I preferred out of the two tissue papers, so decided to go with one of each.


After all, if they've been standing around for decades in different places with differing amounts of sunlight falling on each of them, they'd have faded differently in any case.


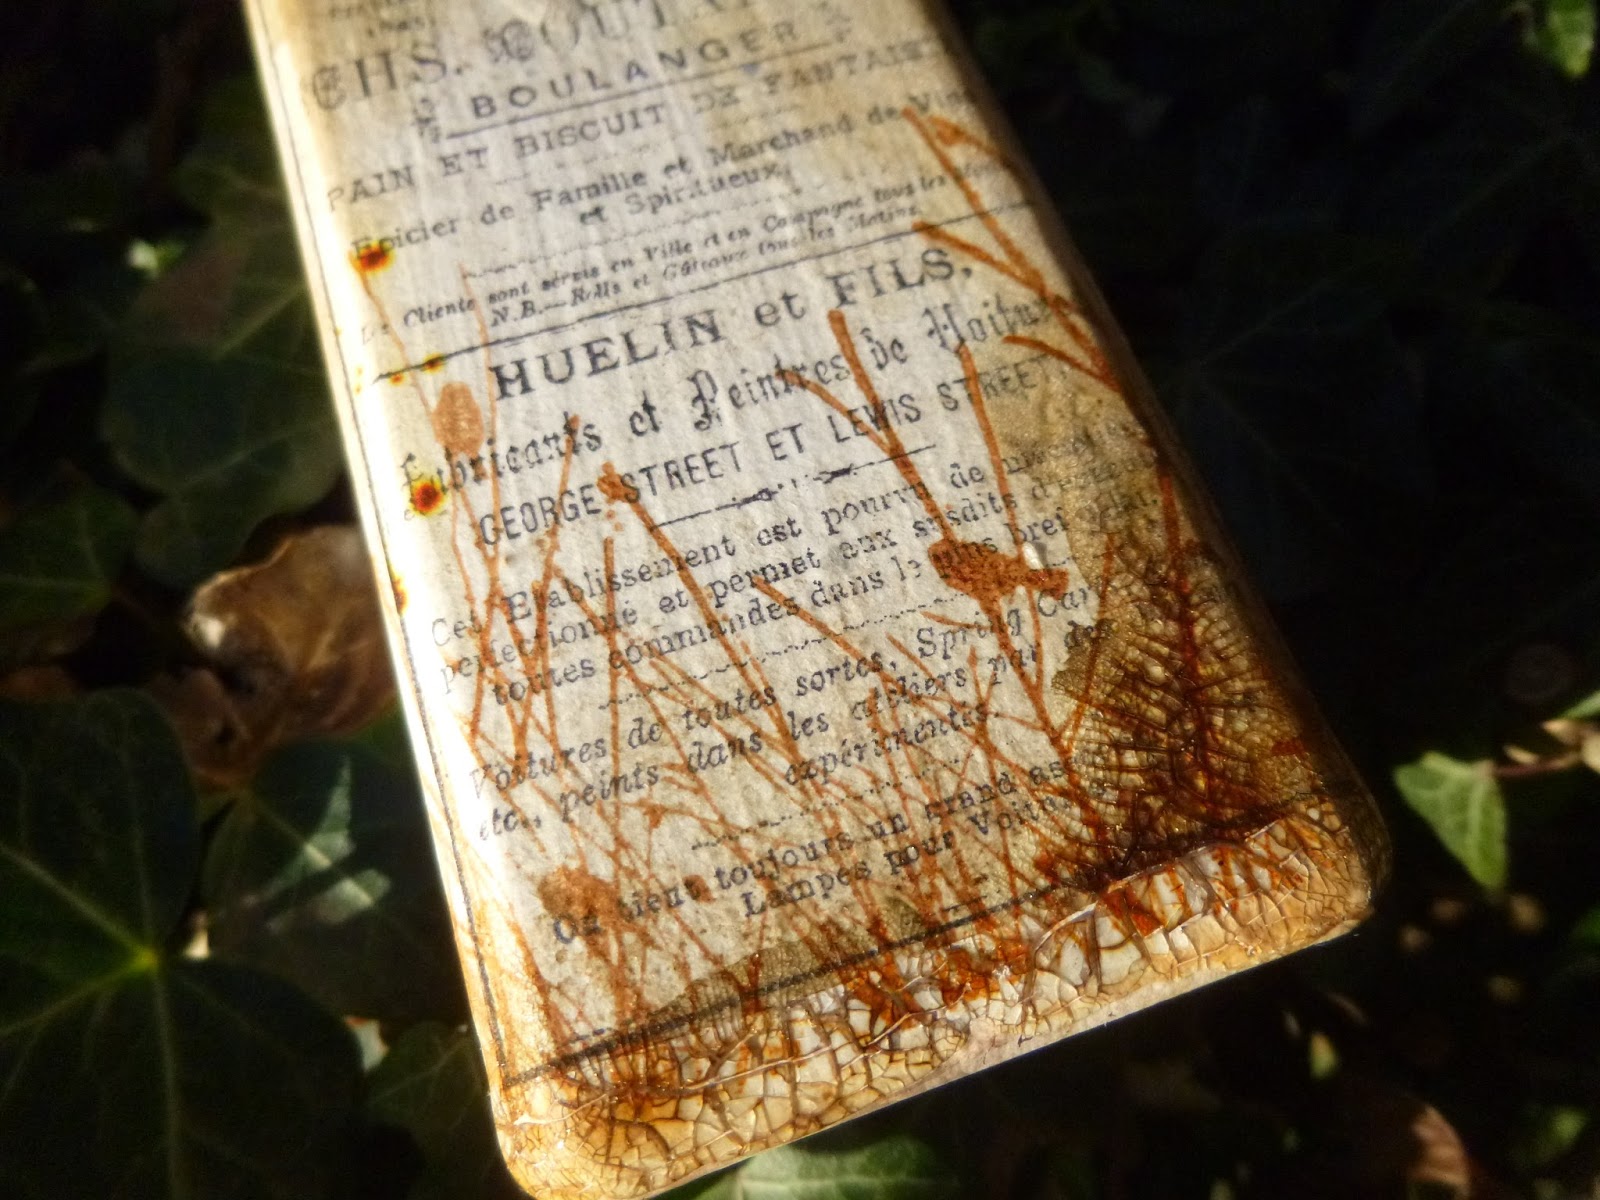
I stamped my favourite PaperArtsy "birds in the grass" along the foot of the bottles.  It just makes me happy!


After that, I applied DecoArt Crackle Glaze in places, just using my fingers mostly.


And once that had crackled nicely, I used various Distress Inks and DecoArt paints to highlight the crackles.


A couple of Idea-ology Muse Tokens are attached with rusty wire...


... wound around the necks of the bottles.


I thought about putting a coat of Ultra Matte Varnish over the top, but the crackle is showing no signs of going anywhere, and I decided I rather liked the gleam of the glaze in the sunlight.


And I really love that embossed lettering along the sides of the bottles too - so glad it has plenty of exposure despite all the ageing. 


And that's pretty much your lot for today.


I hope you like my "antique" bottles, and I hope you'll be "Inspired by Bottles" and come and play along with us at Country View Challenges.


As always, there's a prize voucher on offer from Country View Crafts, and the honour of being one of our Top Three or our Special Mention for the month.  Hope to see you there!

He who pours water hastily into a bottle spills more than goes in.
Spanish Proverb

Monday, 17 December 2012

The Holly and the Ivy


Welcome to Words and Pictures... I'm celebrating today!  

No, it's not Christmas yet, but I've got myself to the finishing line on the Funkie Junkie's 12 Tags of Christmas with time to spare.  

In fact, I finished this tag yesterday, but wanted to wait for daylight to photograph it... and patience paid off - we have sunshine!!

If you've no idea what I'm talking about, you can check it all out here, and it's worth going to have a look just to see the extraordinary inspiration tags Linda Coughlin (yup - she's the Funkie Junkie) has been offering up... and to check out the amazing entries too.  

As for qualifying for the prize draw, generously sponsored by the Funkie Junkie Boutique - well, you have to have all 12 done and posted by midnight (U.S. Eastern time) tonight so, to be honest, unless you can manage one tag an hour...

So, it's my last tag, but it's not the 12th.  I did that one a couple of days ago... No, I'm finishing on number 11.  Check out Linda's original here - it's absolutely gorgeous and, although I've wandered wide and far with some of my tags, I wanted to stick quite close to this beauty.


So my background is done very similarly, but I've chosen to use a music stamp rather than text (and I don't have the same flourish stamp).  

And I've used lots of holly leaves, made like Linda's, but what I've done with them is slightly different.


I loved Linda's colour palette, and I seem to be having something of an obsession with neutrals just at the moment, so I stuck to it, inking the background with vintage photo over the clear embossed flourish (TH), and Black Archival music manuscript (Wow).


Most of the leaves, branches and flourishes are cut out of white card using the Tim Holtz Festive Greenery Decorative Strip Die.  

They've been edged with vintage photo, (fingertips still looking like those of a hardened smoker), and laid out in little festive bouquets around the tag.

But if you say holly to me, it automatically triggers "and the ivy" - not only because of the carol, but because ivy is my absolute favourite of the Christmas foliage choices - pretty much my favourite all year round, in fact.  

I love the long traily tiny-leaved sort; I love the big branches of more rounded leaves.

One of my tasks each year around this time is to create the Christmas vases - great branches of holly and ivy, decorated very minimally and stowed around the house to bring Christmas into as many corners as possible.  So I can't have holly without ivy...


When we were at The Range recently, I hesitated over whether to buy some Das, the air-drying clay (hadn't used it for literally decades), and what decided me was spotting - in the baking section - some little ivy punches, a set of 3 in various sizes, intended for decorating cakes.  

They not only cut out the leaves, but have a press which debosses the little lines onto them too.  Well, I don't really do cake-icing, but I couldn't see any reason why they wouldn't work with the Das - so it stayed in the basket, and they joined it.  And here's my first little go... and I LOVE them!!


I rolled out the clay - using a thick straw as my rolling pin! - and cut and punched to my heart's delight.  

I'd bought white Das, so once the leaves had dried (I did help it along with the heat tool - sheer impatience, and deadlines looming too, of course) I didn't need to do anything more than what I'd done with the card holly leaves: ink them with Vintage Photo DI.  To really get the debossing to show, I went darker with the ivy than with the holly - and I love the look of them together.


The final element in the arrangements was the holly berries.  These are also made of Das, inked in Vintage Photo and then given a coating of Treasure Wax, in White Fire.  

Because they were quite small, it turned out the easiest way to get the wax onto them was to put some on my thumb and forefinger, and roll the berries between.  My "smokers'" fingertips now have a very lustrous shimmer to them too... and you can see fingerprints on some of the berries!


By now it was clear that I wasn't going to have room to get the greeting onto the tag itself without covering up lots of loveliness that I wasn't willing to cover up.  

So I decided to make it into one of the hinged tags which I first met over at Redanne's fabulous blog - I've made them several times before, and love the extra movement and interest the extended part brings to the tag.


The greetings stamp is from the Graphic 45 Christmas sets, stamped onto one of my tea-stained tags, and it's attached with two of the Idea-ology jump rings.  

A couple of bits of crinkle ribbon, dyed with varying amounts of vintage photo, and I decided I was done... yup, done!  If you don't believe me, look...


And if you'd like to go visiting, all the links are at the foot of this post, and you'll get to see the full dozen in all their glory.  Sorry... can you tell I'm feeling quite un-Britishly pleased with myself?!  


And I know I'm only playing for the fun, as I couldn't quite bring myself to work on the Christmas theme way back in September, but it has been some of the most fun I've had crafting, not to mention visiting many of the other players and seeing how they've been inspired by Linda's amazing work.


Thank you so much for visiting today (and for putting up with me in jubilant mood), and I look forward to seeing you again soon, either here or elsewhere in Craftyblogland!


Here's to holly and ivy hanging up, And to something wet in every cup!
Traditional toast


I'm entering this in the following:
As Tag 11 (but did I mention it's my last one?) in the Funkie Junkie's 12 Tags of Christmas
At Top Tip Tuesday the theme is Christmas, and I'm offering a tip: if you're working with modelling clay of any sort, be sure to check the kitchen aisle for cake-decorating tools and equipment!
Simon Says Stamp are playing What's Your Favourite?  I'm sticking with stamping, embossing and neutrals
Anything But A Card are playing Celebrate the Light or Seasonal Holiday - well I celebrated the light last time around, so this time I'm going with the seasonal element
This is my third and final entry for Make a Tag at the Craft-room Challenge
Crafty Boots are also playing a Christmas theme
Out of a Hat Creations have Winter as their current challenge
ABC Challenges are on D for Deck the Halls... how about "with boughs of holly"?
At Pile It On they would like us to Pile on the Embellishments
And over at Ink on my Fingers (and how?!) Hels Sheridan has fortuitously selected Holly as the theme for the Sunday Stampers this week (with the very same post title as mine!!)

My versions of the Funkie Junkie's 12 Tags of Christmas;
Tag 1 - Love's Light Wings
Tag 2 - Work in Progress
Tag 3 - Dance in the Rain
Tag 4 - G is for Gingham
Tag 5 - Every leaf speaks
Tag 6 - Seeking Illumination
Tag 7 - Home Sweet Home
Tag 8 - A Romantic Postcard
Tag 9 - A heart full of love
Tag 10 - Toys, toys, toys!
Tag 11 - The Holly and the Ivy (you're already here)
Tag 12 - Star of Wonder

Sunday, 2 December 2012

Something New


Hello all, I'm delighted to welcome you to Words and Pictures today for my first post as an official member of the eclectic Paperie Design Team.

eclectic Paperie have an online store packed with lovely stash goodies, and a fabulous blog where you can find lots of inspiration and tutorials for how to use them.

And my fellow newbies Marjie Kemper and Annette Green are also making their first contributions this week, so be sure to check out their amazing creations too!

I've been having a play with some gorgeous Graphic 45 papers - the ABC Primer (which is on offer in the store at the moment), as well as my favourite Distress Inks, lovely Idea-ology lettering, and some texture paste, to create this dimensional hanging.


And if my "something new" for today works out, then you'll find all the product details at the foot of this post, and you can click through to eclectic Paperie and put them straight in your basket!!


I started with a paperboard frame which my sister-in-law picked up for me at a bargain price in The Range (it's about 15x6 inches), but you could use these techniques on any untreated frame.

If your surface is already painted or varnished, you might need to sand it down first or you could do the same as me and start with a coat or two of gesso, which should give enough "tooth" for other paints and inks to adhere to the surface.


Once I'd done one rough coat of gesso (instant "shabby chic", I call it!), I used a palette knife to apply some paste through the Crafter's Workshop Mini Ledger template.  

I love the raised texture this gives the text.  Another coat of gesso once the paste is dry makes it look part of the frame itself.


I then used Distress Inks in Antique Linen, Vintage Photo, Black Soot and Wild Honey to build layers of colour on and around the raised text.  


On the sides of the frame I used the same template, but this time I blended Black Soot Distress Ink through it using a blending tool.  

I love how versatile these templates are - you can use them in so many ways, with inks, sprays or texture pastes... the list goes on.


Then I started selecting papers from the lovely ABC Primer set... I wanted to stick to a neutral colour palette for this project, so those were the papers I pulled out and started putting in place.  


Once I had my three main panels, I chose a letter, a sum and a bookplate for each frame, edged them and the main panels with Vintage Photo DI, and adhered them using mounting tape for a dimensional effect.  


Each element within the frame has a different number of layers of tape so that they sit at different heights as you look at them.

And I left the interior walls of the frame in plain gesso - it really makes the contents of the frame pop, I think.


Finally, we come to the sentiment.  It's a thought I really like to live by - for me the most exciting thing in the world is learning and discovering new things.  It's one of many reasons why I've been so lit up by this whole new crafting hobby - the learning curve is huge, and there's so much inspiration and information out there to discover, explore and play with.


The lettering is from Idea-ology: the brilliant Newsprint AlphaParts (also on offer right now). 


I love these little plastic letters... you can alter them with inks and paints as I've done in past projects or, as here, leave them in their basic state.  


They're sticky on the back, so you just twist them off the frame and adhere them to the project.


One of the main things I love is that you get plenty of each letter within a set; so, even though I've used four 'e's for this sentiment, there are still some left for next time.  


So that's me for today... I'd love to know what you make of today's offering.  Your thoughts and comments are so much appreciated, and it's great to have your company as I set out on this new adventure.  I'll be sharing an eP project with you here at Words and Pictures once a week, and every so often I'll be letting you know about a post over at the eclectic Paperie blog itself.  But for now I'll just wish you a wonderful week, whatever it is you're up to, and I look forward to seeing you again soon - either here, or elsewhere in Craftyblogland!

Anyone who stops learning is old, whether at twenty or eighty.
Henry Ford

I am learning all the time.  The tombstone will be my diploma.
Eartha Kitt

Products used:  
(Click to go to product page at eclectic Paperie)


I'm entering this for the following:

Artful Times are playing Anything Goes this fortnight
Simon Says Stamp are also playing Anything Goes at the moment
Top Tip Tuesday are playing Kids and Teens
Sugar Creek Hollow's challenge this week is Distressing - and by that, I don't mean that it's upsetting me... oh, you know what I mean!