I'm travelling into a new way of working, a new country, a new language, and a new hobby which I'm passionate about. Come with me for some of the journey...

Showing posts with label Farmhouse Paper Company. Show all posts

Tuesday, 22 January 2013

Do Re Mi Fa...


So... or should that be sew?  Well, in fact, strictly it should be "sol" but let's not get bogged down in technicalities...  Hello all, and welcome - with an especially big welcome to the new followers, who are probably now wondering what on earth they've let themselves in for.

I'm sharing a tag today, a design piece using some more of the lovely goodies from eclectic Paperie.  As usual, you'll find all the links to what I've used at the foot of the post.  There's also a sneak peek down there for you!

So (again) here's my little tribute to the extraordinary Julie Andrews, inspired by the fabulous sewing-themed Wendy Vecchi stamps Art by Hand.  (If you're anything like me, you're now humming the song to yourself, so if you need a soundtrack for this post, it's here!  Or you could take a detour to this fabulous dancing flash mob in a Belgian station...)

I'll be doing a more detailed tutorial for this over at the eclectic Paperie blog at the end of this month, but just wanted to share a few pictures with you today.


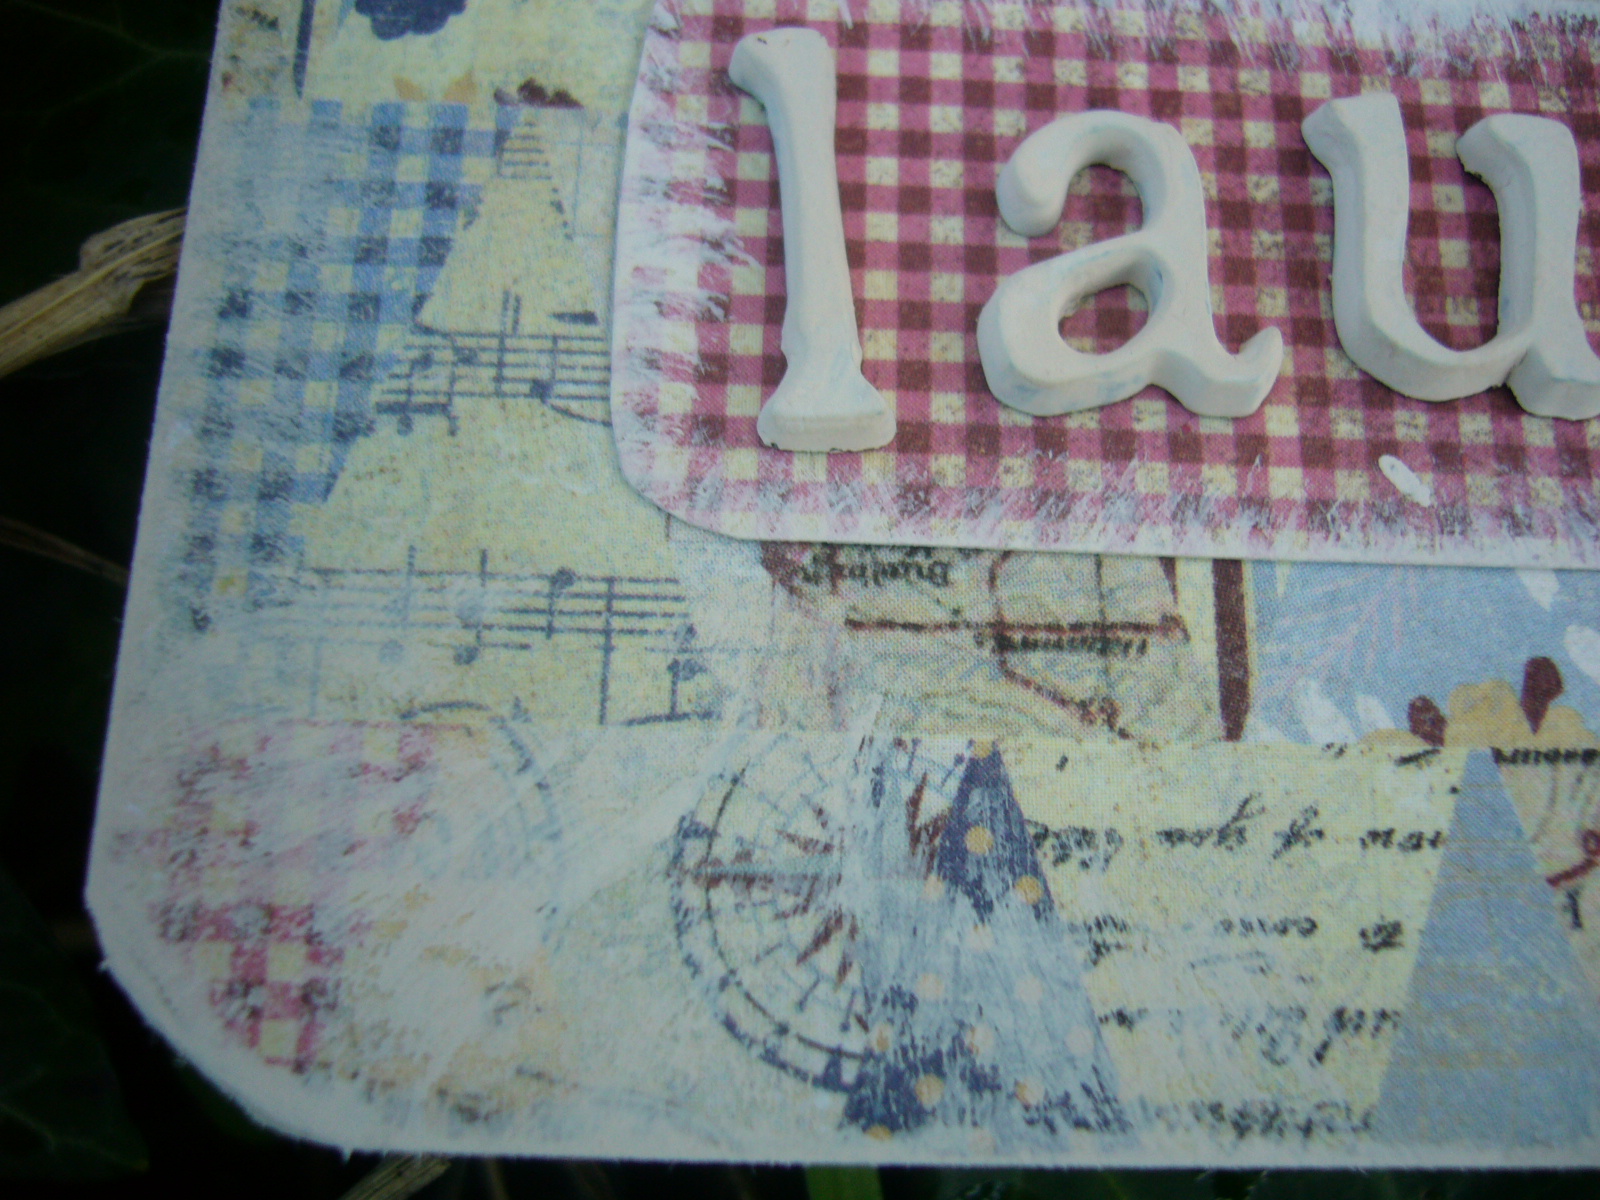
I used the Farmhouse Paper Company collection, Fair Skies, for my background, with washes of paint and some sanding to create a shabby chic look, and then used some of the stamps to create more texture.


I stamped the scissors and thimble separately and glossed them up with Pewter Distress Stain and some clear embossing powder for a metallic look.  I added a little spool from my stash and wrapped some red thread around it, which I also gave a slight wash of paint too, to soften the colour.


The lettering is some more of my favourite Alpha Parts - this time the Ransom set.  Kim has been selling these off at eP - if you're very quick you might just get some at a bargain price!  They come in a black plastic finish, and I really enjoy altering them.


This time, they've had a coat or two of ivory acrylic paint, and then I blended some Chipped Sapphire DI onto the top surfaces.  For some reason it didn't want to play ball with the paint surface, so you get a lovely pale version of Chipped Sapphire!

I finished it off with some paper ribbon from my stash, and that will bring us back to Do...


I'm also sharing a new project over at Artistic Outpost today - here's a quick sneak peek, as promised - it would be lovely if you had a moment to pop over there and check it out (though it will also appear here in full in due course).

But for now, thank you so much for stopping by.  Have a happy Tuesday, and see you soon!

A gentle heart is tied with an easy thread.
George Herbert

Life and death are one thread, the same line viewed from different sides.
Lao-Tzu


Just click on the image to check out the product:


Thursday, 17 January 2013

Boxing Day

Okay, I know it's not really Boxing Day (only 341 sleeps to go, people!)... but it's even better than that.  

It's the start of another brand new, exciting Challenge strand at eclectic Paperie.  It was great to see so many of you taking part in the Altered Challenge, using canvas, and I hope you'll be tempted by this one too.  Each month, as well as the Altered Challenge, there'll be a challenge set by a member of the Design Team, and when I tell you that this inaugural challenge is being hosted by the extraordinary Marjie Kemper of She Who Stamps and Scraps... well, how can you resist?!

The challenge Marjie has set us is to create an Altered Box.  Have a look at the details of what she's after here - and this is one challenge where you can obviously choose to think inside as well as outside the box!!

I wanted to play along, and since my last altered container was a very painty, stampy tin (thank you all so much for your wonderful comments about it, by the way), my first thought here was to go in the opposite direction and work with papers to alter my box.  I'd also been thinking about the Lace challenge over at Simon Says Stamp and Show, and lo and behold, an idea was born.


I started with a small wooden box (about 5.5 x 3.5 inches) - I think probably a cigarillo box - which has been lying around the house for literally years.  It had the paper advertising wrappers still on it, but I forgot to take a photo before I'd already given it the first coat of gesso.  So here's a quick not-quite-before and after:


Using some of the Fair Skies papers by the Farmhouse Paper Company (available at eclectic Paperie - links at the foot of the post), I cut strip after strip with my Tim Holtz Vintage Lace Decorative Strip Die.


I then spent quite some time laying them out in sequence to get a balance of colours, varying laces and a pleasing overall look.


Regulars will spot that these aren't my usual colours, and you won't be surprised to learn that by this point my brain was already busy planning a neutral, lacy version (see the sneak peek at the end).


I also did some mixing and matching of strips to cover the sides.

All the sticking down was done with Studio Multi Medium in Matte, and I put a couple of coats over the top to give some protection to the lacy edges.


And when I mentioned "thinking inside the box", I wasn't being entirely silly...


... because obviously I had to do something with the inside of the box!


So a couple of the papers get to make more than just lacy appearances, and I picked the dark red so that it would set off the patterns.

I also blended a touch of Chipped Sapphire Distress Ink onto all the edges.


I do like how the different shapes and patterns and colours collide from different angles.

So there's my little trinket box for you... a fairly simple affair - but sometimes it's okay to let the papers speak for themselves, I think.


And of course there's an altogether bigger project (somebody's been smoking some huge cigars!) on its way to you in the next day or so (as soon as I get round to writing the post)... here's the promised sneak peek... so I do hope you'll pop back to check it out (Update: it's done now).

But for now, head over to the eclectic Paperie blog for all the challenge details and lots more inspiration from the DT, not least the fabulous Marjie herself.  

There's another great prize on offer, generously sponsored by Kim of eclectic Paperie, so we'd love you to play along.

We could learn a lot from crayons; some are sharp, some are pretty, some are dull, while others bright, some have weird names, but they all have learned to live together in the same box.
Robert Fulghum


Click on the links to go straight there:


Sunday, 30 December 2012

New Year Manifesto

Hello all, I'm so glad you've found the time to drop in today.  I'm sharing my New Year Manifesto... no, not resolutions, as I'm generally useless at keeping them, and they're so often couched in the negative - 'stop doing this', 'give up that'.  So my manifesto is based on positivity, with an aim to ensure that each day includes some of each of the bullet points.  But bullet points are no fun, so mine are bunting points!


This garland also forms one of my Design Team projects for eclectic Paperie, making the most of some of the lovely things on offer at the eclectic Paperie store.  It was really easy to make, and such fun too.  You can find the links to most of what I've used at the foot of the post.

Exciting news... early in the New Year, we'll be starting a couple of monthly challenges over at eP, with great prizes.  There's an Altered Art challenge which will kick off next week, and then each month there'll also be a challenge set by a member of the DT - the first one is hosted by the amazing Marjie Kemper, so you won't want to miss that.  If you join up over at the eP blog, you'll be sure not to miss anything.


But back to the bunting...  The flags are created using some of the lovely alterable coasters eP stocks, which came in my goodie box from them.

They're probably not something I'd necessarily have thought of getting myself, but I'm so glad they turned up.  I'd been enjoying Carol Fox's beermat creations, now finally all garlanded together, so I thought I'd have a go at something along those lines with these coasters.


The papers are the Fair Skies collection by the Farmhouse Paper Company - I love the colour combinations.

I've used four different papers and mixed them together in various ways.


So the balloons which are the base for the dream flag also put in an appearance as the large heart (trimmed a little) on the love flag.

The rest of the hearts were created using a small punch from my stash.  I backed some of the paper onto thicker card, before punching, to give them a bit more sturdiness.


After sticking the paper to the coasters using the Inkssentials collage glue stick (it really does work better than most glue sticks I've tried), I sanded the edges, and then brushed light coloured acrylic paint around them too, mixed to match the the pale colours within the papers, for extra shabby chic effect.


All the cut and punched paper elements have also had a little shabby paint added to their edges.

As well as helping the shabby chic look, it gives some texture and movement to the piece.


The bunting flags on the play flag were easy to make.  All I had to do was simply cut them out from the paper left over from the background on the laugh flag.


The lettering is the fabulous Idea-ology Alphaparts Newsprint set, which I love using.  This time I've given it a couple of coats of acrylic paint, the same mixture as was used for all the edging.


Since the words were getting a little lost against the busier backgrounds, I used some of the gingham papers to back them onto, so that they would stand out more clearly on those two flags.


There are added embellishments from my stash: some mulberry paper roses...


... the wooden ornament behind the dream heart...


 ... the little buttons ...


... and then I used some off-white paper ribbon, also from my supplies, to tie the linking bows, and as the string to attach the garland at the ends.  It's lovely stuff, as once you've threaded it through, you can spread it out to get a great dimensional bow.


I'm very pleased with the end result and - although it will mean some red infiltrating my otherwise bluesy room - I will enjoy having it on the noticeboard to remind me to keep having fun through the (inevitably) stressful time ahead as we sort through 40 years of clutter and prepare to move out of the family home.   It will be important to remember it's not just an ending, but also the beginning of a whole new set of adventures... and what better time for that than the beginning of a brand new year?!


I suspect this will probably be my last post before tomorrow, so I'd like to wish all of you out there in Craftyblogland a very happy, healthy, prosperous and peaceful 2013.  Thank you so much for your support on this journey so far, and I can't wait to see what the New Year brings for us all...

Youth is when you're allowed to stay up late on New Year's Eve.  Middle age is when you're forced to.
Bill Vaughn

For last year's words belong to last year's language
And next year's words await another voice.
And to make an end is to make a beginning.
T.S. Eliot, from "Little Gidding"

Year's end is neither an end nor a beginning but a going on, with all the wisdom that experience can instill in us.
Hal Borland

Find all these at eclectic Paperie; just click on the item to go straight there... and don't forget the great challenges starting soon at eP - it would be great to have you play along!


I'm entering this in the following:
Simon Says Stamp are playing Anything Goes this week
Live and Love Crafts would like to see Anything But A Card
Anything But a Card are playing Anything Goes (or your favourite piece from last year)
At Pile It On, they are still looking for us to Pile on the Embellishments