I'm travelling into a new way of working, a new country, a new language, and a new hobby which I'm passionate about. Come with me for some of the journey...

Showing posts with label Faber Castell. Show all posts

Saturday, 23 May 2015

Dawn Chorus

Hello all... After a quiet start to the month, it's hotting up around here now.  I was over at PaperArtsy last night (I hope you'll check out my Word Tags if you missed them), and today it's a Magpie Day of inspiration over at Country View Challenges.  I wasn't able to be part of the main Simply Scenic inspiration this month, so I'm really happy that I was able to squeeze in a scenic postcard for this.


I've kept it simple with some of my favourite Distress Ink colours and various stamps combined to create a dawn chorus scene.  Did anybody catch the marvellous "slow season" on BBC4?  There was a two hour canal trip, glass-blowing, furniture making and an hour of the dawn chorus - all without soundtrack or voiceover - magical!


Well, this postcard probably qualifies for a similar world of simplicity... some ink, some stamps and some water.

I blended Faded Jeans, Rusty Hinge and Vintage Photo Distress Inks on to a textured postcard, and spritzed water at them with my new T.H. water spray bottle... Yes, I know, I gave in, but looking at this I'm already glad that I did!


The tree silhouettes are formed by the two halves of a Penny Black stamp (used in one of my favourite journalling pages from earlier this year).  It's actually a narrow avenue of trees, but by inking up one half at a time you can have the trees as far apart as you need them!


Along the ground in between I used one of the PaperArtsy Hot Picks birds & grasses images, stamped in a combination of Jet Black Archival and Rusty Hinge, just to get a slightly burnished tone of early morning sunshine on the birds.


The "Postcard" at the top is a Darkroom Door stamp, and I drew the dividing line with a PITT pen.


Another Darkroom Door stamp provides the writing on the postcard, stamped in Faded Jeans so that it would fade into the background.


The words from the Small Talk sticker set seemed about perfect for the theme, and I added shading around them, first of all with Inktense pencils, and then with Faded Jeans and Rusty Hinge Distress Stains, applied with a water brush.


I liked the effect so much I repeated it around the edges of the card to give a bit of extra texture.  So now there are splatters of removed ink and splatters of extra ink.

I thought that was that... but then it occurred to me that I maybe wanted to preserve the colours a bit.  Don't get me wrong, I adore Distress Inks, but over time the colours can fade a little if they're out on display.


So I decided to clear emboss the whole thing.  I tapped the Versamark ink pad all over the postcard and applied the powder, and I love the result.  Not only are the colours more vivid (because of light getting refracted and so intensifying the colour spectrum - or something like that!), but there's a delicious enamelled texture to it.


And of course it catches the light which, as you know, I love as an effect.  Most of the photos in this post are of the plain ink version... just the first and the last photos give you the embossed effect.

So there's my Simply Scenic postcard for you.  I hope you'll hop over to Country View Challenges to check out the Magpie inspiration from the rest of my fabulous team-mates, and I'll see you again soon.

Each time dawn appears, the mystery is there in its entirety.
René Daumal

I'd like to enter this in the Vintage Garden theme over at the new Anything But Cute Challenge.  I hope with the inks, pencils, staining and embossing it's mixed media enough to qualify!
And at A Sprinkle of Imagination it's an Anything Goes theme, as long as you use at least one product available in the store - the Distress Inks and Stains are all there.


Friday, 1 May 2015

Spring Tim(e) Colours!


Hello all!  It's time for a new challenge on A Vintage Journey, and the amazing Astrid would like to see as many Spring Colours as possible.

Remember we are a Tim Holtz-inspired challenge so although you don't have to use his products, we would like to hear from you how he has inspired your project - whether that's through ideas, techniques or (of course) products too.

As always, my fantastic team-mates have created some inspirational projects - do hop over and check them out, along with the challenge details and our Travelling Instructions - and here's my offering for you this month.

It's another of those ones that started in one direction and ended up somewhere else, but probably all the better for the discarded layers underneath!


It's a 7x5 canvas, and I started out spritzing it with my favourite spring colours - the vivid green of new leaf growth and the fresh blue of the sky.  Over that, I embossed the Papillon text in Seafoam White and added more powder around the edges for a distressed look...

And then I gesso'd over the whole lot and started again.  I don't know - I just wasn't feeling it!


Instead, I applied texture paste through the wonderful Blossom stencil (my other favourite thing about spring is blossom).  You can see colour is seeping through from underneath... no problem, it's not like I dislike those colours!


I spritzed that with various Distress Sprays - Cracked Pistachio, Broken China, Mermaid Lagoon Squeezed Lemonade (for some sunshine)... others too, I'm sure.


I sprayed the same colours onto some paper and cut that with the Birds in Flight Decorative Strip Die.


They're stamped with Tim's Tiny Words stamps.  Now they can soar and sing amid the treetops.


There's lots of shading around the birds, done using a combination of Distress Markers, pastel pencils, Inktense pencils and even the odd Copic Marker.


And I also added shadings of Fresco paints to the textured blossoms in the background.  There's some Zesty Zing in there, and probably some South Pacific and Southern Skies.

I was really enjoying the blues and greens, but the whole thing needed some paler highlights and some more of the dappled spring sunlight that I love.


On the way in to work I was looking out of the train window and admiring the glorious tree blossoms in all the gardens.  White is my favourite, so the next time I was at the craft table I decided to add some white accents.


The little wooden hearts have had a coat of white paint and then a couple of coats of UTEE.


That gives them not only a glossy reflective surface, throwing light around, but also a touch of domed dimension.


The WordBand has Distress Paint tinting the lettering, and then a coat of Glossy Accents so that it can catch the sunlight too.


It's attached with a large crinkle ribbon bow - a touch of extravagance to mark the excitement of new spring growth.


Obviously there had to be plenty of spatter...


And all of this also "falls" over the sides of the canvas too, of course.

So there you have my Spring Colours canvas.


Do hop over to A Vintage Journey to see what my lovely team-mates have been creating, and we hope you'll be inspired to play along with us this month.


Remember there's a prize voucher from our generous sponsor Country View Crafts, and you might be one of our Pinworthies at the end of the month.  Can't wait to see your Spring Colours!

The month of May was come, when every lusty heart beginneth to blossom, and to bring forth fruit.
Thomas Malory

This is the last day to add your name to the hat on my GIVEAWAY - hurry, hurry, hurry!  I'll include all comments left before 23.59 1st May UK time (my blog is an hour ahead of that, as it runs on European time, so don't panic if your comment seems to be an hour late - I'll take that into account!).

Friday, 26 December 2014

Ring In The New!

Hello all! I hope you're all enjoying the festivities, as well as my Artistic Stamper 2014 top picks.

Christmas Day is blissfully quiet round here... it's the 26th that is the family celebration, so there'll be presents and lots of eating.  But while I'm busy with that - or recovering - it's time for a new challenge at A Vintage Journey, and our host is the wonderful Brenda.  The theme is Ring Out The Old, Ring In The New, and she's given us some words (yay!) to play with:

Ring out the old, ring in the new,
Ring, happy bells, across the snow:
The year is going, let him go;
Ring out the false, ring in the true.
Alfred, Lord Tennyson

Brenda suggests we focus on key words from the poem and interpret one or more of them in any way you like.  For instance, you could use something old/new on a project; include bells or snow on a card; design a new year card/project/invitation etc.  Be creative, and just tell us what your links are to the words and what your Tim inspiration is on the project.

So here's the card I came up with - a celebration of this time that I love between Christmas and New Year, the lull in activity before we go hurtling into fresh adventures.


I think the Tim inspiration is pretty clear - everything I've used is part of his ever-expanding and ever-desirable product line.  And there are lots of other inspirations going on, including Tim's December tag.

Work has meant I've missed the whole second half of the year tags-wise (more catching up to do!), so I'm very happy to be able to join in again for a last hurrah.  The sparkly die-cut, the sprays of Holiday Greens, the Distress Spray backgrounds, Distress Paint altered metal, and the little bells all find a place.  I didn't have any of the new Frosted - which looks so cool - but my embossing is within the card itself.


As you read, it will seem I must have spent hours working out how to include all the words of the poem, but it honestly wasn't like that.  I just wanted to play with some of my new toys!


I took advantage of one of the fabulous Country View Crafts Advent offers to grab the Festive Gent die...


... as well as the delicious Holly Branch embossing folder which provides the underlying texture on my kraft card panel.

There's also an old year/new year thing going on in the colour palette.  I started out in my Christmas neutrals, but found myself yearning for the vivid blue-greens which seem to be where my crafty instincts carry me in Jan/Feb (check the archive if you don't believe me).

So now the card combines them both!


I blended Walnut Stain and Vintage Photo DIs over the branch to make it pop, and used Broken China Distress Glitter over Glossy Accents to create the dimensional holly berries.


And I think the Holiday Greens Thinlits still count as new to my stash, even though they've had plenty of use since getting here...


... as do the Distress Spray Stains used to colour the greenery as well as to spatter the kraft background.


I used the Rays Layering Stencil with Vintage Photo DI to add extra movement and depth of colour, and then spritzed the panel with Picket Fence Distress Spray.


I had a lovely time creating spritzed blue/green backgrounds - but my fingers are still looking a little bluesy!


Once cut, I arranged the greenery (including the wax paper cuts) in loose sprays...


... and added the clock, altered with Distress Paints, and warning that it's almost midnight.  Our Festive Gent is going to have to hurry if he's going to be the First Footer tonight!


He, of course, is dressed up in sparklingly new array for the celebrations.  This is, in fact, the test cut that comes in the package (waste not, want not), inked up for some shading and then given a good dusting of Rock Candy Dry Glitter.


I edged him with a Big Brush Stampers Pen (shock, horror, not a Tim product!! - but that's allowed too, as long as you let us know your Tim inspiration) to make sure he stands out against the background.


Obviously, I've got my little rusty bells (rusty and therefore old)... and they're happy bells too, filled with the Merriment of the Idea-ology Muse Token (which I only noticed as a happy coincidence once I was taking the pictures... subconscious selection of the most appropriate token).


The bells are ringing out across the snow-y spatter of some Picket Fence Distress Spray Stain, and the alcohol-ink-altered Word Band lets us know the noise they're making as he goes.


The main kraft panel is layered up over some more of that Distress spritzed card, some white card and onto another kraft layer, all distressed with the TH distresser to create extra texture and dimension.


And since this is doing duty as a "voucher" during the present-giving today, I zhuzhed up a plain brown envelope to hold it.  I continued the holly theme spritzing Tumbled Glass and Evergreen Bough sprays through the Holly Bough Layering Stencil, and then spattering with Picket Fence.


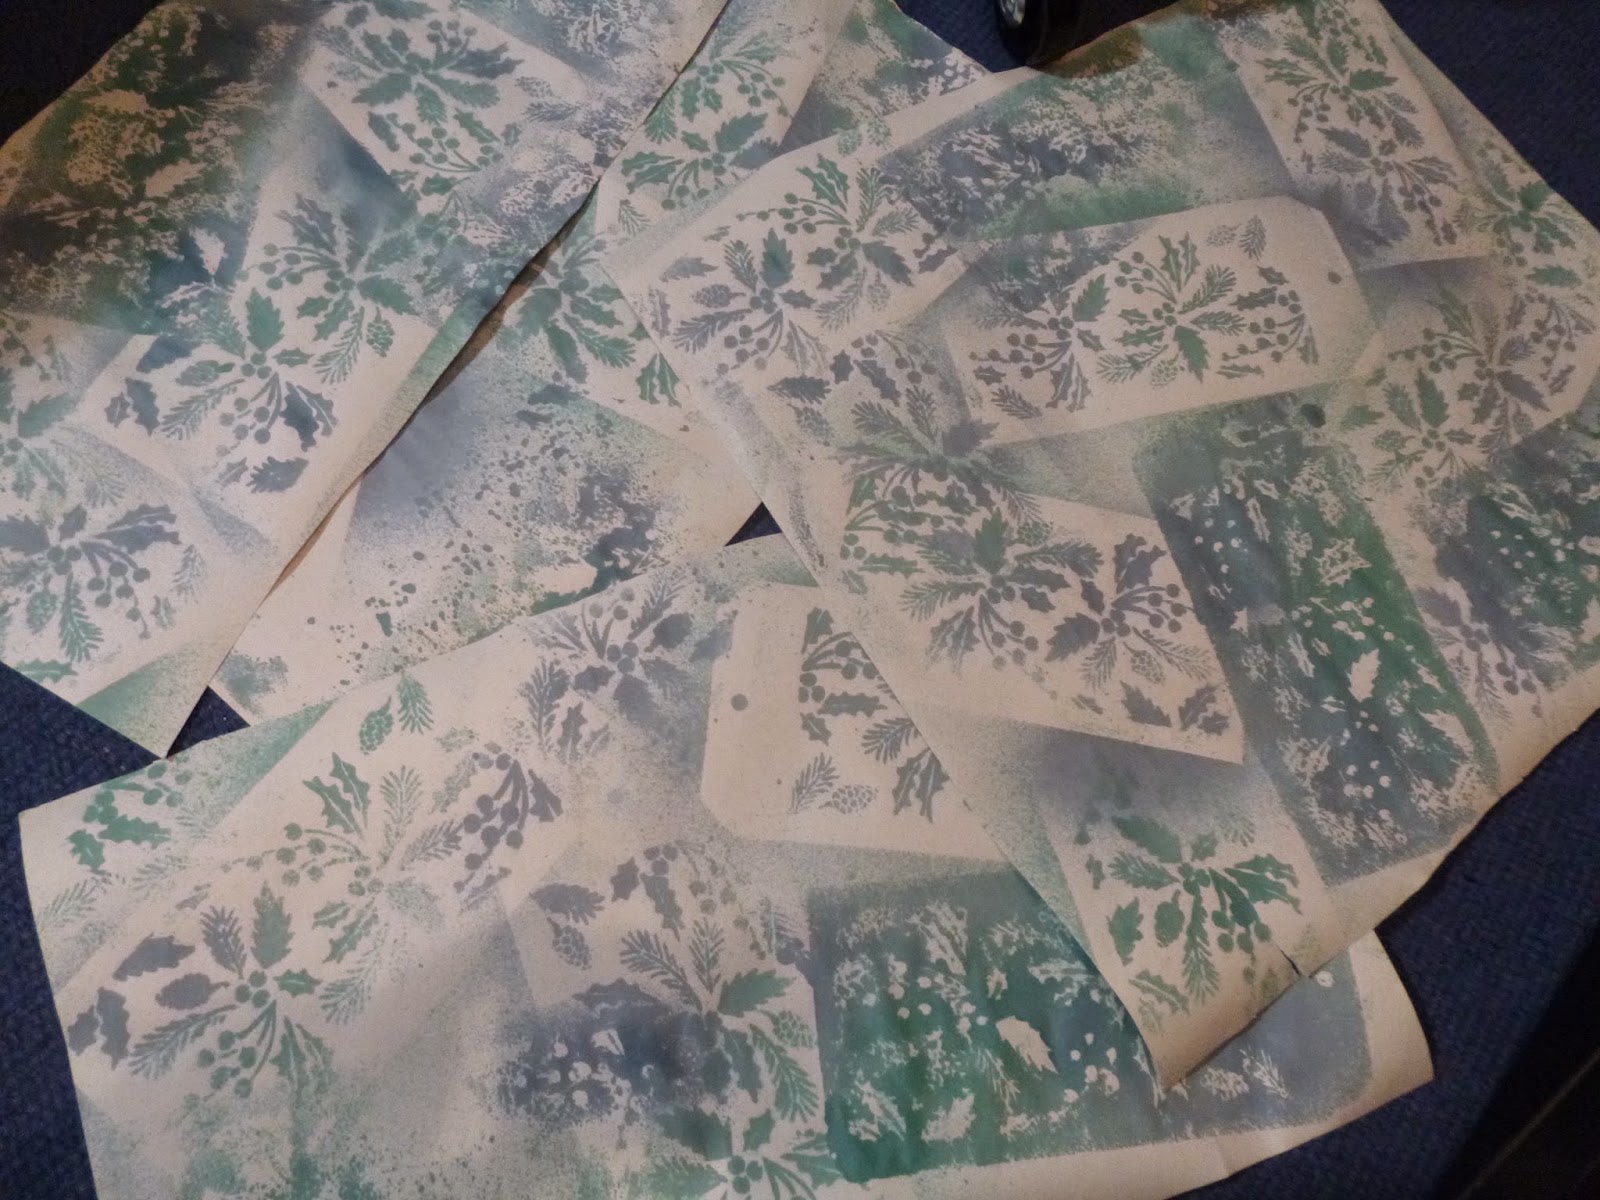
Just as a little added extra, here's a sneak peek of some more handmade wrapping paper that will be putting in an appearance this afternoon...


This is done with Stormy Sky and Evergreen Bough sprays, also turning the stencil over occasionally to print with once it was nice and inky.


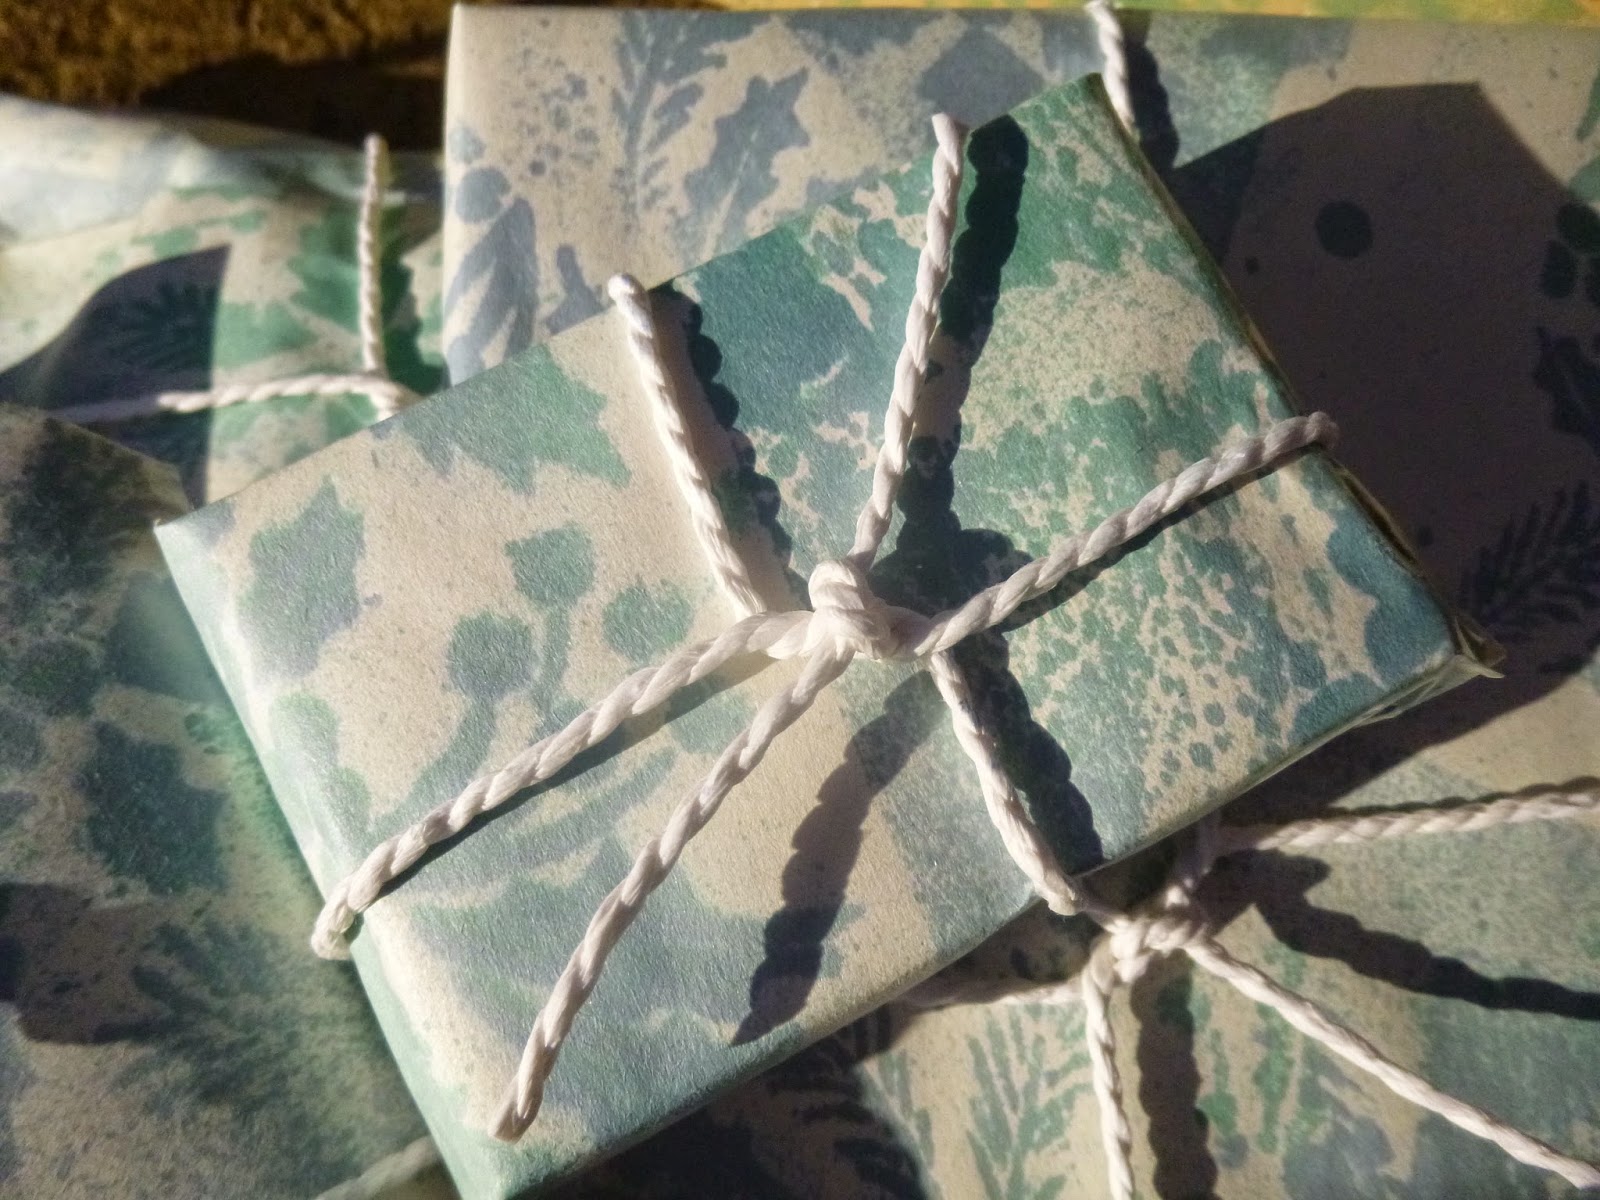
I always wrap gifts according to a wrapping paper code - each person has their own pattern/decoration so that I can tell what is for whom (not all handmade papers!)... these and the voucher are going to the same person.


That's quite enough from me... we hope you'll come and Ring Out the Old, Ring In the New with us.  If you're in need of further inspiration you'll find plenty of it over at A Vintage Journey, where my amazing team-mates have been busy, and you can also check out the small print of Brenda's challenge details and our Travelling Instructions - just to make sure you qualify for the chance to win the gift voucher from our generous sponsors, Country View Crafts (where you can also find all the goodies I've used to create this).


I hope you enjoy this quiet time in the run up to New Year's Eve.  I'll be hoping to do some hopping and see what you've all been up to but, until then, stay warm and safe and happy!

Of all sound of all bells... most solemn and touching is the peal which rings out the Old Year.
Charles Lamb

I'd like to enter this as my take on the December tag for Tim Holtz's 12 Tags of 2014
And in the Anything Goes theme over at That's Crafty Challenge Blog
With the ringing of the bells and the WordBand with the lyrics from "that song", I'd also like to join in with the Sing, Sing It Loud musical theme at the Inspiration Journal

Monday, 6 January 2014

Oops...


Oops, indeed!

Yes, I nearly missed this one!  

There I was, thinking I had it all under control, and that I'd completed my Funkie Junkie 12 Tags of Christmas (with just one bonus tag to go), and suddenly I realised I'd completely forgotten about number 11!

I was in the middle of writing the post for Tags 6 and 7 (you'll see that tomorrow), and realised I'd better stop writing and start crafting again immediately.  

With the light fading, I had to be quick, so it's a pretty close casing of Linda's wonderful number 11 with just a couple of alterations owing to different supplies being used.  

Quite apart from anything else, I'm working on a smaller tag rather than the jumbo size.


I loved the natural colours of the scene in the background, so decided to stick with that, but used Distress Stains to create it.  I had a lovely time letting the stains run and blend in the background for the ground and the sky.

I stamped my little trees very simply to create the woods along the horizon.


The little deer was another of my lucky buys in the recent Sizzix Mega-Sale (it really was mega... I got him and the "25" that goes with him for £2.75!), so I was delighted to give him his debut here, cut from a piece of the Maja It's Christmas Time paper.

I used the brown Stampers Big Brush Pen to create the shadow underneath him so that he's not floating in mid-air, and did some more pen work using the green and white Big Brush Pens to create some grassy snowy textures.


I don't have the Snowflake On the Edge die, but I'd bought a bunch of pre-cut ones from ebay.  No vivid Distress Glitter, so I inked the snowflakes with Tumbled Glass and Broken China, and then added some Rock Candy Dry Glitter.


I used the white pen to add just a dusting of snow to the trees... 

Oh, and used a bit of music stamping in the background as Linda did too.


A little bit of seam binding, inked with the same colours, and an Idea-ology Muse Token with an appropriate word, and that's pretty much that - speed-tag!!


Just as well that Linda added the bonus tags with the extended deadline, or I would have had to declare defeat this year!

Thank you so much for dropping in today... I promise we'll be moving on from Christmas soon - but it's only just gone Twelfth Night and we're just taking down decorations today, so I'm not feeling too guilty.  


If everything seems under control, you're not going fast enough.
Mario Andretti

I'd like to enter this as Tag 11 in the Funkie Junkie 12 Tags of Christmas, sponsored by The Funkie Junkie Boutique.