

Hello all... a process post today.
If you saw my recycled Stampotique tag, you'll remember all the rusty loveliness involved, and I promised to show you some pictures of it all being created... and with the more recent Coffee Guys, as well as the Words, Words, Words tag, some of you are champing at the bit to know how it's done - well here you go!
I have to admit, it's no great technique on my part... just a really, really good product.
My real plan for the day was to do some tea-dyeing (with some coffee thrown in for good measure), the rusting was an afterthought. But they add up to a pretty good post title, no? (Tim Holtz Distress Colours if there's anyone out there that doesn't recognise them...)
It was on a day a few weeks ago when I was feeling a little low on mojo. I knew I wanted some more tea/coffee stained tags for an upcoming project, so it seemed like a good day to do that.
And I thought I'd experiment with the Crafty Notions Rusting Powder while I was at it.
I'm happy to say that all the messing around gave me a good shot in the arm mojo-wise too...

I added a couple of tea bags as well as a spoonful of instant coffee to a bowl of boiling water and put in the tags to soak for a few hours.
Once that was done, I added some seam binding, a bit of lace (in a slightly strange peach colour that I couldn't see me ever using) as well as some white satin ribbon that I got ages ago, and is just too shiny and boring for my liking, so I thought I'd see if I could shabby it up a bit.

Very happy with the tags - you've already seen them used for my reluctant Christmas tags - and with some of the ribbons.
The satiny stuff barely took any colour - they do now have a very delicately off-white appearance in places.
Lying in a big bundle, they look quite good, but as soon as you cut a bit off and use it, it pretty much just looks white again... ah well, back to the drawing board with that.

For the rusting, I used Crafty Notions Rust Powder and, having lost the instructions that came with it, I consulted this very useful post from the brilliant Kim Dellow.
(The banana is not a necessary ingredient.)
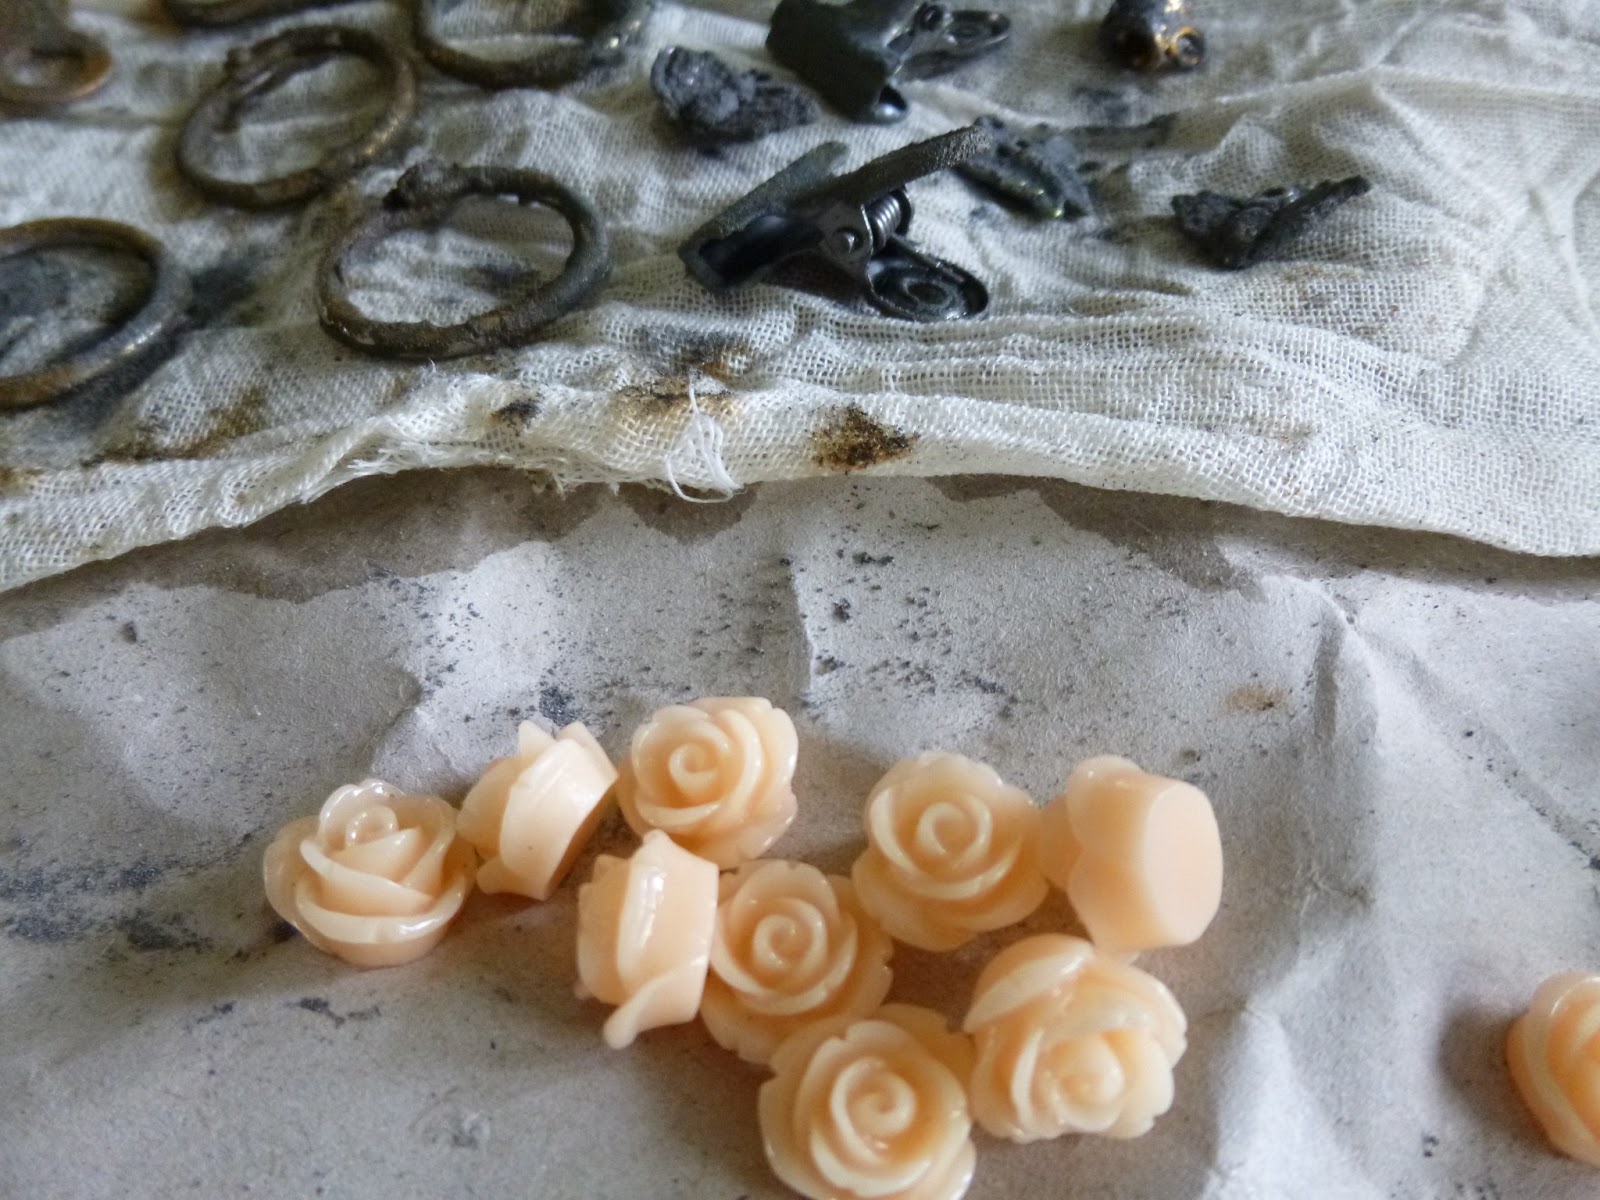
I didn't remember to do very comprehensive "before" pictures on the first batch, but I did get one of the peachy plastic roses which, I think, are one of the biggest successes.

And I love the rusted material - you've seen that too already, on Rough Around The Edges, and as the tag topping for the Words, Words, Words tag.
Watch this space for it playing a major role on a project coming later this week...

But I've got before, during and after for the second go...
Here it all is, awaiting the powder.
Annoyingly, I forgot to soak the muslin before starting this time, so the material itself didn't work quite as well this time around.

Then, after applying glue stick or multi-medium to the surfaces, I sprinkled the grey powder over everything, or dipped the things into a small bowl of it.
Bit mucky, but isn't everything that's fun?

I put cheap white vinegar into a little spray bottle and used that to spritz everything.
Interesting smell... probably a good idea to do this somewhere well-ventilated!

I love how quickly it starts working... though I actually left it to dry overnight.

And I'm really happy with most of the results.
I probably didn't get quite enough glue onto the the washers, so some of them are only partially rusted, but I quite like that too.

And the Idea-ology flowers and bookplates look completely yummy...
And those peachy plastic roses - how cool are they now?!
As you can see, I've rusted quite a lot of stuff, so you can expect to see it popping up every now and then!
Thanks so much for stopping by this week, and all your lovely comments - as always, every single one is so much appreciated. Happy Crafting!

Sunday clears away the rust of the whole week.
Joseph Addison
A sword, a spade and a thought should never be allowed to rust.
James Stephens
Oh, and for anyone who missed my Pink and Girly blip a couple of weeks ago... you can catch up with it today over at Artistic Outpost!
...great posting Alison, i'm in love with rust, decay, aging and all things old so to see you process is a delight and those yucky peach flowers were transformed into little beauties...Mel:)xx
ReplyDeleteI have some of this stuff and have just done something for a piece coming soon, but boy you did lots and what you have done to those peach flowers is amazing!!! Clever you . Must get rusting some more , I have lotsof those plastic roses that are not my taste! Hugs Trace x
ReplyDeleteNooooooooooo I thought I would be your first comment which would be the first for me lol. Wow what a fantastic idea to do it all in one go, and those roses. Hope you don't mind but I'm going to pinch your idea and a nice day this week do the whole batch thing, can't believe I never thought of it lol. I may have to get some roses out as well if you don't mind me pinching that idea as well lol. Thanks for the tutorial, do you only spray once? I thought you had to keep spraying it with vinegar, so when dry spray again, then when dry again, that's what the sort of put me off, it took ages the first time I used it. Think I'm off to your link and find the tutorial. Happy Crafting :-) hugs kezzy xxx
ReplyDeleteGreat lesson here, the end results are amazing. Thanks Alison.
ReplyDeleteFabulous rusting Alison love the flowers particularly. Chris ordered me the powder while I was away and I am going to collect it Thursday so I can see me doing this next week. I have some bits sitting in vi gear at the moment which reminds me I need to check them out. Thanks for showing the process.
ReplyDeleteHugs Brenda xxx
What a great adventure that was Alison, and just love the end results...fantastic..I would not know how to use any of these bits and bobs.. but.. love what YOU can do with them, and really looking forward to each and every project.
ReplyDeleteLuv CHRISSYxx
Woooow fantastic.
ReplyDeleteFabulous rusting Alison. I did this technique over a year ago and really thought everyone new about it. Have a Good Day. Hugs Rita xxx
ReplyDeleteFantastic--a 'must have' I reckon. I love what it does to the muslin-worth it just for that lol.
ReplyDeleteThanks for all the info
Have a great day
Love Chrissie x
Hi Alison, thank you SO much, I lost my instructions too, so your 'how to' and Kim's link are greatly appreciated! Your rusting looks fabulous, especially those little flowers - who would have thought... Wonderful work, as ever. Hugs, Anne x
ReplyDeleteThank you Alison for this great how to. I had been wondering whether it was the rusting powder. The lovely Annie told me about it and explained how to do it. Love you mass production here, excellent idea to set time aside to this kind of stuff when mojo is low! I have the wax to rub on the stuff to be rusted but I have to say I am really impressed to see it works just as well with glue stick or medium..... Can't wait to see what else will come our way from you and those yukky roses look totally brilliant rusted up like that!!
ReplyDeleteThanks for sharing your rusting experiments, Jenny. Those naff plastic roses now look terrific.
ReplyDeleteAh, thanks for sharing the process. I *have* to find time to make it, at least once!! grrrrr :-)
ReplyDeleteYou're always so inspiring, Alison!
I have some of the rusting powder and used it once - you've inspired me to find it and have another go, I love the idea of doing it on the muslin.
ReplyDeletexxx Hazel.
LOL! Rusty banana! Yum! Looking fantastic Alison, just love your rusting! Thanks for the link back too :) xx
ReplyDeleteI so love seeing your photos of work in progress Alison. It is comforting to know that I am not alone when it comes to feeling the need to get messy to satisfy the soul.
ReplyDeleteAnd of course it's a lovely piece you have created.
B x
Oh my, what a treasure trove of wonderful info and projects Alison. I love all of the transformations but I have to say your peach roses did turn out well. You've inspired me to give this style a go so thanks for passing the mojo on. :) Hope all is well with you, hugs.
ReplyDeleteI've done bits and pieces with mine and I love it too, particularly the effect on fabric, it really is amazing stuff and doing latches as you have is such a good idea so there are lots of bits and pieces at hand. Really super post Alison, always love your creativity. Chris x
ReplyDeleteThanks for sharing your rusting experiments Allison.
ReplyDeleteThey are fabulous.
The project you made with it is great.
Greetings Janny
Honestly.....are you watching me? Believe it or not, i had a play with rusting powder yesterday! (:o)Yummy stuff. Can't wait to use it on a larger piece of fabric.
ReplyDeleteI am so happy to see you embracing tea and coffee baths as they are my absolute favourites, then again you know that already as I always seem to be using something that I've stained in such a bath and of course the amazing Rusting Powder. The downside is most definitely the smell, it seems to linger for far too long lol.
ReplyDeleteIt is such fun and so inexpensive and quite addictive, have you found that to be the case?!!
Wishes
Lynne
Great results Alison,,,didn't know this product...so thanks for the pictures and your explanation!
ReplyDeletekind regards Alie :-)
Wow! This all looks such fun! I love how you transformed those roses! Oh, I adore rust. I can't wait to grab some more time and have a go at some altering of bits and pieces! Thank you for sharing. Julie Ann xx
ReplyDeleteRust = Beauty!! Who would of thought! I definitely will have to give this a try. Thanks for the tutorial and great pictures. What do you usually soak the muslin in? I love the after look!!!
ReplyDeleteHugs, Cathy-Lynn
UHHH, that is looking wonderful, Alison, -such a fantastic result, with everything you used that magic powder on !! great it works on both plastic and metal pieces... fabric and ???
ReplyDeleteI will try lo look after theís in danish shops...
Thank you for show and tell- you did some gorgeous rusting and dying !!
Dorthe,-xo
Absolutely terrific Alison! Thanks for sharing. Nicola x
ReplyDeleteWay to go Alison! I have often looked at the rusting agent but not sure if it works but now I know it does I want some. It looks great fun to do. Give me a shout next time you are doing some and I will bring the wine!
ReplyDeleteHugs
xx
Fabulous rusting Alison ....and it's certainly addictive, except for the strong smell of vinegar.
ReplyDeleteLove the fabric....still to try that
Only 9 sleeps to go!
Annie x
you are so smart! you knew I'd been eyeing those most cool rusty pieces, wondering to myself, how did she do that? now i don't have to wonder, i just have to find some of the powder!! those roses are perfect! not a huge fan of plastic anything, but if you can make it old and grungy, i'll be on the look out. thanks so much Alison!
ReplyDeleteoh and one other thing...the material is awesome. just muslin?
ReplyDeleteokay, last one for today...i promise! i've sent an email to the rusty powder folks...is there anything else uber cool I should get from them (just in case they do ship to the US?) thanks!
ReplyDeleteCool post! I love the results! I need some of this stuff!!!
ReplyDeletehow weird is that Alison - I was playing with my Crafty Notions rusting powder at the weekend too - amazing stuff isn't it? have you tried putting it through a stencil?
ReplyDeleteWhat a wonderful post Alison, THANK YOU !!! I love your - great ! - tutorial today on how to do such stunning embellishments hand-made you put on some of your fabulous projects. Many thanks again, have a lovely day :) Coco xx
ReplyDeleteWhat amazing results, Alison! Those roses are fab, I would rather be given those than a punch of red roses any day!
ReplyDeleteLucy x
Wow, Alison, I'm so glad I managed a little time for backtracking through posts I've missed. I have some of this powder but didn't have a clue what to do with it .......... now I do ;D!
ReplyDeleteHugs
Lesley Xx
Very inspiring :)
ReplyDeleteW-O-W! Looks like fun and what a result! Now, what will you do with them - I'll try to be patient!! Chrisx
ReplyDeleteI wonder if that's what you used? :) Love the effects...the flowers turned out amazing! Oh drat, only avail in the UK. drat drat....
ReplyDeleteYou enabler you! ;) MY gosh that was so much fun to read. Thank you.
ReplyDeletehugs!!
Hi Alison, just catching up - and a brilliant read on the rusting technique. Thanks.
ReplyDeleteAvril xx
Wow, great tutorial Alison :) Very inspiring!
ReplyDeleteThis is a wonderful post. I have been looking for an effective way to rust embellishments but haven't been happy with anything I've tried so far. Your end products look fabulous. I can't believe what it has done for the roses especially. The rusted fabric is a definite bonus as it lends itself to so many wonderful uses. Thanks, Alison!
ReplyDeleteOoooh lah lah!!! Love all this rusty grungy goodness.
ReplyDelete